Strats!
Sporefall
March on Quel’Danas

Closest flight path: Sanctum of Light/Terrace of the Sun
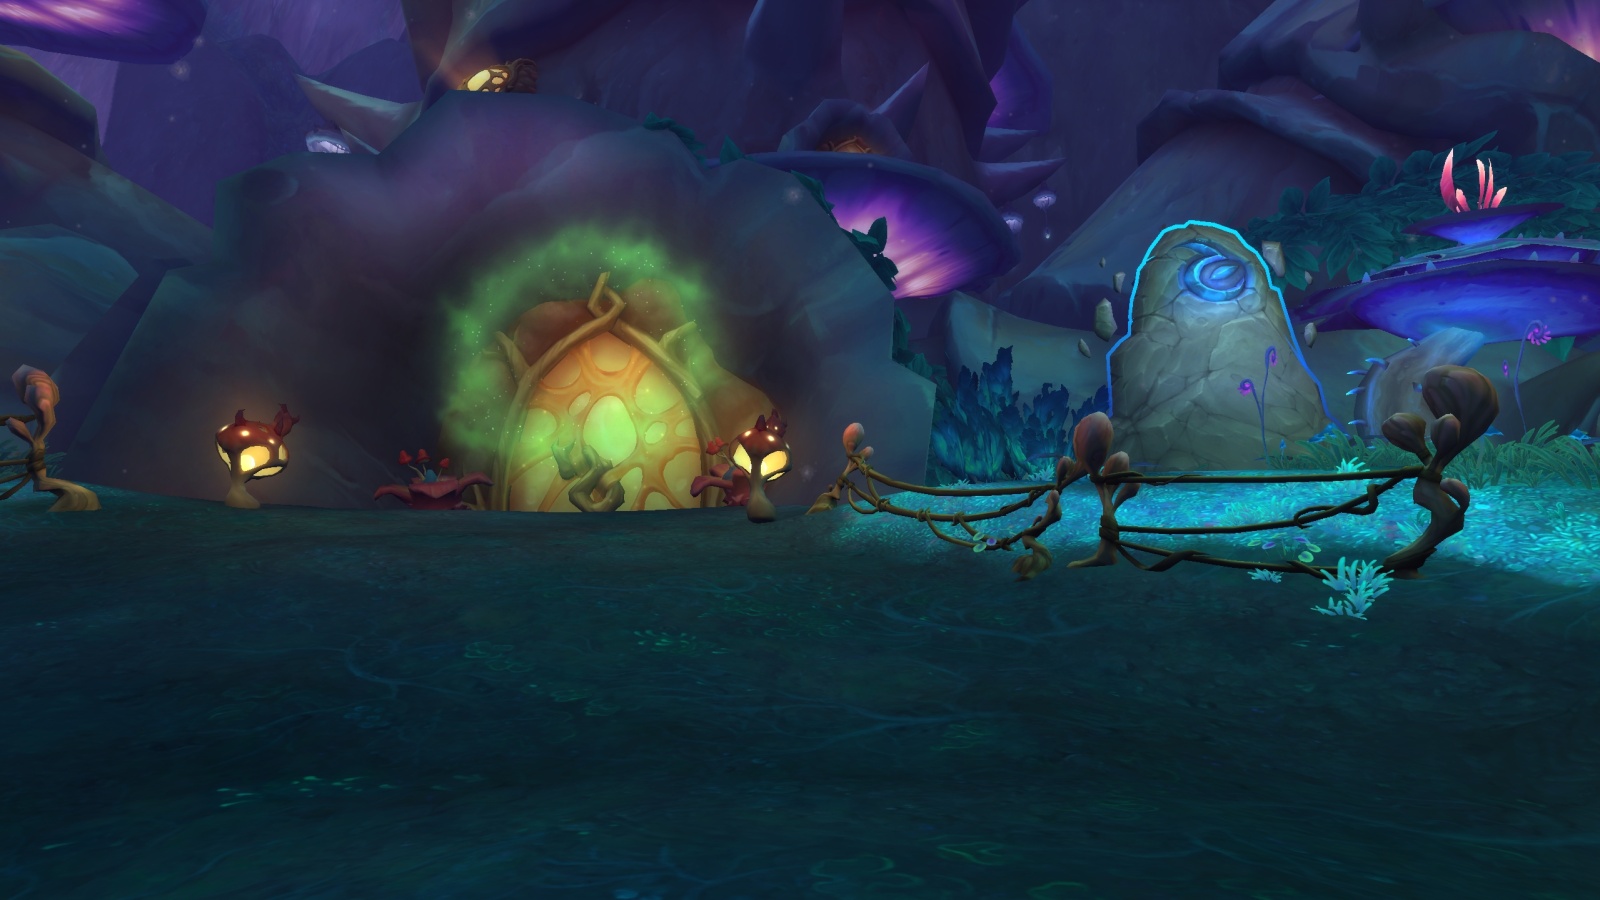
Dreamrift
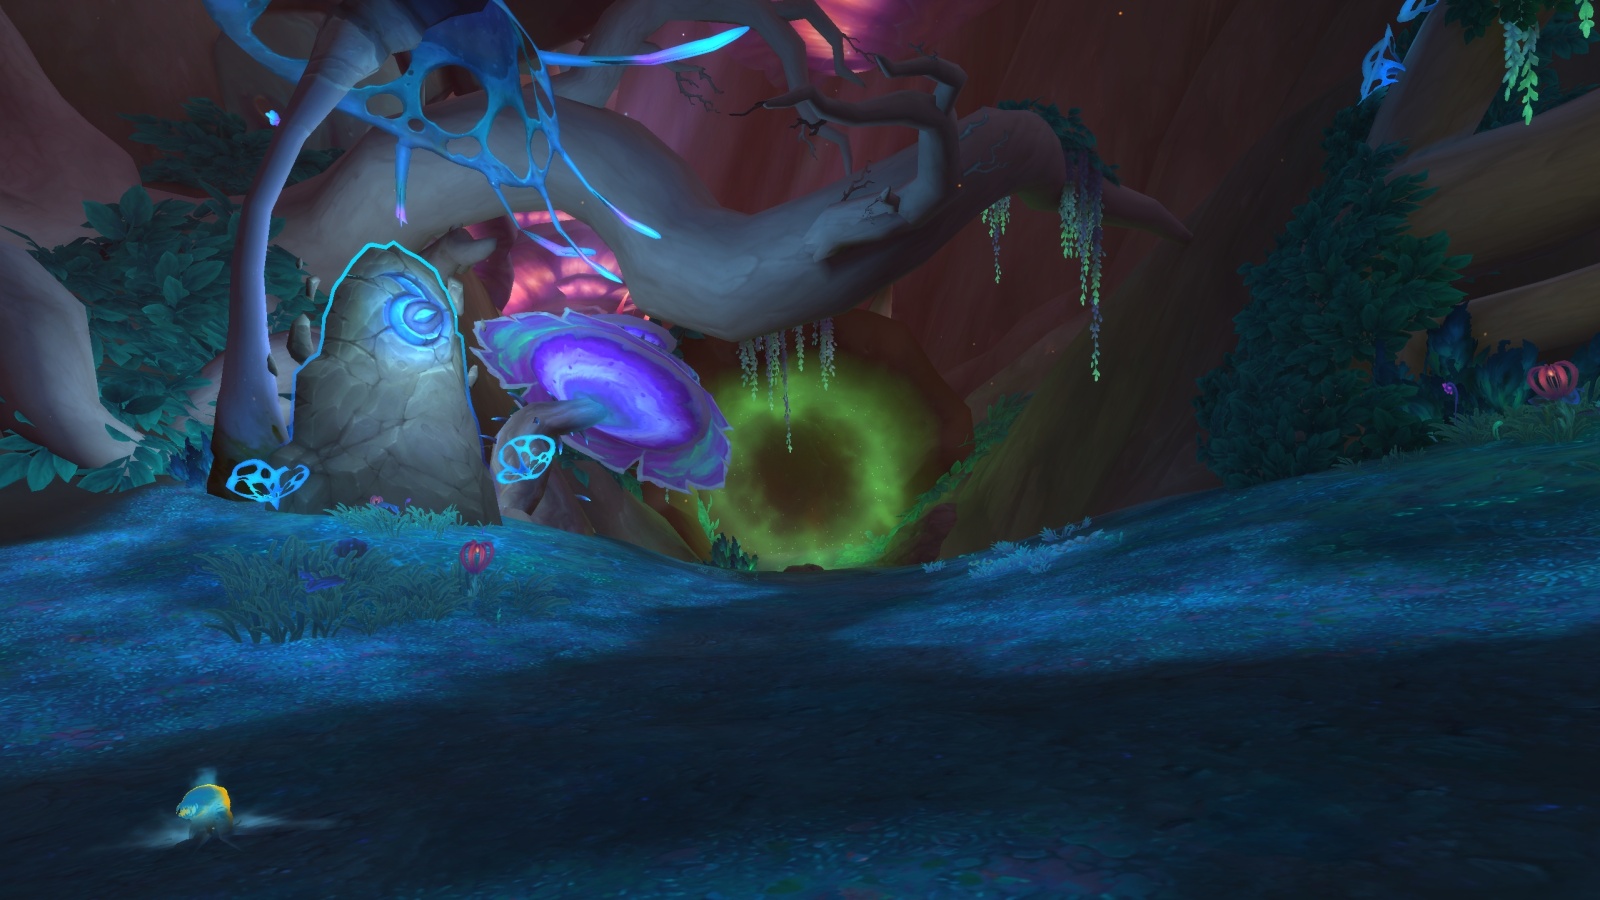
Closest flight path: The Den
Voidspire

Closest flight path: Howling Ridge
Manaforge Omega
Closest flight path: Shadow Point?
Liberation of Undermine
_Wallpaper_1920x1080.png?otf=y&lightbox=y&sky=b22219e9ffa5d02cbd02cb5ab26e80d4f202bca7d726c6f626f569439c23585f&w=1024&maxheight=4096&mode=pad&format=png)
Closest flight path: Teleport pad, Dornagal-Undermine
Nerub-ar Palace

Closest flight path: City of Threads
Amirdrassil, the Dream’s Hope
Closest flight path: Wellspring Overlook
Aberrus
Closest flight path: Obsidian Rest
Vault of the Incarnates
Rotmire
Yarr!
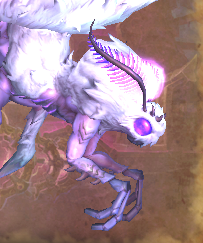
Belo’ren, Child of Al’ar
Belo’ren, Child of Al’ar
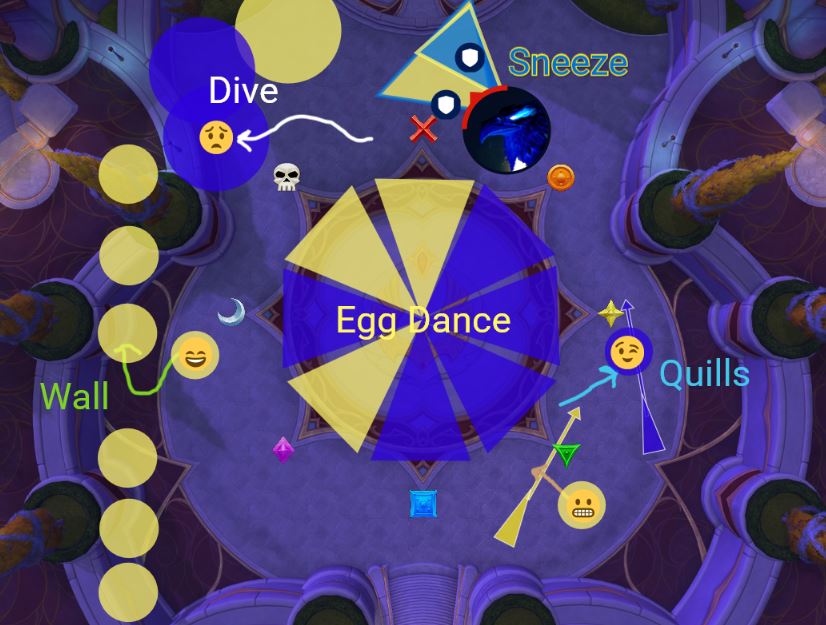
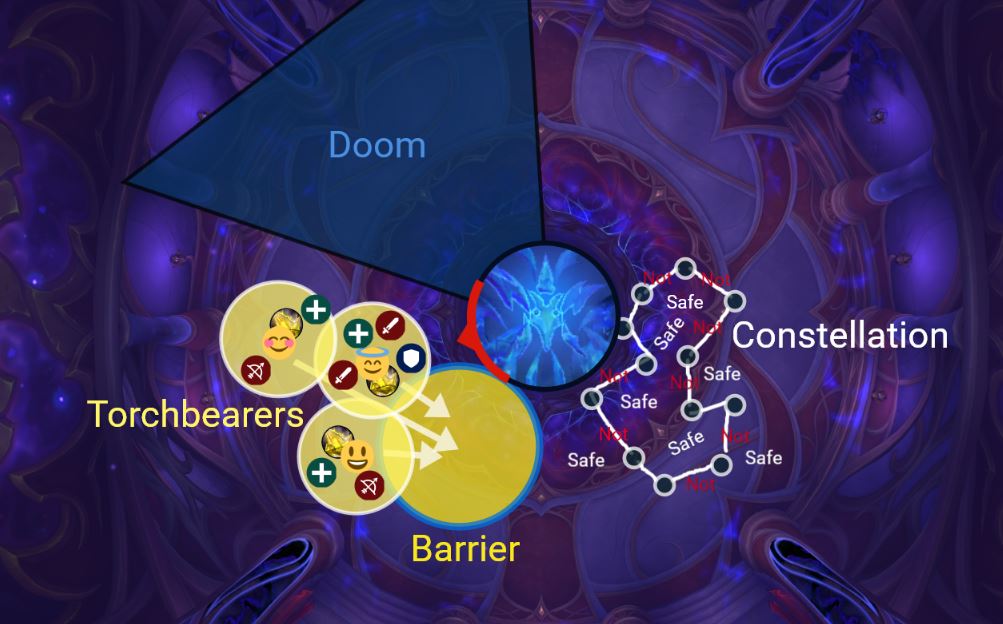
The battle between Light and Void made manifest in feathers. For this one you have to engage with mechanics based on color, so if you have a blue feather you want to avoid all yellow mechanics… but, thank Elune, for the first time your teammates do not count. You may dance like Pepe on the head of the opposite color player, scot free. Oh lovely blurple phoenix, yes plz.
- Tanks: Dance, 5 hits per stack
- Healers: Heal Burn victims
- Dps: Emergency murder Embers and Mini Eggs
- Dodge: Everything you don’t match
- Interrupt: Eruption
- Soak: Dive, Echoes, Quills
- Hero: ~30%, during an Egg phase
Expanded Strat
Phase 1: [Title]
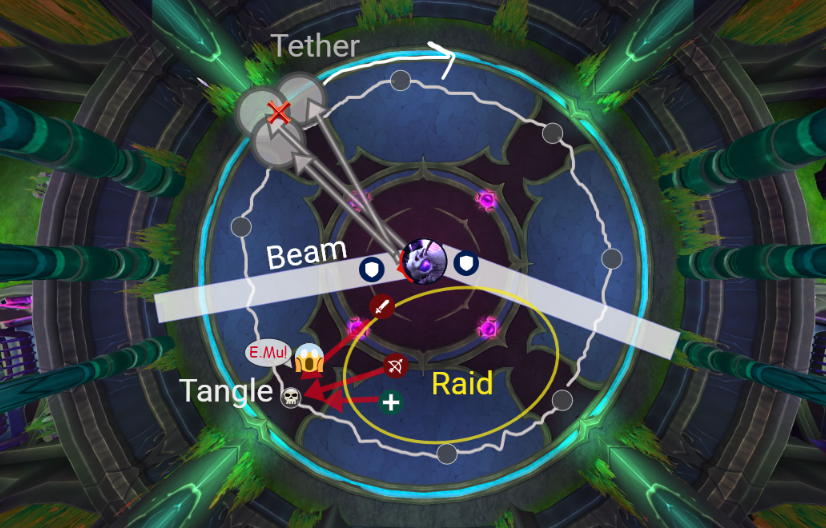
The boss will begin by Diving at a player, who wants to run to the edge if the room along with everyone else of that color, to soak nd then drop a corresponding puddle, which will stay on the ground. You get an Ember, which when killed becomes an Egg. When it’s alive, Interrupt it if you match its color. When it’s an egg, don’t let that thing hatch.
Tanks, who do NOT soak, may bring the boss over to cleave with if they wish. The tanks will mostly be busy with the boss, who will be sneezing in color. Tanks each need to soak the ones they match, being careful not to miss any. There are shenanigans with stacks and colors and removing a stack with 5 separate sneeze?
If you see a Quills beam heading towards a person, and your color matches them, step into the beam to intercept and protect your fragile co-worker. Orbs will slide across the room in a line, someone who matches should soak one so that everyone can move through that gap.
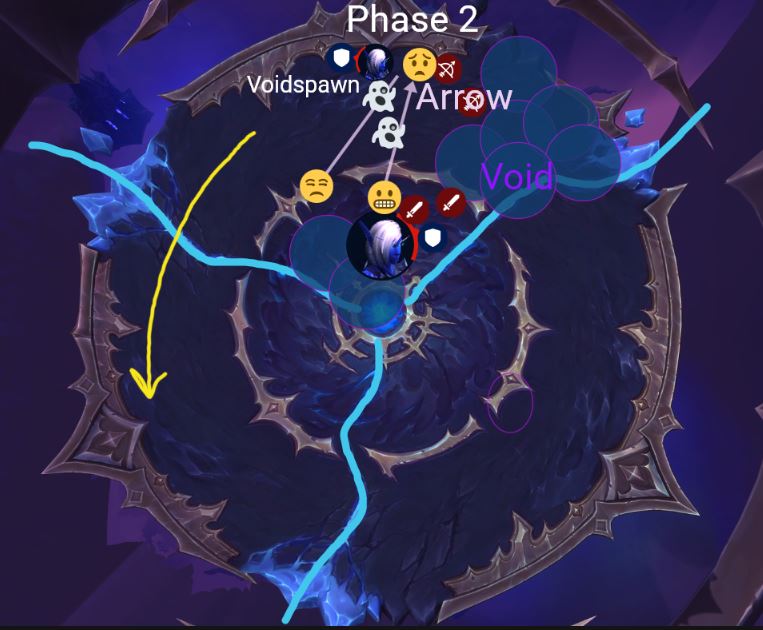
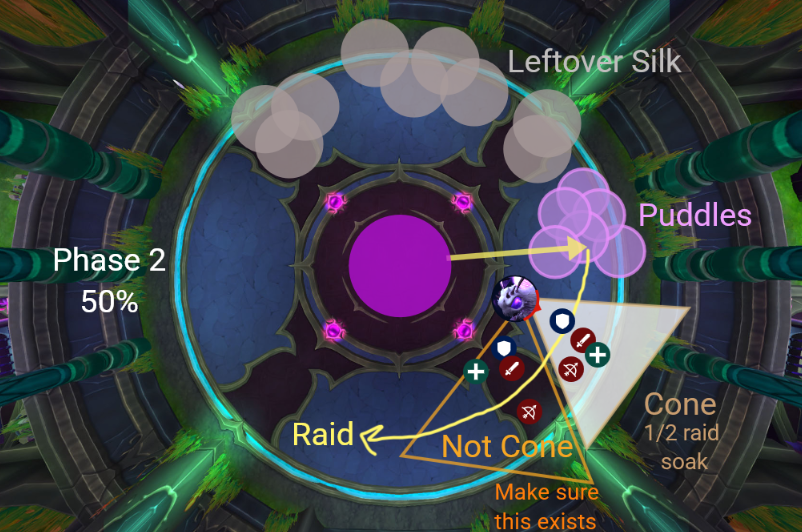
Phase 2: Phoenix reaches 0%
Here, the boss will fall to the ground in a Death Drop that knocks folks in the air, grouping and using a Gate or Roar to get back to the center can help. For this phase we need to do as much damage as possible to the Egg while dodging pizza slices, making sure we only stand in our own color and being careful to keep creating gaps when Echoes drift by. It is worth mentioning that this 30 second burst phase is the only actual Boss damage we get in the fight.
L’ura, Midnight Falls
L’ura, Midnight Falls

[Some brief text]
- Tanks: Heaven’s Lance
- Healers: Crystals, Intermission
- Dps: Sigils, Crystals, Beams
- Interrupt: Safeguards
- Dodge: Beams, Cores, Stars, Lasers
- Hero: On pull
Expanded Strat
Phase 1:
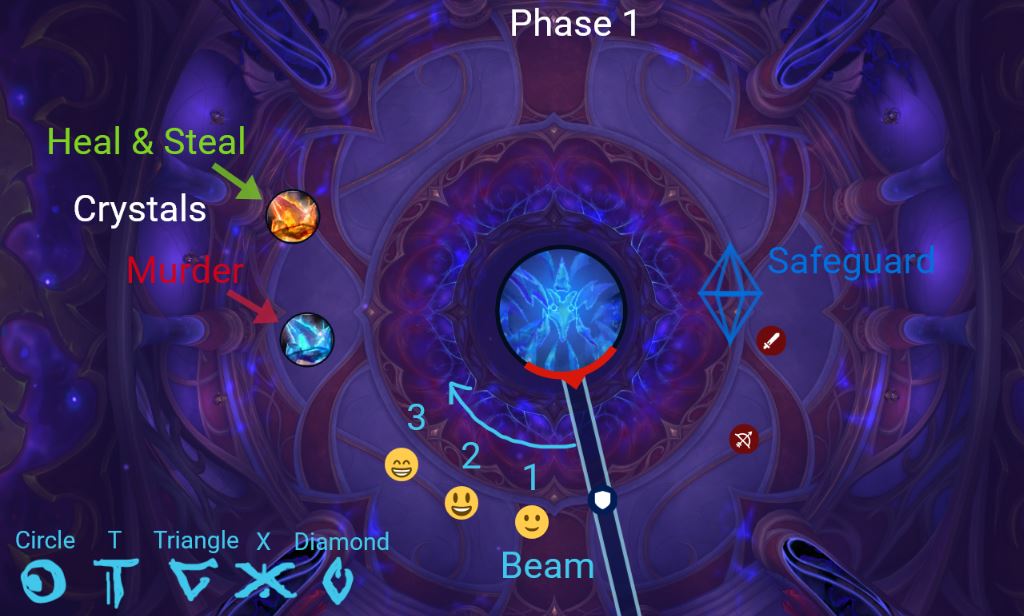
So it looks like we have a matchy memory game here, L’ura makes three to five little sigils in a particular order, and we need to remember it so that we can disarm a later mechanic, a laser that moves clockwise from its starting position. People who get the symbols will need to make a line, in the correct order from Right to left, so that the tank can position a laser just to the right of the first target. If the laser zaps the sigil’d players in the right order, we don’t take all kinds of damage. X, Circle, Triangle, T or Diamond.
Tanks will be waiting for the boss to build up 5 stacks of Heaven’s Lance, and then Impale them with it, swap once that happens.
Some Safeguard adds come out, each reduces the boss’ damage taken by 1/3. Instead of damaging them healthwise, you just need to remove all their stacked bubbles with purges and interrupts til they poof.
Two kinds of crystals appear, kill the bad ones and heal the good ones. Once the good ones are healthy, you can pick them up and keep them for the last phase. On heroic, if the healed ones take damage they make puddles to soak.
Intermission: (Boss runs out of mana)
Manage heal absorbs and dodge people who have stars on them.
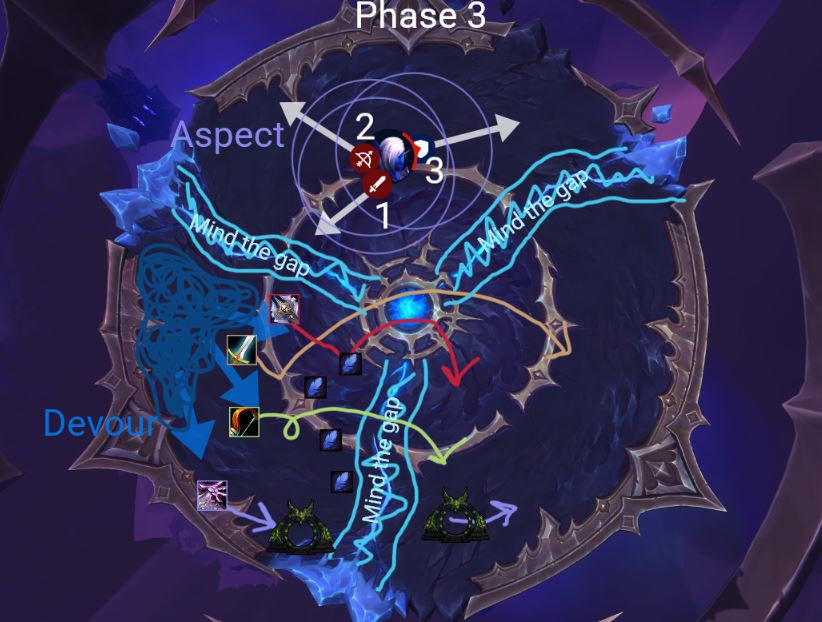
Phase 2:
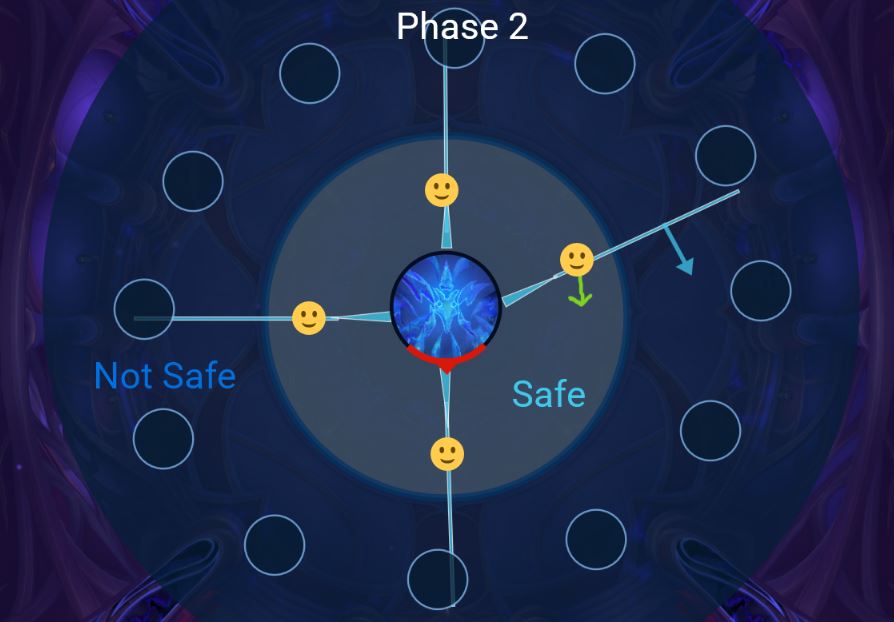
We all fall in a well. Around the edge of the room are orbiting floaty orbs. 4 people will get marked with beam lines that need to split up and zap four separate orbs with them, in completely opposite directions. On heroic, people will need to stand in these beams as well to help soak and minimize damage. After the orb is hit, it will become a gravity well and try to pull you in, don’t fall for it. Dodge anything that the boss tries to eat, and make sure as many Orbs as possible are broken by the end of the phase, or they throw a temper tantrum.
Chimaerus
Chimaerus
[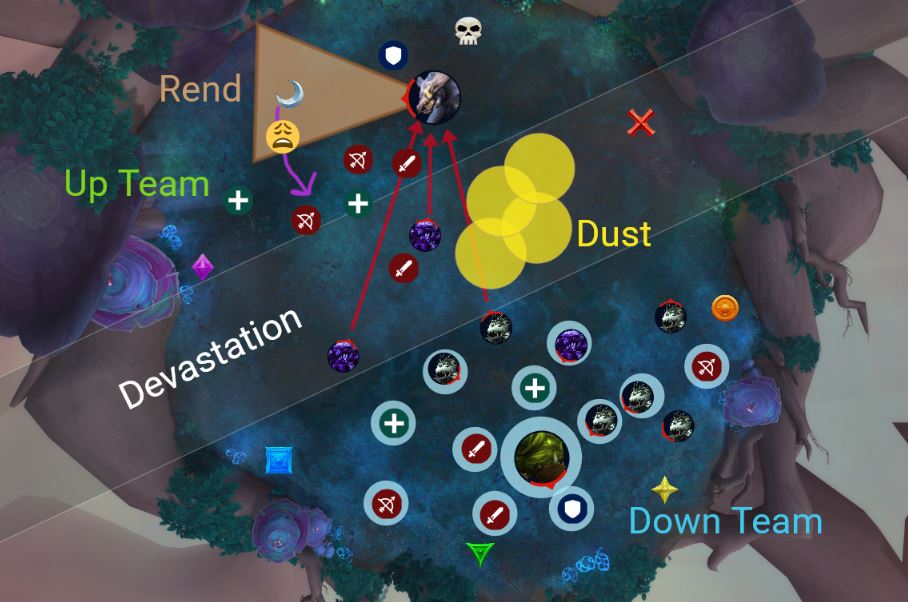
This is the only boss in here. This boss is a raid split, one for upstairs on for down, where we trade off and manage adds while dodging all the things. Pretty much no one will like this fight because we spend all our time on adds.
- Tanks: Upheaval
- Healers: Caustic Phlegm
- Dps: Haunts, Shades. Colossal.
- Interrupt: Fearsome Cry
- Hero: On pull
Expanded Strat
Phase 1: [Title]
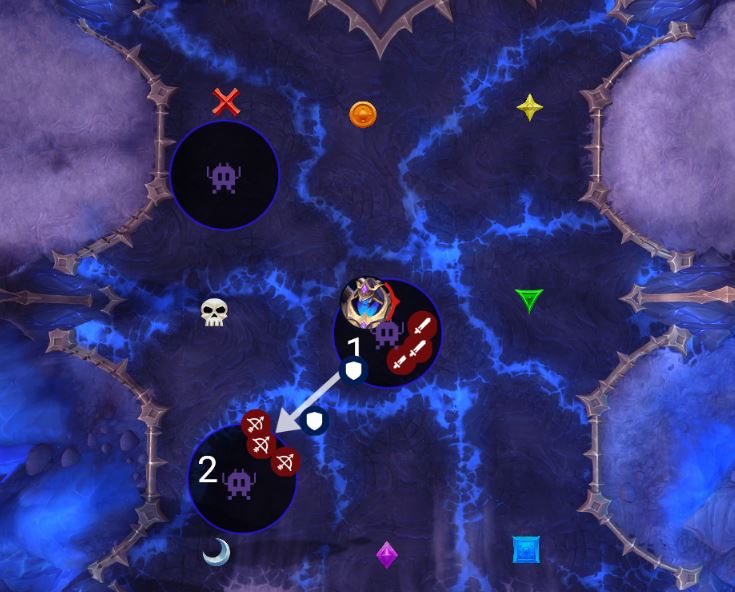
The first thing we need to worry about is the tank Soak, Alndust Upheaval, which you can already guess needs to be soaked in alternating teams due to a vulnerability. Down Group will stack up with the tank to get shifted into the add realm, where our job is to break the shields off the adds so that they pop upstairs for Up group to kill. Ideally you want to gather them up far from where the Up tank is positioning the boss so that they will have the longest possible walk when they emerge. Shades are just baby trash. Haunts, which may not even spawn in the first phase, have a Fearsome Cry that needs to be interrupted, and Colossals need to be tanked, and faced away from the raid.
Best plan is to not kill them until they are grouped up, and time the death of the Colossal to match the expiration of the Aln buff (40 seconds) so that both groups can help on him.
Once they get upstairs, the Up group needs to kill them before they can get to the boss, and the Up tank may need to kite a bit to help with that, because if they succeed, they give a pretty hefty buff.
Upstairs, the boss will send a big earthy cone, Rending Tear, towards a random player, even tanks should avoid that since it has a bleed. After two rounds, the boss casts Consume, a knockback where he eats any adds you didn’t kill fast enough, regardless of what realm they were in. Be faster than him.
Heroic concerns: the floor puddles created by adds do not get erased by the boss, and you need to use Miasma, a circle debuff that can be positioned and then dispelled to clear them manually.
Phase 2: Intermission, 100 energy
Corrupted Devastation is his big attack here, flying across the arena in a Deep Breath style run. Dodge that. In its wake, adds spawn, gather them up and fry them. Meanwhile we’re all taking damage from a raidwide DoT, Caustic Phlegm. Manage floor space as best you can, call out safe areas, and wait for him to mark his Dive location. No one should be there when he lands, and all adds should be dead by this point. Then he goes back to Phase 1.
Imperator Averzian
[Imperator Averzian]
This boss is described as tic-tac-toe, and for good reason. Throughout the fight, he creates VoidieOs in certain sections of his 3×3 grid, and if he gets three in a row… well. You know. Our job is to kill him before he wins the game, and strategically take out adds to buy ourselves time.
- Tanks: Blackening Wounds, Void Claimed
- Healers: Dark Upheaval
- Dps: Stalwarts > other adds
- Interrupt: Pitch Bulwark
- Soak: Umbral Collapse
- Hero: On pull
Expanded Strat
Phase 1:
The basic point of this phase is to keep the boss from winning the game with three in a row. Averzian will Cast Shadows Advance, knocking back anyone nearby and summoning three Abyssal Voidshapers to the board. We will use Umbral Collapse to remove two of these by stacking with the tank on our chosen add location to share the AoE meteor damage and destroy the add. Immediately thereafter, we will move to our second add and repeat the soak.The third add we can’t stop, and he claims that space permanently.
Choose your spaces, stack for soaks, gather up and burn adds, interrupt shielders, and dodge fire.
Heroic things to know: Odds/evens split for soaking to account for the debuff, boss cannot touch adds or claimed spaces or he enrages, some adds try to heal at low health, zones may need a secondary soaker at range, and some adds try to protect others..
Vorasius
Vorasius
We’ve seen a lot of these mechanics before, but some may surprise you. For this boss we’re trying to manage tank damage while reclaiming the playing field from walls and earthquakes.
- Tanks: Shadowclaw Slam, Smashed
- Healers: Primordial Roar, Blisterburst,
- Dps: Kite Blistercreep
- Hero: On pull
Expanded Strat
Phase 1:
For most of the fight we’ll be in front of the boss, be careful not to get pulled off the edge. The first critical mechanic uis the large tank soak, we’re gonna let them do it alone this time. After the soak, circles of earthquake move outward from that impact point for everyone to dodge. It then spawns a wall of crystal spikes that hem us in, we must be inside these walls or there’s no getting us back. Eventually a few Blistercreeps will spawn, which fixate on random players. Kite your add to the wall, because when they die, they have an explosion that will buff and punt players, but also break our wall for us. Make sure we do bring some to each side so we don’t stay trapped.
This needs to happen before Voidbeam, a Belial mechanic that our Diablo players are all too familiar with. He will pick one side of the room and start channeling a beam that sweeps the entirely of the chamber, leaving only a teeny safe spot at the far opposite end. You can tell which it will be by watching his glowy hand… whichever side of the boss is glowy, Be Somewhere Else.
After the cast, we may be in need of some healing cooldowns, so be ready. And then we repeat! Tanks, watch your stacks of debuff, they are applied unevenly and you don’t want to swap too early or take stacks that weren’t meant for you.
Heroic things to know: In normal you only need to successfully kill one add at each wall, bu in heroic it will take two, so we have less room for error.
Fallen-King Salhadaar
Leftover Saladbaar
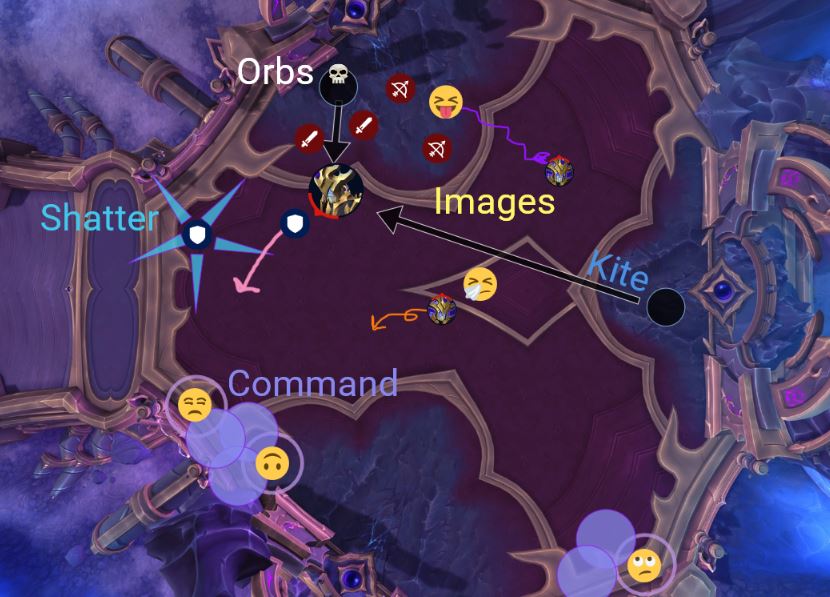
Don’t worry, it’s nothing like the other one. Movement heavy add fight where tanks are continually kiting the boss away from problems.
- Tanks: Instability, Shattering Twilight
- Healers: Shattering Twilight, Twisting Obscurity
- Dps: Emergency Murder orbs, cooldowns in Intermission
- Disturb: Images
- Hero: on pull or at intermission for debuff
Expanded Strat
Phase 1:
Throughout the fight, orbs will spawn and try to reach the boss. DPS needs to kill these before they can get there while the tanks try to kite him, but be aware he will sometimes stop to cast. Tank him near a gate, and when the orb spawns, emergency murder that one while moving him away from the second. Tanks have two mechanics, the tank debuff Instability which stacks, and also the tank spikes, Shattering Twilight, which first hits the tank for heavy damage and then causes spikes to shoot out from that location.
Despotic Command gives you a purple circle, you want to run it to the edge before being dispelled because it will make a puddle. Bear in mind that the dispelled target receives a heal debuff. Fractured Images adds will stand around and channel, interrupt or punt em to remove because if you don’t,they make more puddles and clutter the floor. Twisting Obscurity is a raidwide DoT
On heroic: killing an orb makes an 8 second debuff, so either let it fall or use cooldown before you kill the second. Tank spikes will bounce, watch for secondary targets.
Phase 2: Intermission, 100 Energy
The boss starts channeling Cosmic Unraveling, rotating beams like his platform adds used to. he does take increased damage during this phase. Dps as much as possible, staying out of the beams at they move around him. When the channel finishes, he drops a void puddle below him, so you’ll want to position this phase to account for the rotation, but also to avoid leaving a problematic puddle.
Hero can be at the top for maximum uptime, or at the intermission for vulnerability.
Vaelgor and Ezzorak
Vaelgor and Ezzorak
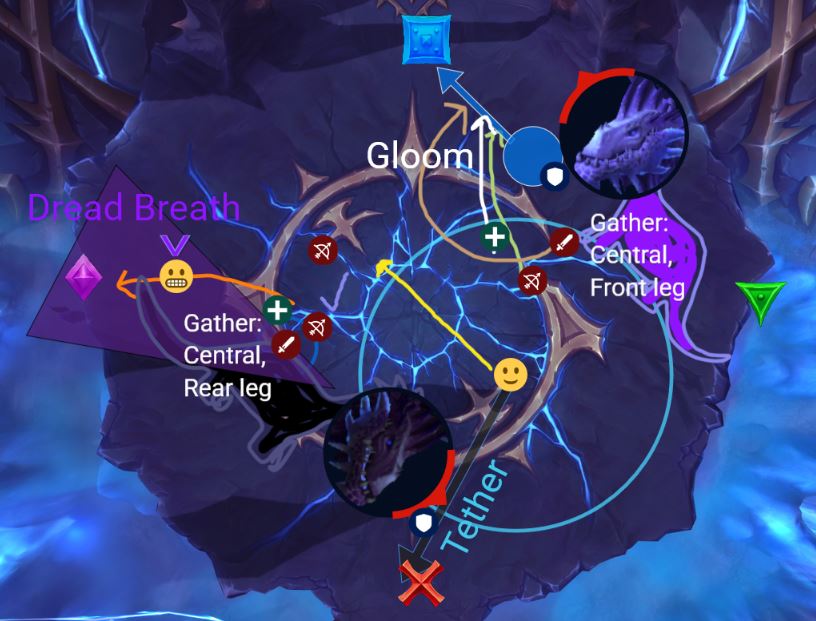
These two dragons are best buddies!
- Tanks: Keep bosses 15y apart
- Healers: Watch out for tethers, dispels, intermission, and random DoTs.
- Dps: Stay central as much as possible
- Dispel: Fear
- Soak: Gloom (blue)
- Hero: On pull
Expanded Strat
Phase 1:
These two dragons need to stay with 15% health of each other (10% on heroic) and die at the same time, but you can’t let them get within 15 yards of each other either. Moving the grounded dragon will cause the flying one to move in some squirrelly fashion. Dragons have tail swipe.
Breath cone targets a random player or the tank, causes a dispellable fear. Howl is splash damage that creates an add, stay nearby for cleave damage. Beam targets the tank, creates a gravity well. Gravity tethers you, breaking it causes AoE damage but you do need to break them. its tank should go last,and pause for raid health to recover. Red-purple orb of Gloom starts at tank, everyone needs to soak by standing in its path til it’s disarmed, tank and 3, (blue white), in heroic you need to take turns, tank and 4.
Phase 2: Intermission, 100 energy
The Light Twerps come and make a barrier, we need to stand in it. Shadowmark spread out so you don’t hit anyone. Emergency murder the add, stack and sprah. Bosses swap and repeat.
Lightblinded Vanguard
Lightblinded Vanguard
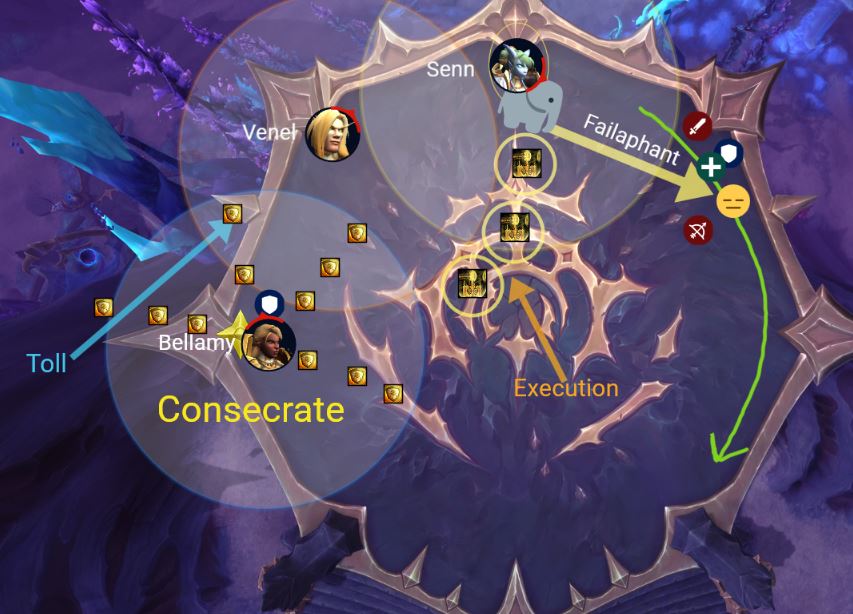
We always knew paladins were crazy, but these ones have really lost it. And wouldn’t you know it, the darn things bubble on pull! But considering we one-shot them with no strat, I don’t think I’m really that worried.
- Tanks: Judgement
- Healers: Heal absorbs, radiating damage
- Dps: Bait Charges
- Interrupt: Blinding Light
- Soak: Execution Sentence
- Hero: On pull*
Expanded Strat
Phase 1:
A fairly normal Council fight, we need to kill them all together as you’d expect, or they get surly. We do use Hero on the pull, but you may wish to delay your major cooldowns just a bit, because we won’t be able to cleave all three together until after the 8-second Bubble the first two cast when we engage. After that, go all out, and try to split the damage up when one of them pulls ahead.
Each of them has a mana bar, and when it fills, that paladin will cast their special ability. Tanks need to position them near the edge so that we can position outside of their range in preparation for Heroic
General Amias Bellamy: Arguably the leader of this sorry band, Bellamy will be the first paladin to cast her Empowered ability. She has an Aura that grants damage reduction to her allies, so you want to make sure they get pulled out of that. She then casts Toll, which sends out waves of shields that you need to dodge or they silence you. and throws her Shield, which will bounce between players if you are too sloe, so when you get the yellow circle, spread out a bit til it finishes.
Commander Venel Lightblood: Our first target because he isn’t a cowardly bubble hearther, he is the second to Empower. His Aura increases the holy damage dealt by his friends, so don’t sit in there and chat. His next trick is Execution Sentence, three players in circles that need some buddies to soak with them so they don’t get a hammer on their toes. After the soak, each circle procs spinning hammers that will do danage and possibly silence you if hit, so spread your circles just a bit to allow room to dodge. His Toll ability just throws heavy raidwide damage and may require cooldowns.
War Chaplain Senn: Senn’s Aura will protect her allies when they are nearby, and if you hit any of them, you become pacifed for three seconds. Make sure we move out of her area before we hit anyone. When she isn’t channeling, she has a Failaphant and uses it to charge the furthest player. Stay together and bait this into position so we can immediately burn down her Shield to stop the raidwide Blind cast! She will also drop heal absorbs on the three players closest to her, so if your health becomes problematic and you have stacks of this, I recommend standing behind Molt so he takes your stacks instead. Don’t make the tanks soak these, they have enough to do.
Crown of the Cosmos
Crown of the Cosmos
Turns out Alleria and her husband are having the exact same problem keeping their inner fire in check. Poor Arator, parents are such a headache.
- Tank Swap: P1 – Add death, p2 Arrow, p3 Tether
- Healers: Corona, Aspect
- Dps: Arrows, Voidspawn
- Hero: Phase 3
Expanded Strat
Phase 1:
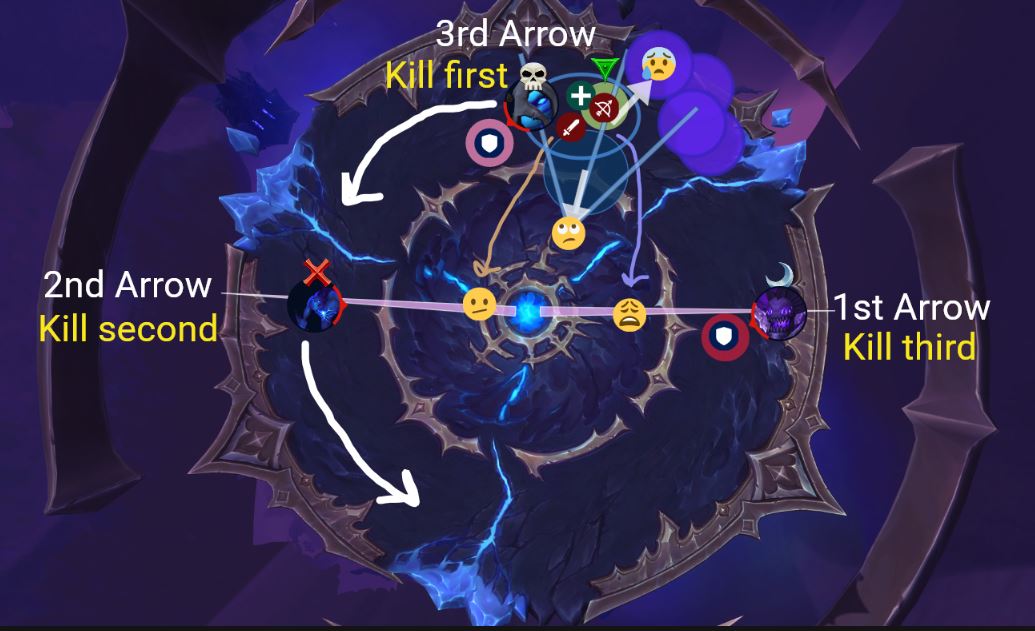
In the beginning it’s pretty simple, we have three Void Blueberries and we need to kill em. Tank them like we were in Araz, one tank on Morium, one tank on Demiar, and then when the first one dies that tank heads to the third, Vorelus. Little Void adds should be gathered up and tanks on the kill target to help debuff it. The Sentinels all start with a bubble, the Tether, which can only be broken by an Arrow. Whoever gets Silverstrike Arrow needs to aim the arrow at the Sentinel to get rid of that shield. The first two Arrows should go to the second and third Sentinels, which sounds strange, I know, but this allows the damage debuff to stack on the add without us accidentally clearing it. When the second set of arrows goes out, one should aim at Morium and the third should aim at nobody. No arrows should ever point at a Sentinel that is already unTethered.
Healers will be babysitting people with the Null Corona heal absorb and dispelling it off to its next victim when necessary, and everyone will be watching for a Grasp of Emptiness circle to appear beneath them. If you get that, you want to move out of the void puddle right away, and then STOP moving, because the lines you’re about to proc will change direction very time you take a step. This is best countered by the raid all staying together and stepping forward as a group, which forces the lines to make themselves obsolete. Make it easier to dodge by watching where you move and moving as little as possible.On Normal, this only targets one person
Lastly, watch for Void Expulsion, which leaves floor fire beneath you and can really eat up the room if we aren’t careful with positioning.
Intermission: (upon death of the Sentinels)
Once we kill all three adds, we move to the first Intermission. Make sure you’ve run to the edge to get as far away from the center Gravity as possible, dodge all the circles, and some of the arrows. Some? Yeah, you’ll have a debuff stacking on you during this phase, and the arrow will clear it. Don’t try to catch em all, just the ones you need to keep safe.. if you’re getting pulled in too far, your debuff is too high. Every other arrow is fine, but never do two in a row.
Phase 2:
Phase two has the platform separated into three sections with the lines on the floor, crossing the line will leave a DoT. Alleria herself will need to be tanked in this phase, as will her Simulacrum, but the two must be kept 25 yards apart. Tanks will need to taunt off each other after 2 stacks, which is also after every Arrow, and position carefully to help control the area. All damage should be on the Simulacrum when possible, as killing it is the only way to end the phase, but because the two teleport between tanks, it’s fine if the Melee want to just hang out in the middle by the inside tank, and just stab whatever teleports to them.
The Simulacrum will get a shield, which deals pulsing raid damage as long as it’s up, so we have extra incentive to burn through that. She will also summon two Voidspawn adds
Lastly, we really need to manage the Void Expulsion puddles, to ensure we still have enough real estate to beat the phase
Intermission: (upon the death of the Simulacrum)
Very similar to the first Intermission, position near the edge, dodge pools and orbs, and only soak the Arrows you need. This time we get cute little void bubbles floating round the room trying to pretend like they aren’t a cutter beam or tornadoes. They are, though, so dodge them as you move and keep soaking every other arrow as necessary.
Phase 3:
Plexus Sentinel
Plexus Sentinel
Overview:
- Tanks:
Obliteration Autocannoncurrent target, splash dmg, leaves puddle, leaves debuff , run far away - Healers: Cooldowns during
PurgeContinuous ramping raid dmg, high movement - DPS: Burn shield during
PurgeRe-engage boss and break shield to end the phase
- Soak: stack on
Salvometeor, requires 5 players target , two teams in heroic - Run:
Manifest MatrixPurple circle, 6 seconds to edge, avoid exploding tanks and Displacement MatrixPuddle, stuns and teleports - Cloak:
Atomizerkills all non-energy beings , - Hero: On pull, or on
Purgerepeating burn phase if necessary
Preliminary Strat:
Phase 1:
Tank boss by the barrier, raid spread out as much as feasible to avoid extra chain zap damage. Tank swap for Autocannon and run far away to minimize raid damage and drop giant puddle. On the second cast, the tank will need to use other side of room. Salvo targets, stand still, need 4 more to soak
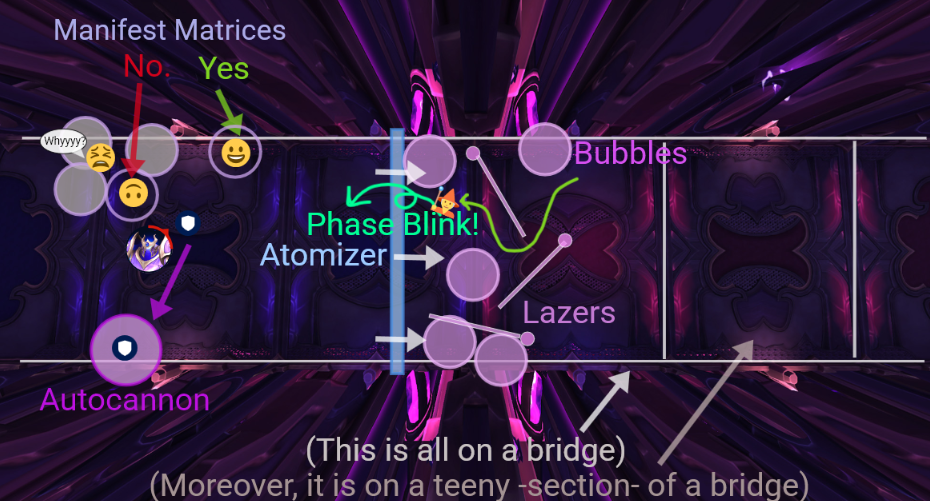
Phase 2: 100 Energy
At 100 energy the boss will move back, pushing all players away (speed boost would be really helpful here) and starting his Purge Protocol. Run against the pushback, avoiding bubbles and lasers, and use your Cloak ability Phase Blink to phase through the wall of death. Heavy raid damage during this phase, use cooldowns and engage boss quickly to break his Shield and resume Phase 1.
Loom’ithar
Loom’ithar
Mythic, Real quick:
Overview:
- Tanks: Aim and swap for
Piercing StrandBeam with debuff , Writhing WaveMeteor cone with debuff - Healers: Watch health after each
Writhing WaveHeavy soaking damage to half the raid - Dps: Emergency murder the selected
Infused TangleConnects two points of the ring
- Run: Get to edge with
Infusion Tetheryanks to boss, leaves puddle when broken , and for Overinfusion BurstCovers entire center of room - Soak: Half the raid at a time soaks
Writhing WaveMeteor cone on Tank - Avoid: Puddles:
Living SilkLeft behind after Tether , Primal SpellstormPurple splash puddles , Arcane IchorPurple blood in center - Hero: Phase 2, at 50%
Preliminary Strat
Loom’ithar is a giant moth, they keep her here to make silk for whatever it is they do. We don’t like them OR what they do, so we’re gonna… halt silk production. Or free the moth! Yaknow. Permanently. Whatever helps you sleep at night. Two phase fight, hero and burn when the second phase begins at 50%.
Phase 1
Phase 1: Stationary Phase
For this phase the boss is stationary in the center of the room. Players yanked by Infusion Tether need to run to the far edge of the room to break the strands, this leaves a puddle behind that you don’t want to be in. Run as a group and try to keep these consolidated to save space, always moving clockwise from the last Living Silk zones.
The boss will occasionally begin Lair Weaving, which creates a ring of string that collapses inward on us, and we need to break a Infused Tangle to break free of the ring. We’ll choose a target behind the clockwise tank, and Emergency Murder that one so that the raid can escape from that location.
Overinfusion Burst, cast at 100 Energy, reads as a non-issue… it covers the entire inside of the room but we just need to run out to the edge and we’ll be fine. A speed boost here would be great, don’t go back inside until the cast is finished! There may or may not be purple circles to dodge during this phase, if there are, they have a 6 yard splash.
Phase 2
Phase 2: Mobile Phase (50%)
At 50% health, the boss is done with this nonsense, and pulls herself out of the center, causing a vulnerability debuff on herself and moving us into Phase 2, where we will quickly run out of room. Hero here to take advantage of the debuff and to get us a chance to get out of here without filling the room with goo. We’ll be continually moving clockwise through this phase, and space is at a premium, so position every mechanic carefully.
Purple circles, Primal Spellstorm?, definitely happen here, we’ll want to be close together because they look baitable and we really need to be moving in sync now anyway. Move out of them quickly before they splash and prepare for the Meteor Cone.Writhing Wave is a cone cast on the tank, and we need the raid split in two groups to soak each cast
Soulbinder Naazindhri
Soulbinder Naazindhri

Mythic, real quick:
Overview:
- Tanks: Swap after
Mystic LashSet of 6 stacking debuffs - Healers: Cooldowns for
Essence ImplosionRaidwide damage when vat breaks , watch out for PhasebladesIf alive, high target and raid damage - Dps: Burn
UnboundVulnerable baby ethereals , focus Phaseblade > Mage > AssassinEliminate in infancy
- Interrupt:
Void BurstDamage and DoT if any Mages are alive - Avoid:
Soulfire Convergence5 orbs spawn from player and all its geofflings, Arcane ExpulsionDamage and knockback - Aim:
Soulfray AnnihilationBeam targets player, then fires an orb at the correct vats - Hero: On pull
Preliminary Strat
So one of the things they’re doing with all that silk is turning souls into Shadowguards, and this is the lady that does it. We spend this fight turning her own mechanics against her and trying to kill off her adds while they are still in chrysalides so we barely have to fight them. No obvious place for Hero, so we’ll do it at the top unless we need to move it for Heroic.
Phase 1:
When we pull, several Soul Vats (6 in Normal
We want to prioritize killing off the Phaseblades first, followed by the Mages, then Assassins last. In Normal, we have enough beams to make sure none of these adds reach adulthood
- Phaseblades: A real piece of work, this guy stabs its target and then echoes that damage onto everyone somehow. Priority target.
- Mages: Cast a nasty Void Burst damage with a DoT, but it’s interruptible. Second priority.
- Assassins: pop up behind you and backstab, lowest priority
Tanks can move the boss so that we have access to the intended vats, keeping watch on their debuff status from Mystic Lash, a flurry of six attacks that stack vulnerability and require a tank swap. Everyone also needs to watch out for Arcane Expulsion, which is raidwide damage,a DoT, plus a hefty knockback, so mind the gap and don’t have your back to the edge of the room. There is also Soulburn, another DoT, which apparently wasn’t interesting enough to mention in the videos.
Lastly, we also have to watch out for players with Soulfire Convergence, a star shaped effect that we once called “mothballs” but more recently is lumped under the category of “geoff”. Little orbs will fly out in all five directions, greatly annoying your healers, and doing such terrible things to whoever is hit by them that Wowhead is afraid to even speak of it:
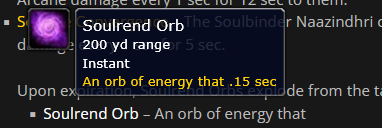
An orb of energy that. And it thats every .15 seconds too. So, avoid, er… that, I guess.
Forgeweaver Araz
Forgeweaver Araz
Mythic, real quick:
Overview:
- Tanks:
ConvergenceRun to center, meteor soak , Overwhelming PowerStacking arcane damage - Healers:
HarvestHeavy DoT on targets , ConvergenceMeteor, leaves absorb on Heroic , watch out for SurgeBAD raidwide damage and DoT if an orb gets through - Dps:
Arcane ManifestationsOrbs from Harvest , Arcane EchoEmergemcy Murder add from tank soak , Charging Collectorintermission, will have orbits
- Slow:
Manifestationsdon't let orbs get to boss - Run:
Tempestdrops silence puddles under you , Singularitytries to vacuum you into the void - Soak:
ConvergenceHalf the group soak with tank - Hero:
Mana Splinterpreferred, 12s vulnerable window , or possibly Singularityfinal burn phase, if hp too high
Preliminary Strat
All Araz wants to do is summon Dimensius to this world and destroy everything. Apparently, that’s too much to ask. Single target fight with some need for cleave that doesn’t outweigh the single target concerns. Hero will depend on how we’re doing, but we want it at the end of an intermission.
Phase 1: Priming the Forge
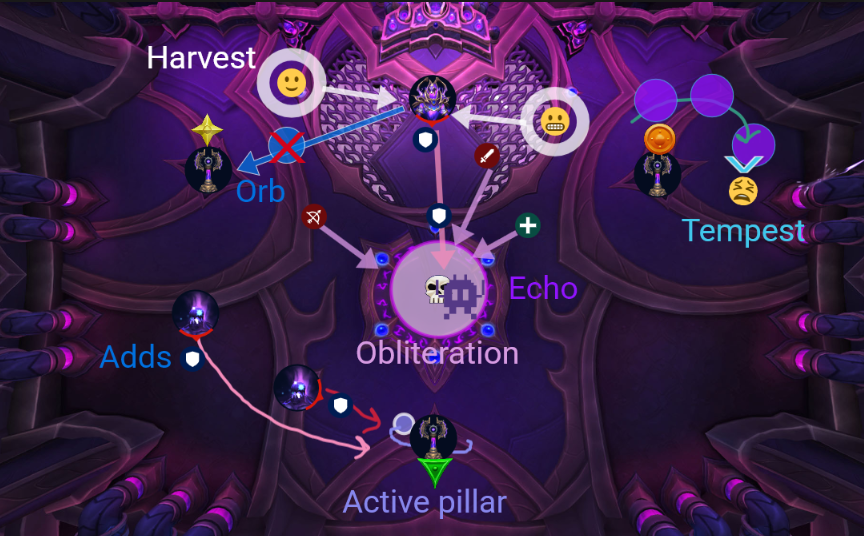
During this phase, we’re attacking the boss while managing his nuisances. Harvest will be cast on people, these targets need to run to the boss where they will then drop Orbs. The orbs are trying to get to the pillars around the room, we need to kill them before they do. Slows and roots may well work, so try those too. Players marked with a blue Tempest arrow are going to be dropping silence puddles, run those out of the fighting area. The boss will cast Convergence on a tank, and that tank will run to the middle of the room, joined by alternating halves of the raid to soak the tank meteor
Intemission: The Iris Opens
At 100 Energy, after three full sets of orb spawns (does that mean three orb spawns, or three rounds OF three orb spawns?) the boss will phase into invulnerability and we’ll need to deal with the Arcane Collectors directly. One of the pillars will get little satellites around it, that means it’s charging, and we want to kill it first. While we’re doing that, the other two will also start charging, and we need to be sure we’re killing them in order. Meanwhile, some Shielded Attendants appear. Tanks need to drag these around by the ear, taunting off each other at about 5 stacks so the same ghosty isn’t hitting you with Ramping Power the whole time. We want these to die, we just can’t afford to spare any DPS on them, so bring them to the active pillar and keep them in cleave range as best you can. You’ll probably just get them positioned in time to move them off again, but that’s tank life for ya.
When we finish killing all three pillars, the boss gets sulky. He goes to the middle and gets a nice vulnerability window. it’s only like 12 seconds, but we’re probably going to use Hero here anyway, it’s just a question of which Intermission we use it on. adds may still be bumbling around, but seriously, don;t waste an arrow on them during the Mana Splinter burn window!
Phase 2: Darkness Hungers
Once we’ve done two intermissions, or perhaps at 40% or at 20%, the boss has had enough of us messing up his summoning ritual He creates a giant Dark Singularity intended to vacuum us all up and get us out of his ethereal hair. We need to run to the far end of the room, taking the boss with us, and kill him off before the gravitic pull becomes too strong to run against, and we all fly screaming into the Crushing Darkness. The other mechanics persist, but the tank swap in this phase will be driven by Overwhelming Power …Araz’ power, not yours, Myrdd. Taunt off each other when you don’t like the number of stacks you have.
If the boss is consistently entering this phase with higher health than we’d like, we may have to move Hero here, but it does us a lot more good during Mana Splinter, so we’re gonna try that first.
Fractillus
Fractillus

Mythic, real quick:
Overview
Single target, single phase fight. Shoot the boss, watch where you stand, and keep the walls under control until we either win or run out of time. Hero on pull.
- Tanks:
Shockwave SlamTank swap, leaves vulnerability and creates walls , stay in your lane. - Healers:
Shrapnel/ExplosionPlayer is about to explode , ShattershellDoT, followed by being punted through a wall - Dps: This is your moment kids. No notes; focus boss.
- Sprah:
ShockwaveCreates walls targets, blurple blob - Stack:
ShattershellShatters walls targets, blue arrow - Hero: On pull
Preliminary Strat
Phase 1:
There’s only one phase here, and it’s just us, trying to keep crystal walls from piling up and reaching the boss. The room is divided into columns, and if any one column room gets six sets of crystal walls in it, he will enrage and that’s it for us. To stop that from happening, we use a combination of a) placing walls where we want them and b) destroying walls where we don’t want them.
Crystalline Shockwave is the ability that spawns walls. This will do heavy pulsing damage to anyone hit by it, the damage may actually stack if we do it wrong, seems to have a small knockback, and will definitely create a wall. If you have a purple blob on your head and a white arrow pointing at you from the boss, this is you. We will be stacked in the Safe Zone, so take your arrow and spread out to try to get only one pointing down each lane, avoiding the tank zone if possible.
Crystal Nexus is the name of the walls that spawn
When Fractillus reaches 100 energy, he’ll do Sweeping Backhand, which will deal raidwide damage but also knocks back any players who are under the Crystal Encasement effect caused by Shattershell, an 8 second DoT that ends with the player rooted in a block of crystal. These are indicated by blue arrows on your head, and in order to break the walls effectively, we need to stack this debuff. Anyone with Shattershell should stack in the same zone as the rest, which will then remove as many wall segments as there are impacted players. (Note: It will remove these walls by throwing your face through them.)
Shockwave Slam is listed in the dungeon journal as a mythic ability, but it also appears to be the tank swap, so I’m gonna assume they miscategorized it and it will in fact appear in all difficulties. This is cast on the current tank, deals high damage and increases vulnerability to the Slam for 55 seconds, as well as knocking the tank back into walls. Tanks should stay in their own lane, handling their own mechanics and avoiding other people’s drama.
The Soul Hunters
The Soul Hunters
Mythic, real quick:
Overview:
- Tanks: Tank Velaryn and Ilyssa, swap for Fracture/Beam
- Healers: Heal absorbs everywhere, watch for Fracture and Eye Beam on tanks, Consume on Ire targets. Spirit Bomb/Soulcrush isn’t fun.
- Dps: Try to stay in cleave range of all three when possible, bosses should die at the same time
- Soak: Ire, Hunt, Stars
- Dodge: Eye Beam, Blade Dance, Fel Rush
- Hero: On pull
Preliminary Strat
This is a council fight, where we fight all demon hunters at once, managing their abilities until they each take turns showing off their ultimate form, one after another. When the final phase arrives and all three empower simultaneously, that’s the enrage. Hero at the pull unless we discover there’s another mechanic we cant manage without it.
Phase 1:
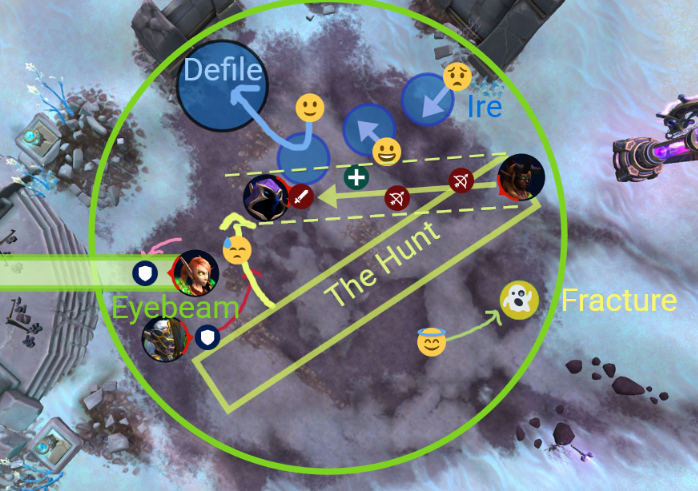
The primary phase of the fight will have Velaryn and Ilyssa each being tanked while chasing Aldarus, who is leaping around like a crazyhead, trying to get any cleave uptime we can. Aldarus throws three soak circles out on the ground in front of him. Failing to soak deals heavy raidwide damage, so three players need to go each stand in one of these. Grats, you three are now his tanks. Soaking the circle gives you Devourer’s Ire, a dispellable debuff that gives you two special treats. Firstly, you are now eligible for him to jump over there and cast Consume on you,
Tanks will spend the fight chasing him from one player to another, and as the Ire people are running all over creation soaking, this is a full time job. Velaryn’s tank will be trying to keep her both in cleave range of the rest AND facing away from the raid so that Eye Beam only hits that one tank. So have fun with that. After you’ve soaked a full Eye Beam, you won’t want to take another, so be ready for a swap, it’s channeled damage with a vulnerability debuff. Her other big ability is The Hunt, where she poofs to a location and makes a large yellow charge corridor between herself and another player. At this point, give the kiting a brief pause while the targeted player runs behind the boss “stack” and allows that charge line to pass through the raid and the melee. Every player in the line reduces the damage taken by the target
Lastly, Ilyssa is also being tanked and dragged around the room. Her big trick is Fracture, where she chops out a piece of her tank’s soul and makes a ghostly copy of them somewhere in the room. This leaves them with a vulnerability debuff, Shattered Soul, but also stacks Frailty on the tank, and that’s a stacking heal debuff. Someone who is NOT the tank needs to run to these right away, saving the tank, but gaining a stackable DoT. When Ilyssa casts her Spirit Bomb, if any of these ghostys are still active, the whole raid will get blasted with Exposed Soul in addition to the unavoidable Soulcrush heal absorb, so we need to make sure that never happens.
Intermission: Adarus
When Adarus takes his turn, he jumps to the center and creates a black hole, trying to drag everyone in. From around the room, little stars are also being pulled in. These do damage when you hit them, but we do need to run into them all, because they do MORE damage, raidwide, if we don’t. Try to take as many as you can, tanks too, and stop when it’s not safe
Intermission: Velaryn
Velaryn’s turn is next and all she does is rush around charging everything with Fel Rush. But it’s a LOT of Fel Rush. Treat it as usual, if you are targeted either stand perfectly still or VERY slightly sidestep so you aren’t in two lines, bare minimum movement from targets so that everyone else can get out of the way.
Intermission: Ilyssa
Lastly, Ilyssa starts her Infernal Strike leap to crash onto an area of the map, and immediately shoots out a Fel Devastation cone. It’s a really big cone, and you do not want to be in it, so move as close as you can to the landing spot so that you can scoot out of the way immediately when she picks a direction
Final Phase: Enrage
All the things, all the time. If this happens, we’re probably toast, so make the best bad decisions you can, brez Molt and Armas, and hope for the best.
Nexus-King Salhadaar
Nexus-King Salhadaar
Mythic, real quick:
Overview
- Tanks: Cosmic Maw, Starshattered, Dimension Breath
- Healers: Reap, Tyranny, Twilight Scar
- Dps: Titans, Voidwing
- Interrupt: Netherblast
- Soak: Conquer
- Avoid: Vanquish
- Hero: On Pull, or during King’s Hunger if necessary
Preliminary Strat
So the phases here are a bit arbitrary, but he considers himself to have three phases and two intermissions. Okay, fine. If we’re going with that, here’s the breakdown, Hero can be at the top (by preference) or in the middle if we need it to kill the dragon.
Phase 1: Oath Breakers
This phase begins with Salhadaar casting Oath-bound which gives us all 3 stacks of a promise we never agreed to. If we end the phase without removing this Oath,
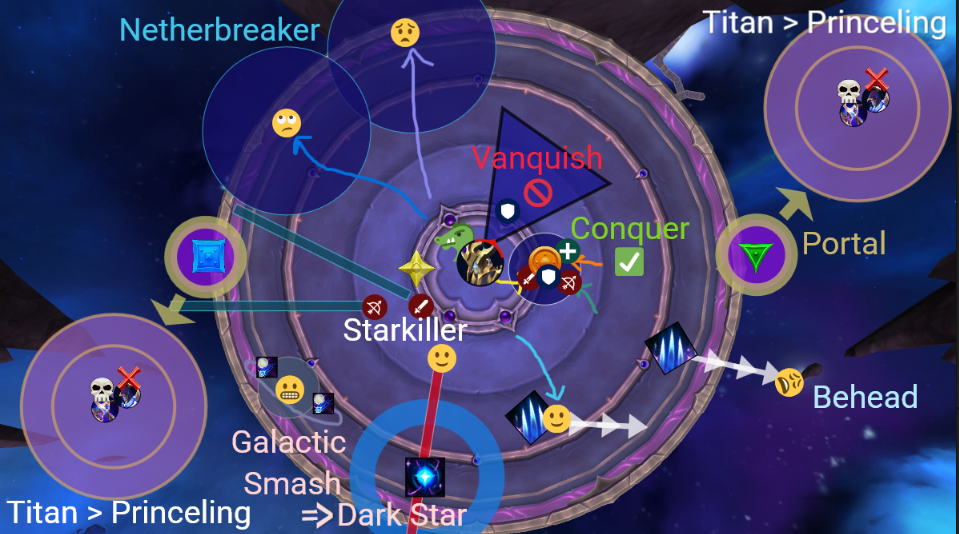
We remove this Oath one stack at a time through proper handling of the tank mechanic, and this is where they’re trying to trick you. The tank combo here is four casts total: two each of Conquer and Vanquish, but those can come in any order so we have to really watch.. and by we, I mean the tanks. All we need to do is stand in the right place and the tanks will bring the mechanic to us. But you should still know what they are so you don’t flail around.
Vanquish is a giant cone. Surely this is the soak, right? We’ve been soaking tank cones this entire raid insta— no. No, it most certainly is not, this is in fact a giant cleave that we want no part of. Tanks will move the cone away from the stack point, and you should definitely let them. This time, cone = bad.
The one we’re looking for is Conquer, which is a circle like proper soaks should be. Each group should stack on their tank flare and soak the Conquer, removing one stack of Oathbound each time you do. And of course, it leaves you with a Conquer vulnerability. It is possible to soak a Conquer when it is not your turn if you are going to otherwise become mind controlled, but if you do, make sure you have your own mitigation ready to go, because the healers aren’t gonna be able to save you this time.
The Oath/tank thing is the critical part of this fight, but make sure you are also watching for all the other fire on the floor, like Behead, the claw marks that you should run out of the middle, but to to the very edge because they have a knockback, and Beseige, the fly-by lasers.
Phase 2: Rider of the Dark
This considers itself to be a new phase, although in practice it didn’t feel much like one. All the ghosty dragons around the edge suddenly turn into one Royal Voidwing in the middle, and there’s a knockback so you know it happened. At this point we should be focusing on the dragon itself, for Reasons, but cleaving onto the boss as well. Tyranny is causing pulsing raid damage, and the dragon is using Dimension Breath to blast a beam that his anyone in front of it
The Beheading is still going on during this phase, so watch out, but also watch for the very large Netherbreaker circles, which need to be run way out of the raid so the chakram that bounces between targets doesn’t find more targets than it bargained for.
Intermission 1: Nexus Descent
Next up, Salhadaar casts Rally the Shadowguard, a sure sign that we should be booking it out of there. Adds appear on the two side platforms, just like Razageth, and we follow our tanks to the sides we’ve been assigned. There are two types of adds on each platform that we need to watch for, the Titans and the Princes. Princes cast nasty spells like Netherblast, which should be continuously interrupted just as if they were trying to explain a strat on voicechat. DPS should be focused on the Emergency Murder Titan, because if we don’t kill him before he explodes, it’s bad news for us. During this phase, the boss and his dragon are shielded, so we need to clear our adds and gate back before we can progress.
Intermission 2: King’s Hunger
Now we’re in the second intermission, where all that damage we did to the dragon starts to pay off. The boss begins to channel King’s Hunger, which is a life drain from the dragon to the boss, but while he’s doing it, the dragon gets a vulnerability window. None of the health he’s gathering will actually transfer until his channel completes, so for that 30 seconds we want to hard focus the dragon and make sure that the boss’s heal will be as small as possible. Salhadaar is still pulsing Tyranny shadow damage throughout this phase, and the Behead claws are still radiating around, but our real goal here is to make that dragon pay.
Phase 2: World in Twilight
Having eaten his dragon, it’s now just Salad Baar and the Raid, facing off. The mechanic here is Galactic Smash, which puts little swirly orbit stars around you. You want to take these out of the middle, because you are about to create a Dark Star. And it looks more like an angry Super Mario porcupine than a star. Never touch these, and stay out of the rings they make too,
Dimensius
Dimensius
 \
\
Mythic, real quick:
Overview
- Tanks: Massive Smash, Oblivion, Collapse
- Healers: Shattered Space, Devour, Voidgrasp
- Dps: Living Mass, Nullbinder, Void Lords
- Soak: Anitmatter
- Stack: Devour, Gravity,
- Spread: Dark Matter
- Hero: Phase 3
Preliminary Strat
Phase 1
Phase 1: 100-0
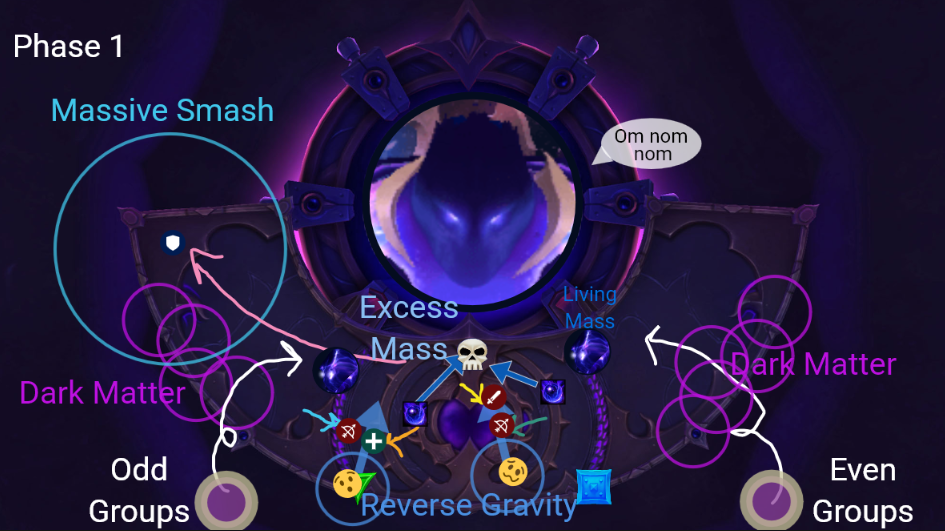
Split the raid in half before the fight, each half take their portal and engage the add on your side, Living Mass, so that you can pick up the Excess Mass that they drop on death. People who pick up the Excess Mass need to stack in melee for Devour, creating Collective Gravity that prevents us all from being eaten. The stacks of Excess Mass needed to keep us safe must be at least equal to the amount of Growing Hunger stacks he has, or we get eaten. He will recast Devour every 100 energy. So adds need to get killed in time to collect those poofs.
Intermission 1: Event Horizon
Ejected into space, we can use our cloak’s power to mount, and fly through rings while dodging lasers and debris. We are attempting to land on a platform, having hopefully collected a Stellar Core on the way if that’s a thing that exists.
Phase 2
Phase 2: The Dark Heart
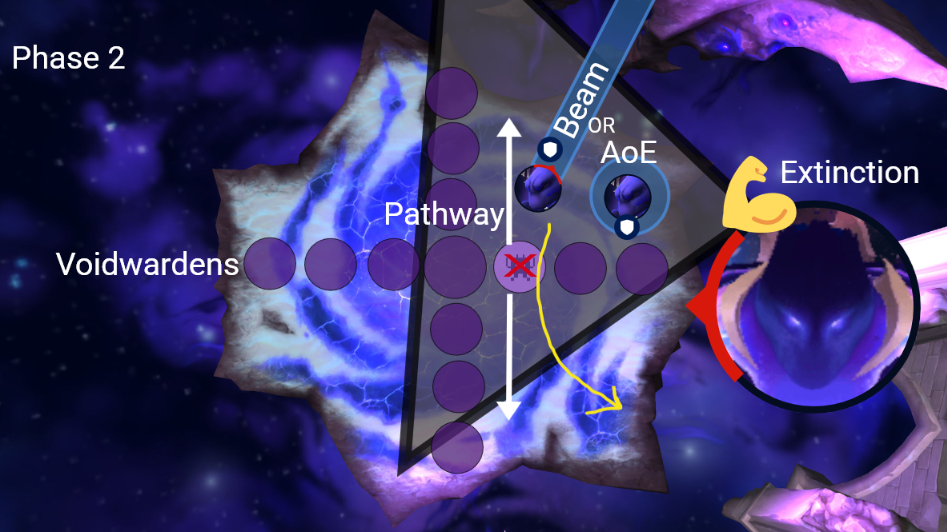
On the Platform, we find a Void Lord. Arthosion casts Mass Ejection, a frontal beam Tanks should aim off the platform because it leaves a puddle in Heroic. Conqueror’s Cross spawns a mess of Voidwardens to get in our way, kill one so you have free right/left motion. In heroic it also spawns a Nullbinder that ruins everything for everyone, emergency murder. He’ll pull up his right or left arm, run as far to the opposite side as possible to avoid Extinction. Gamma Burst is a pushback. Kill Void Lord, fly to next platform.
Next Void Lord, Pargoth, does Stardust Nova instead of the beam, an AoE at his location that also leaves pools, try to maximize space. All other Phase 2 mechanics persist. Watch for Touch of Oblivion stacks, and taunt off each other before the stacks get you dead.
Phase 3
Phase 3: Singularity
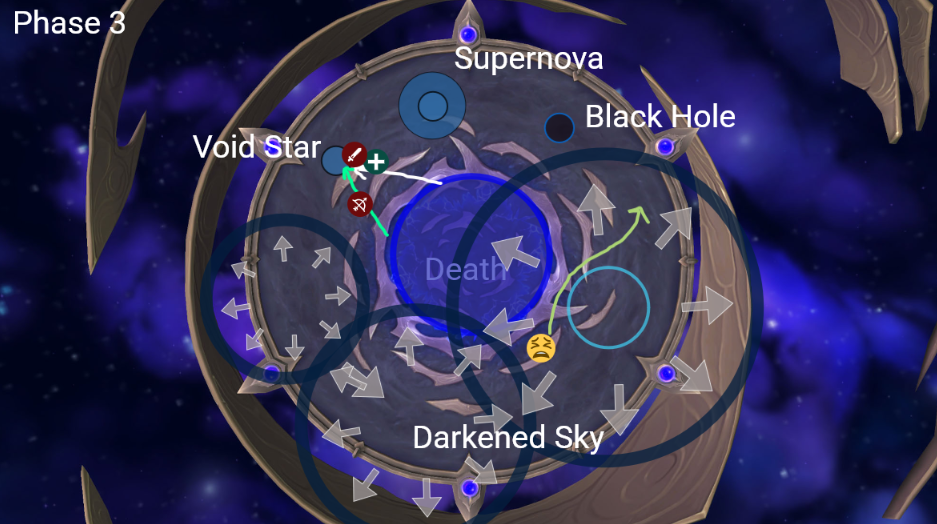
At the start of phase 3 when we land, Dimensius is Destabilized, this is is our burst vulnerability window. Hero and burn as much as possible until he starts doing mechanics again. Extinguish the Stars summons void stars around the platform, each of these has a little Gravity Well beneath it. You must stack in these during Devour or you get et up. Sometimes, a star will Supernova, getting a cloud around it and then collapsing into a Black Hole. Do not stack in the Black Hole. That’s a little TOO much gravity. And really, don’t be near the Supernova either.
Darkened Sky will drop a comet on the floor, which emits a Shadowquake, like Dausegne. Touching the Quake gives you a debuff, don’t touch another til it wears off. This will probably happen in threes, so you’ll want to take the first debuff as soon as possible to leave time for each to wear off before you take another. Voidgrasp will also be happening, this is a DoT with a slow, so you won’t like it. Cosmic Collapse is the tank dance, it has a splash damage and vulnerability, and on Heroic,m it also functions as a Tank Yank, which we all missed terribly. You can mitigate it by using the slow of a Star if necessary. Eventually, we’ll have no more Stars to hide in, and then he’ll Devour us for good unless we kill him.
Geargrinder
Vexie and the Geargrinders
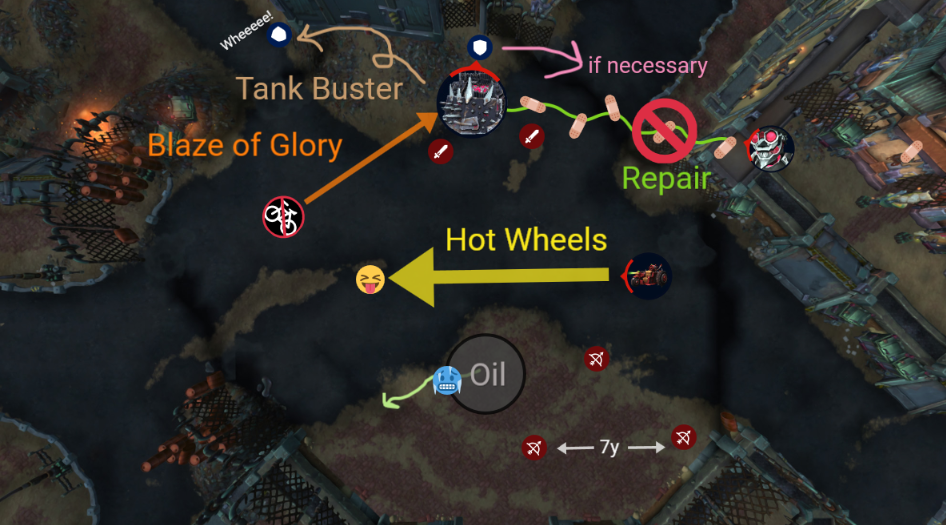
We start with the boss fully armored, and our goal is to break that armor to push into phase 2, where we get double damage against the Geargrinder. Dodge charges, puddles, and swirlies, stay 7 yards apart to avoid splash damage. In phase two, use cooldowns and burn the boss. Keep Repair interrupted so that the boss heals slower. Phases repeat until we win.
- Tanks: Move boss out of any oil, swap after Tank BusterPunts tank, leaves DoT and debuff.
- Healers: Raidwide damage on Blaze of GloryBikes crash into boss, direct damage and swirlys, use cooldowns on BackfirePulsing damage during Breakdown in Phase 2.
- Dps: Phase 1, kill Bikers to steal bikes. Phase 2, dps boss only.
- Interrupt: RepairAdds try to speed up boss repairs in Phase 2
- Hero: Phase 2
Expanded Strat
Phase 1: Fury Road
During this phase, our primary objective is to fight the Geargrinder, a war-tank belonging to Vexie Fullthrottle. The tank is covered in 4 stacks of Protective Plating, 6 in Heroic, which allows it to slowly gain energy. When it reaches 100, it begins Unrelenting CAR-nage, a 30 second tantrum dealing very heavy raidwide damage and giving everyone a stacking DoT, I assume this is at the two minute mark and is intended to be fatal. Geargrinder may also use the Spew Oil ability to target players, causing a splash damage DoT, so make sure everyone stays 7 yards apart. This Oil definitely happens in Heroic as part of a tank thing, and may or may not be in Normal as well. In Heroic, this ability also leaves an Oil Slick on the floor, which deals damage, slows you, and makes you slide around. We can use this to stun Bikers if we can get them to charge over it, but it will impact our aim as well, so position wisely.
Geargrinder has a rocket ability, Incendiary Fire, which targets several players and launches fire at them repeatedly over 6 seconds, dealing 3 yards splash damage. Weirdly, it is reported that running through oil while on fire is a good idea, and removes it. I vote Alien tries it first. Geargrinder will also target players for Bomb Voyage, which deals damage on impact and leaves a 9 second DoT. Meanwhile, the Tanks get to enjoy the aptly named Tank Buster, the tank swap, which slams the active tank for heavy damage, knocks them back, and applies DoT plus the standard damage increasing debuff for 25 seconds. On Heroic, this will also cause an Oil Slick at the tank’s location.The Tank Buster triggers Exhaust Fumes, which leaves a smoke fog causing raidwide damage for 6 seconds. Exhaust Fumes gets stronger each time it is cast.
To counter all of this and advance the phase, we use the Geargrinder Bikers who come in and start charging us with Hot Wheels, which hits everyone in its path and knocks them back. When Bikers are killed, we can interact with the Bike they left behind to get what was originally called an extra action button, but may now be a Vehichle Toolbar ability called Blaze of Glory. This allows us to zoom the vehicle straight into the boss, which causes a burst of raid damage, damages the boss, and more importantly, removes some of its protective armor. Please note that any Oil on the floor will mess up the bike no matter who’s driving it, so don’t waste our Glory by driving through this. Once we get rid of all the Plating, we can begin Phase 2!
Phase 2: Pit Stop
Destroying all of the Geargrinder’s Protective Plating causes it to have a Mechanical Breakdown, leaving it vulnerable. All damage is increased by 100% during this phase, so this is the time for Hero and all your cooldowns! Healers will want cooldowns here as well, because the broken tank tends to Backfire, causing the entire raid to take damage every 2 seconds. Meanwhile Burning Shrapnel, what’s left of all that armor, is raining down around the arena dealing damage to anyone within 3 yards of its swirly impact.
While we are trying to burst down the broken tank (that’s Geargrinder, not Jeisa), Vexie is busy trying to fix it. Her 45 second Tune-Up cast will slowly restore all the armor plating, but she calls in a bunch of Pit Mechanics to speed things up. These adds will try to cast Repair, which restores 2% of the armor every 2 seconds it channels. We don’t want to waste DPS on these twerps, but we do need to keep them interrupted so that the boss stays in its vulnerable phase as long as possible before going back into Phase 1. Feel free to cleave them if you can reach!
Cauldron of Carnage
Cauldron of Carnage
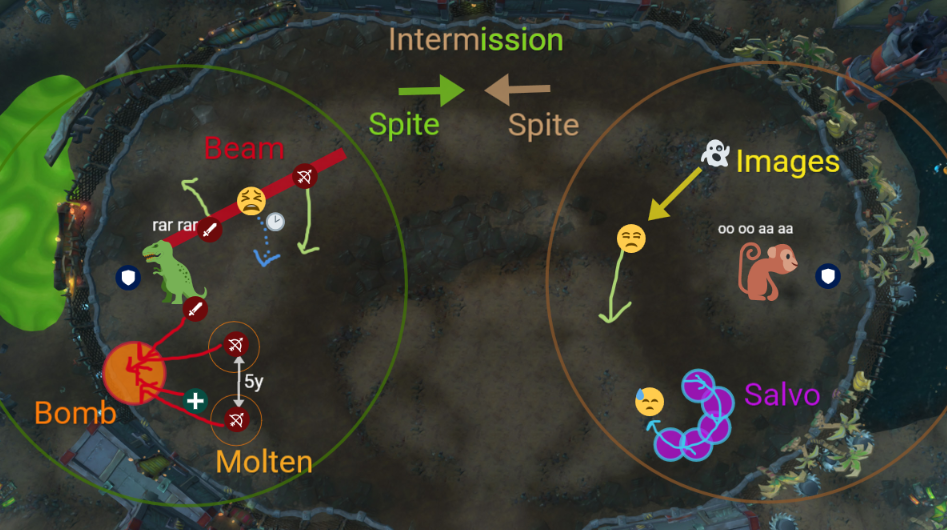
This one reads a lot like Amalgamation, from way back in Aberrus: split the raid in half and swap bosses at intermission to reset stacks. Bosses immune if tanked together, and if one dies, the other enrages.
- Tanks: Bosses 40+y apart facing walls. Dino tank will be StompedPunts tank, causes lava, Monkey tank needs to mitigate BashRaid dmg based on how much you didn't mitigate
- Healers: Keep an eye on Monkey tank before BashHelp tank mitigate to avoid extra damage, save cooldowns for Intermission.
- Dps: Single target damage, possibly cleaveable during Intermission.
- FlarendoDino: Be 5y apart, stack only to soak BombsMeteor with knockback and fire. BeamTargets player, get away target stand still first, then move.
- TorqMonkey: Moving builds StaticStuns if fully charged. Leisa circles for Salvo6 seconds of swirlies on your feet, kite ImagesFixate, leave pools if touched.
- Hero: On the pull
Expanded Strat
Phase 1: Boss phase
When we start the fight, Tanks should pull each boss to the far end of the arena, keeping them as far apart as possible, with the boss facing the outside wall. They become functionally immune within 40y of each other due to Raised Guard, but the bigger issue is that they place a debuff on anyone within 60y, and each team only wants to have one type of Spite active at a time (Galvanized or Blistering). Spite will stack, naturally.
Flarendo, the Dinosaur boss, likes to throw Scrapbombs, which will explode after 10 seconds and function like a meteor, so we should run them to the wall and then stack up to split damage. When this explodes it leaves a puddle, knocks everyone all over the place, and creates lava waves. All the rest of the time, we want to be sprah to avoid anyone taking splash damage from Molten Phlegm, a 10s DoT that pulses within 5y in Heroic. Lastly, the dino has a Blastburn Roarcannon, a beam attack that targets and follows a player for a short time before locking to their location. Once the beam has locked, the targeted player should join everyone else in being nowhere near that place. Meanwhile, the tank will be having fun with Eruption Stomp, which deals magic damage, punts them into the air and throws lava waves around.
Torq is the Monkey boss. People on this side need to move as little as possible to avoid building up Static Charge. Moving to deal with mechanics will cause Static to build up, whereas standing still will deplete the charge. At 100% Charge, you will be stunned for 6s, and in heroic, that stun impact anyone within 10y of you. Things that cause you to move include the Thunderdrum Salvo, 6 seconds of swirlies that follow everyone around for 7 seconds and should be dealt with by making abrupt (not fluid) Leisa Circles. On Heroic, there will be Voltaic Images which fixate a player and chase them around for 12 seconds. These should be CC’d and kited, as they leave a pool on the floor if they manage to catch you. Monkey tank has a Lightning Bash to deal with, the nasty physical damage tank smash that deals extra damage to the raid based on how much of the first hit actually got through. This should be mitigated before it hits, and the tank may well need external cooldowns as well.
Phase 2: Intermission
When the bosses reach 100 Energy, they initiate a Colossal Clash, sending both to the center for some kind of chest bump or whatever. This deals heavy raidwide damage, and boss damage is increased by 15% each Intermission. This also triggers Lava Waves and Swirlies which everyone should dodge. It seems that bosses lose their immunity during this phase, becoming cleaveable, just watch out that you aren’t murdering yourself out of Spite. After each Intermission, we’re going to want to swap sides to reset our stacks of whichever Spite we had previously been receiving, so while Intermission is happenning, both teams need to fully reposition on the opposite side of the arena.
Don’t forget that as soon as you kill one of them, the other one will Enrage, so watch their health and slow down as necessary. Dps swapping to help the other team is dangerous, as you will then have both types of Spite stacks at the same time, so this isn’t the optimal solution. Any DPS imbalance will typically self-correct during the swaps, but once they start getting low mid-phase, it’s on us to make sure we react accordingly!
Rik Reverb
Rik Reverb
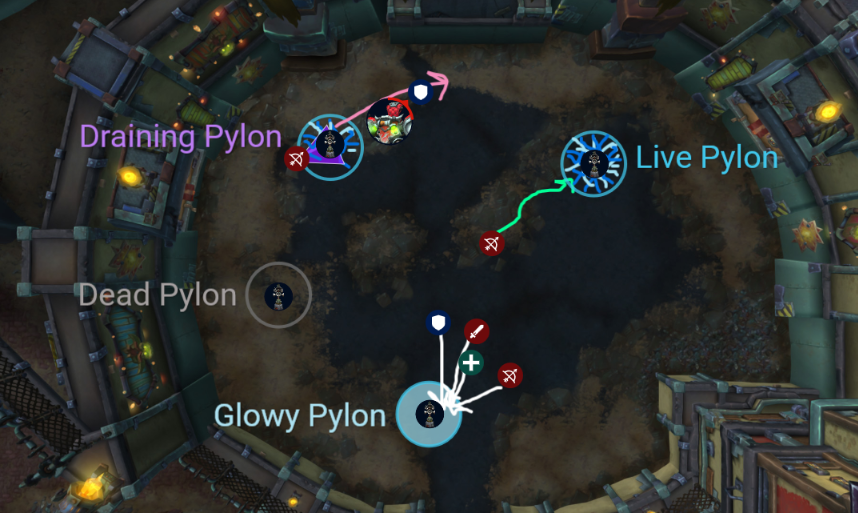
Tank the boss facing away, he has a frontal cone. Boss drops pylons hat gradually charge and need to be drained of energy before they fill. Kill adds on sight, boss is immune during Intermission. Dodge waves, use glowy pylons to be punted over the Ring
- Tanks: Sonic BlastFrontal cone, leaves stacks, swap to manage Tinnitus stacks, move boss away from Pylons.
- Healers: Watch channellersLeaves stacking DoT in Heroic for increasing stacks.
- Dps: Single target fight, Emergency Murder BarrelsExplodes if not killed, gives haste buff if attacked in heroic.
- Channel: Amplifierswipes raid if fully charged, watch stacks to prevent overload
- Hero: On pull
Expanded Strat
Phase 1: Boss phase
During the first phase, we move the boss around the room to keep him away from the Amplifiers he drops in pairs. One will be in his current location, the other will be targeted on a player, so make sure to bait them behind the path of the encounter and move the boss right away, because he empowers any pylons within 15y. Pylons will slowly empower on their own, as well, eventually going Haywire and wiping the raid unless a player clicks on them to drain their energy.
The boss will cast Resonant Echoes, which makes any active pylon shoot out damaging bolts. These cause stacking DoTs if they hit you. Faulty Zap is a circle that targets random players, you have a few seconds to get away and then it zaps anyone within your circle, making them vulnerable to nature damage. In Heroic, we also get Sparkblast Ignition, a set of barrels that drop into the area and need to be burned down immediately before they explode. Attacking the barrels will grant you a haste and speed buff, so definitely Emergency Murder!
Tanks will be managing stacks of Sonic Blast, a debuff caused by the boss’ frontal cone, this attack ignores armor. The first taunt should be at X stacks, and the rest should be as soon as the previous tank’s debuff wears off. Try to position pylons ins a cute, compact circle so that we can easily run between them, favoring positioning that uses as little of the arena as we can afford without empowreig pylons.
Phase 2: Intermission
At 100 Energy, the boss casts Hype Hustle and flies up into the air, becoming functionally immune while he starts pulsing deadly sound waves. One of the pylons in the arena will be glowing, stack inside this pylon to receive a free Punt over the deadly ring, similar to Queen poison jumping.
The third time the boss begins intermission is the enrage, entering Hype Fever where no new phase 1s will occur. At this point, his immunity is gone, but we will quickly wipe due to the damage.
Stix Bunkjunker
Stix Bunkjunker
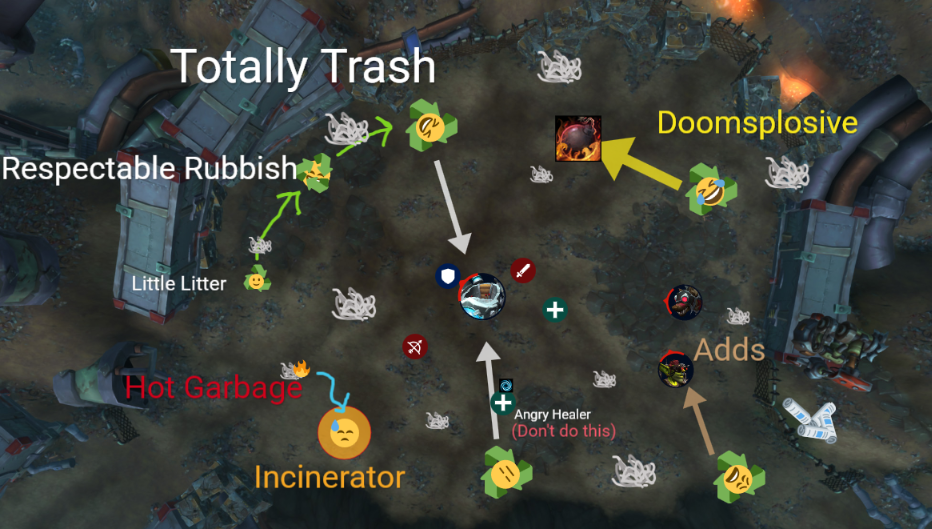
We seem to spend this fight attempting to become piles of trash. It is primarily a single target fight, although there are adds present and in Heroic we do have some Emergency Murder targets. Use trash piles to counter mechanics, and don’t run over your friends.
- Tanks: Taunt swap if your partner is Garbage, taunt after Demolish.
- Healers: Sorting needs cooldowns, watch out for Hot Garbage, watch Meltdown (heroic only)
- Dps: kill Territorial Bombshells, you can basically ignore trash unless its you.
- Interrupt: Scrap Rockets
- Emergency Murder: Territorial Bombshells (Heroic Only)
- Hero: On pull
Expanded Strat
Phase 1: Boss Phase
In phase 1, we have the boss playing with trash. At 100 energy, he casts Electromagnetic Sorting, which yanks trash in from around the arena, creating Garbage Piles of varying sizes. In addition, one of the tanks and four of the raid will themselves become Rubbish and begin rolling about the room. If you are a lucky Garbage target, your job becomes simple: roll around and try to collect Garbage from the arena in order to fill your Trashometer. You’re just a little garbage though, so you will need to first collect four small Piles. Now you’re Medium garbage, so you can either go for Large Piles or the Scrapmaster adds to finish filling up the bar. Do not roll over your friends, they will be stunned, and do not prematurely roll over the boss himself or you end your tenure as a lump of soggy newspaper
Rolling over adds with your Rubbish ball will make them take extra damage, and if no Doomsplosives are around, is encouraged once you reach your final garbage form. You may also be able to gather them up with this ability, which would be a good thing to take advantage of! Make sure that we interrupt Scrap Rockets when cast by a Scrapmaster, and be aware that the Hyenas will just bite their target, causing a healing reduction debuff in heroic. Talke advantage of teh add Vulnerable window to burn them all down, then go back to the boss.
If you are not lucky enough to be a ball of trash, then you should be watching out for Incinerator, which gives you a 3y AoE circle around you. Incinerator must never come in contact with the trash piles, or they become Hot Garbage and give the entire raid a permanent DoT, which can stack. The last thing we need is more Hot Garbage. Try to keep the raid safely positioned within the Druid Circle so we have a safe zone that we can avoid while rolling!
Tanks will obviously not be tanking while they are rolling about, but the actual tank swap mechanic is called Demolish, which deals high magic damage and increases all damage taken. You should swap immediately after this is cast.
Phase 2: Overdrive
After the first two Garbage cycles, the boss will go into Overdrive. He will fly up into the air, becoming functionally immune, and throw swirlies down on everyone. After this, he crashes back down into the arena again, dealing wave damage and knockbacks, and for the remainder of the encounter he’s at Maximum Output, so the mechanics all happen more often, in greater number, and with more attack speed. It’s basically creating an enrage.
Sprocketmonger
Sprocketmonger Lockenstock
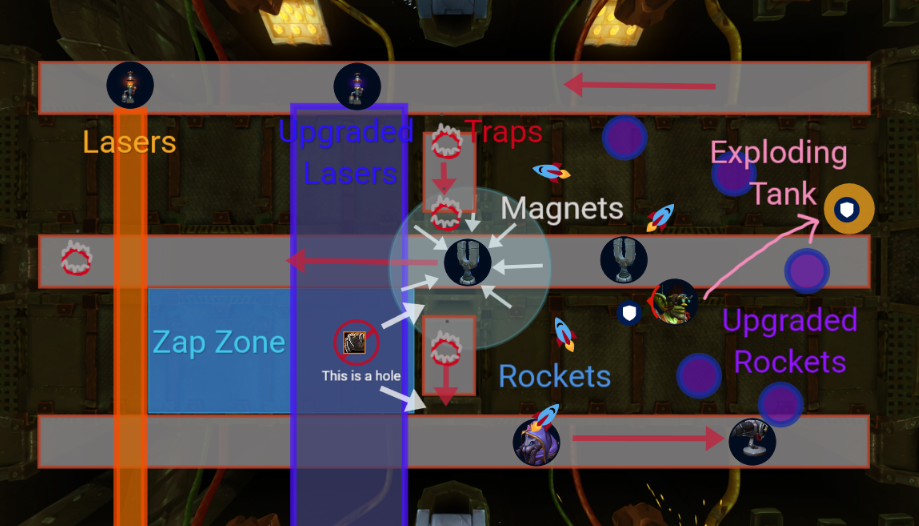
We spend this whole fight dancing on conveyor belts, but don’t worry! You don’t need to solo them. Single target fight with no adds at all, but very high movement, use the belts to get an advantage and pre-position or you won’t have time to get away from the fire! Favor a central approach, so that we are more o less gathered in the middle and healers can reach us, moving as necessary to avoid the zap zones.
- Tanks: Run away with
Pyro PartyYou're the bomb! 6 seconds to get away - Healers:
Sonic Ba-boomraidwide damage for 10 seconds , watch out for people with heal absorbs in phase 2. Boss hits harder every phase 1. - Dps: Single target fight, but constant movement. Get back to boss asap during intermission.
- Hero: On the pull
Expanded Strat
Phase 1: Invention Phase
The room is made up of four “safe zones” flanked on all sides by conveyor belts. The tiny ones on the inside are traps. Like, for real. They’re always moving, they have death holes on either side, and actual traps that cycle through, touching a trap will hurt and throw you around, so avoid these when possible. The left, right, and middle belts stretch the length of the room, and they both start and help solve mechanics.
When you are targeted with the nasty Floor Drills, they will spawn at your location for a few seconds. We’ve tried running them to the edges, but they drop too often and take too long. Prioritize making tight groupings of easily avoidable plies of drills rather than spreading a line of doom across the room, touching them gives you a disorient. When the boss electrifies a section of the room with Wire Transfer, obviously don’t stand there. He will also cast Sonic Ba-Boom, which deals raidwide damage for ten seconds, and will probably hurt.
Tanks will be dealing with two mechanics, one that leaves a slowing debuff an the other that makes you a bomb. When you gain the Pyro Party Pack, you run it to the far end to explode, you’ve seen this a zillion times. You will be slowed from the Gravi-Gunk you’ve been taking up til that point, so save your movement cooldown to negate this!
Throughout the phase, the boss will roll out some of his handy inventions. These always come from the same conveyor belt, so if left and right are meaningless, that’s not an issue. The beams come from the left, and left is therefore defined as the side beams come from. See how delightfully circular that is? But beams are not circles. Don’t stand in em.
- Blazing Beam: a straight beam of fire from each device on the left conveyor belt. Empowered makes them stupidly wide
- Rocket Barrage: multiple rockets that shoot from the devices on the right belt, dodge these. Empowered, they become orbs, super hard to see, and cause raid damage if anyone touches them.
- Mega Magnetize: pulls in all players, stuns if you touch it, spawns on the center belt.
- Mines: on the tiny sideways belts, also in the center during the Intermission.
Phase 2: Beta Launch
During this phase, all four “safe zones”…aren’t. The conveyor belts are still ok to stand on, and if you’re lucky and can find the edge rails you’ll be ok there too, everywhere else, zap! Boss will punt us all back from wherever we were standing, so be expecting this! But he still takes normal damage in this phase, so we should be dodging all the pink floor fire and the zap and the mines in the center belt, there will be constant pulsing raid damage throughout this phase as well. After each phase 2, the boss gets stronger and empowers one of his creations, first lasers, then the rockets.
One-Armed Bandit
One-Armed Bandit
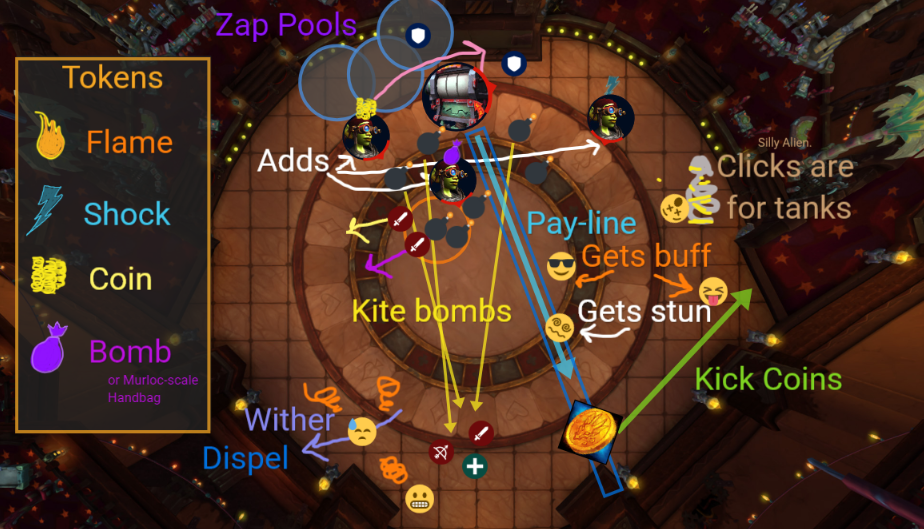
And now we’re fighting… a slot machine. Because of course we are. Kill adds to get tokens, play tokens to win prizes. Spoiler: the prizes are death.
- Tanks: Taunt after
The Big HitDamage, debuff, and puddle , manage puddles, CoilsCan use to erase puddles, need a cooldown - Healers:
Searing Hot CoinsHigh raid damage needs cooldowns, Dispel Withering FlamesExplodes when removed - Dps: Funnel and murder all adds right away, watch out for
Chipsplay chicken, get a buff. Miss, get stunned
- Interrupt:
OverloadRaid damage, knockback - Hero: Start of phase 2/30%
Token Order: TBD
Expanded Strat
Phase 1: That’s RNG, Baby!
At 100 energy, the boss will hop to the front of the room and begin Spin to Win, summoning three Reel Assistants and triggering any active Coils
In general, we want to avoid using the Shock in the early part of the fight, as Shock mechanics will make pylons that then repeat their effect every cycle, whereas the rest we just deal with the one time and they are done. Near the end of the fight we’ll have to start adding in some Zap though, so we can’t avoid them forever.
- Flame and Coin: Searing Hot Coins, 8 second stacking raid DoT, cooldowns will be needed.
- Flame and Bomb: 3 Fiery Dynamite adds that fixate, can be CC’d but also have Burning Blast, which makes them explode on death, with a splash damage of 15 yards, and shoot fire tornadoes… so don’t take out the melee with them.
Leaves a DoT on Heroic. - Coin and Bomb: 5 Premium Dynamite adds that fixate, they have high health and are not CCable, so funnel them and Emergency Murder, deals raidwide damage if they reach their target.
Leaves a DoT on Heroic. - Coin and Shock: Premium Currency Coil, A pylon yanks people in with Coin Magnet and deals 5 seconds of pulsing raid damage
- Shock and Bomb: Dynamite-Laden Coil, A pylon summons Fiery Dynamite adds that follow people and if they touch their target, they explode on the raid, crowd control, kite and burn.
Leaves a DoT on Heroic. - Flame and Shock: Superheated Coil, A pylon shoots out little Traveling Flames, fire tornadoes that target Sylv specifically, and knock back.
If/when we do make a pylon, recall that it activates again if you click it and also during Spin to Win. Any person who clicks it gets whomped with Explosive Shrapnel, but activating it will disperse the closest two Shocking Fields, so it may become necessary if we are running out of room. This should be done by Tanks only, the damage is no joke.
Reel Assistants cast Withering Flames, which gives you a DoT and reduces your health. It can and should be Dispelled, but upon removal, the target will spawn fire tornadoes, so run out first. Overload should be Interrupted, as it will cause raidwide damage and knockbacks if the cast completes. They also cast Electric Blasts, which bounce and stack, but there’s nothing to be done about that except murder, spreading out isn’t supposed to help.
Pay-Line is a pair of casino chips that shoot out from the boss, stunning anyone they hit. Here’s the thing, though: If you ALMOST get hit, you instead get a damage and healing buff called High Roller. I mean, go for it if you want, but you better not miss, is all I’m sayin’. Crushed! is an 8 second stun. When the chips collide with the wall, there’s a 15y AoE damage burst, along with regular raidwide damage. Someone needs to go over and flip them back over using their Extra action button, because if we don’t, the boss gets a buff called Up the Ante, stacking 5% extra damage for each chip. Aim at the wall to be safe, nothing suggests that this will harm the boss in any way, but it will sure kill us if we Crush the raid. Anyone gambling for the High Roller buff… eh. we can work out a plan for that by Heroic.
Every so often, we get Foul Exhaust, an AoE damage pulse that triggers a heal absorb, DoT, and slow on all players. The Tank mechanics are a physical damage The Big Hit, the standard tank smash that makes you vulnerable to itself and stacks. It also leaves behind a Shocking Field on the ground. It is suggested that tanks try to position these carefully to the edges of the encounter, swapping each time it is cast and trying to ensure that the location of the zap puddles don’t stop us from killing the adds that spawn.
Phase 2: This Game is Rigged! at 30%, or after all 6 combos.
At this point, the boss is done playing fair. Along with his other abilities, like rolling chips around and filling the room with gas, and smushing our tanks and creating Zap puddles, now he uses Cheat To Win
- Linked Machines will create a new Hyper Coil that links to the boss with Voltaic Streak capable of killing anyone who touches it. More Coils will spawn the longer this goes on. (note: these are functional Coils, and you can still use them to clear puddles if you had to. But we likely don’t have time or mana for that, we need to kite and burn)
- Hot Hot Heat will mark random players with the red arrow, after which they will be targeted by fire beam. Marked players need to quickly fan out and then STOP moving (like we did with Huntsman way back in the day) so that everyone else can avoid the beam.
- Scattered Payout will start dealing raidwide damage for the rest of the encounter, which really won’t be very long because
- Explosive Jackpot just wipes us.
Mug’Zee
Mug’Zee
Mug’Zee are a two headed ogre, me fight this one next. We start with whichever side has more players, so everyone stack up on the Mug side first and make sure we stay together, especially when it’s time to swap! Split raid in 2 groups with a mobile outlier team. Lots of unavoidable damage on this one, so it’s important to avoid the ones you can.
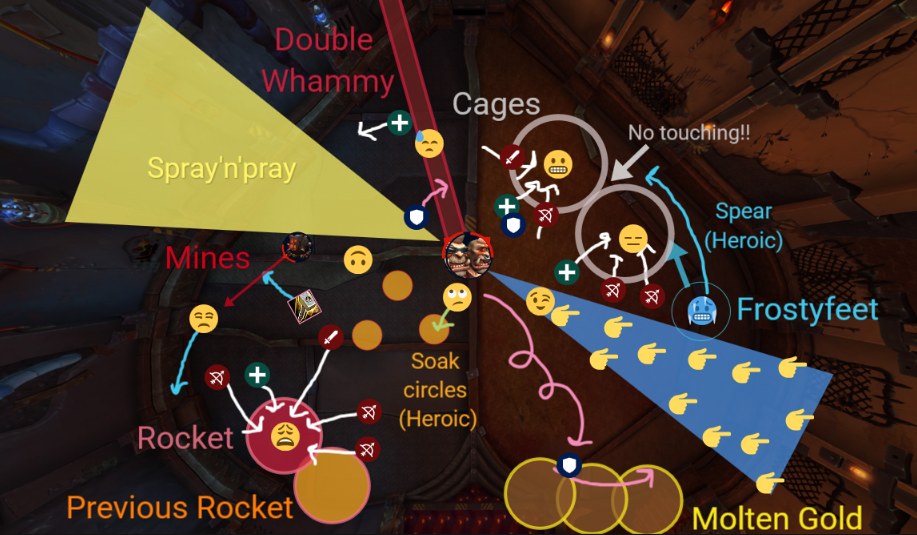
- Tanks: Swap every Molten Gold, place pools. Soak the Whammy
- Healers: Cooldowns every room swap
- Dps: Emergency murder debuffed adds, can’t dps bombs
- Interrupt: Pay Respects
- Soak: Gaols, Rockets, Swirlys on Heroic
- Hero: final (Enrage) phase
Expanded Strat
Whichever side of the room we are on, that head thinks it’s in charge and gets to pick all the mechanics. The longer a particular head is calling the shots, the more Moxie it develops, giving it a stacking damage increase, Swapping sides removes the Moxie; sorry, Gil. When we swap, the boss will do 6 sec of pulsing raid damage then light stacking damage, so cooldowns will be needed… but we need to make sure we do this before they reach 100% energy or we wipe. One suggestion is to trade sides after each tank has flown to hakabalukia exactly once, and then again after every Spray’n’Pray.
Phase 1: Mug (Red/right side)
When fighting Mug, he starts with a 6 second burst of pulsing Elemental Carnage followed by a Dot that comes with a debuff against the same, making the next Mug phase nastier. Two players will be targeted with a circle, they are about to go directly to Gaol. Yeah, some people actually spell it that way. These circles should be placed beside each other without touching (or the adds enrage), and the boss must not touch either one (same reason). Each Earthshatter Gaol must be soaked with X other players to help kill and heal, or the target will be sad. Inside the cage will be a Gallagio Goon that you must kill to escape, dodging the Shakedown cones and interrupting each cast of Pay Respects. When the add dies, we have a Gaol Break and you are saved!
In Heroic, a separate mechanic called Frostshatter Boots will be cast on players who are NOT in a cage. This will make them slippery, and also has a small splash radius.
Someone, probably Alien, is doing Finger Guns through this phase, this just causes another cone you want to avoid, the targeted player shouldl stand still so everyone else can dodge. Tanks, meanwhile, will be swapping on every cast of Molten Gold Knuckles, which is a cone, so keep the boss facing away as usual and taunt when your partner goes flying across the room and starts dropping Molten Gold Pools all over the place. Try to run the perimeter with these pools, but whatever you do, don’t stand still. Doing nothing will stun you! For 30 seconds.
Phase 2: Zee (left/grey? Side)
When we’re on this half of the room, Zee is in charge. Zee starts with Uncontrolled Destruction, a similar burst of fire damage with its own debuff that leaves a permanent DoT. Then, he sends out Unstable Crawler Mines that will fixate on people. These are immune to damage, but anyone can detonate them by running into them with their face. It is possible the inactive tank should be doing this, but that seems impractical to me, and I vote Armas. We do want to stagger these detonations, however
The MK Electro Shocker add will be casting chain lightning on people, but when his health gets to 80%, he gets an 8-12 second Vulnerable window due to Faulty Wiring, so this is Emergency Murder time for him. I believe there are two, if we can split ranged/melee to get them down, great. If not, whatever works.
Goblin Guided Rockets will also target players with a meteor effect rocket that needs to be soaked, after which it leaves a Hot Mess. Half the raid should soak each one, and then rotate to the other half for the next
Double Whammy Shot is a beam attack that will target a random player but must be soaked by the tank! Stand still behind the active tank and allow them to take all your damage for you. Aren’t they nice? The tank cannot save you from the Explosive Payload, however, and you are still going to explode 6 seconds later, so make sure that you have scooted back from all players and mines before this happens, it will leave a permanent fire puddle. Also note that the beam goes right through things, so no one else should be anywhere near where this is all happening.
Intermission: Bulletstorm
At 40% the boss will prepare a Static Charge towards a random player, which will destroy any mines or cages it passes, not to mention any players. Try to aim this carefully. After that, the boss gives us a Bulletstorm, rotate around the boss to ensure you are in one of the safe areas to avoid the barrage of bullets or lightning on either side. There will also be a Stormfury Cloud that clutters up our life, so ye’ve got tae dodge.
Final Phase: Head Honcho
After Mug’Zee repeat the above pattern three times, they move into the Enrage phase, where the boss casts Bloodlust, all abilities are fair game and they just do whatever they want until 100% energy, whereupon we die.
Gallywix
Chrome King Gallywix
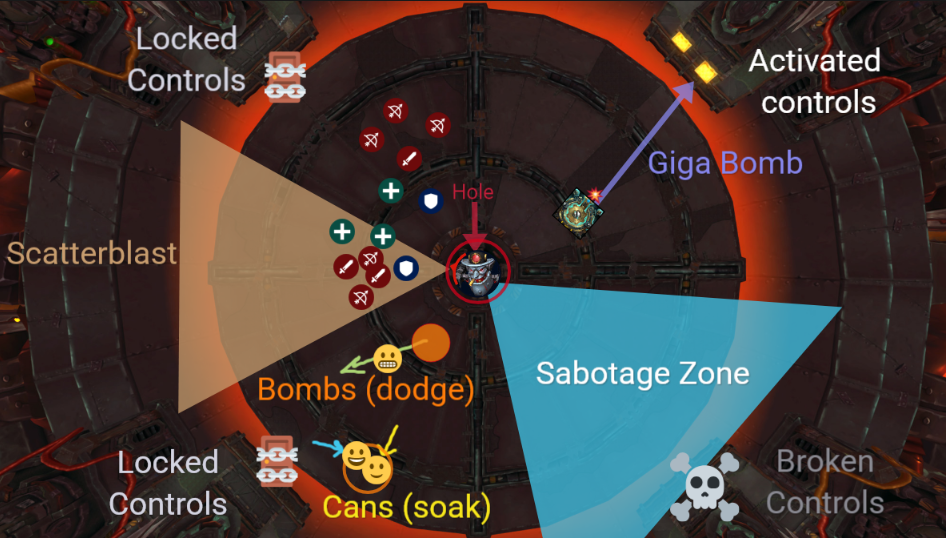
The info on this one is kinda sketchy, because they don’t let people test it before launch, so we’ll have to do a lot of SCIENCE here and then I can clean the strat up. But basically, four phases, tons to dodge but a lot to soak, heal absorbs for days, and basically: All fire. Bow wow wow.
- Tanks: clear Duds on Heroic, watch Trick Shot stacks, mitigate Ego Check on heroic
- Healers: Stagger heal absorbs everywhere, watch tank’s Ego on Heroic
- Dps: add management, soak soaking things
- Bomb Running: get them to controls fast!
- Soak: tanks, canisters, with buddies and then alone
- Hero: last phase
Expanded Strat
Phase 1: Title
The boss will be in the HOLE in the center of the encounter and can’t be moved in this phase. We’ll be fighting from not inside the hole. When he casts the Scatterblast Canisters, we need to have some number of raiders soak with the tank. Half is one possibility, less would be even better if we can do it, but it must be at least three. Everyone who soaks gets a heal absorb, Mechengineer’s Canisters. If the absorbs don’t get healed off in time, it will deal damage
The boss will throw a Big Bad Buncha Bombs into the raid, and many of these will explode. If you don’t get out of the way, you get a long Blast Burns DoT which can stack. Bad Belated Bombs go off a little after they should have, but they do the same thing, so avoid these too. Some lucky players get a Sapper’s Satchel, whether or not you yell at them, these will detonate after 7 seconds with a splash range of 7 yards
Tanks: The boss’ Gatling Cannon deals extra damage to the tank based on how far away they are, so it’s important not to leave melee. Watch out for Trick Shots stacks on the boss, every time the tanks swap he will deal heavier physical damage and add a DoT based on how high the stacks were. If he reaches ten stacks, he does this automatically, so you’ll want to swap earlier than that.
Phase 2: 100 energy
The boss will now start to activate his peripheral machinery, charging up the four Giga Coils and summoning Darkfuse Technicians. The newly activated Giga Coil starts to pulse horrible AoE damage and the Giga Blast does a beam of heavy damage for us to dodge. At this point, one of the four gates on the edge of the room opens up, allowing access to the Giga Controls.
In order to stop all this, we need to wait for the Tech to come in, and kill him to steal his Giga Bomb. Once he dies, and drops it, someone very fast needs to take the bomb to the open Control gate using the Extra action button, your goal is to blow up the Controls. It reads as if you pick it up with the button and it self-detonates if you go to a control, but we’ll have to see. Giga Bombs don’t last forever, though, and they will explode on their own if we don’t get to it within 40 seconds, or if they are hit with a Giga Blast. Breaking the controls stops the deadly damage.. but of course it also inflicts damage, because nothing is free. It also creates a Sabotage Zone to avoid
Meanwhile, Fused Canisters are being cast at random targets, they will explode after 6 seconds. These cause stacking heal absorbs just like the other Canisters did, and each person needs to soak with at least 2/3 buddies or there’s extra the whole raid gets it. There are also other adds and plenty of lovely mechanics to kill us while we try to break all the controls. If you see a Sentry channeling on Sylv, please interrupt the Shock Barrage, and please do offtank any Wrenchmongers that show up to hit people with Wrenches
Intermission: 50% health
Boss begins Cratering, smashing a giant circle in the center that kills anyone it hits, and he gets Armageddon-class Plating, a massive absorb shield which we must break in order to interrupt the Total Destruction cast.
Last Phase:
Now the boss can be re-positioned but, we still have Giga Bombs and Giga Coils, and the other abilities and adds persist, with some upgrades.
Bigger Badder Bomb Blast starts with a frontal cone? and a 30y AoE around the tank location in addition to the previous effects. Tank should run away. Rockets shoot out from people soaking. Giant zap circles appear that you need to get away from.
Tick Tock Canisters: upgraded ability now throws canisters on the ground, one person must soak each with a buddy? or the whole raid gets hit, applies healing absorb. There is some difference of opinion between the guides and teh dingeon journl on teh precise numbers you need soaking what, so, Science it is!
We just need to kill it before we run out of floor or die to the horrific levels of damage.
Queen Ansurek
Queen Ansurek

Phase 1
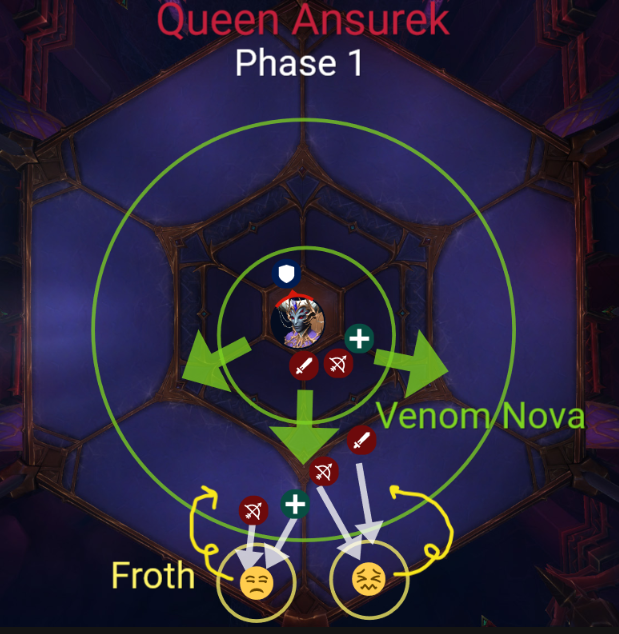
Phase 1: Bottom platform
- Liquefy: Cast on tank, swap on cast. This will cause a puddle, meaning we have to keep moving the boss each time.
- Feast: Heavy physical damage on tank combined with a heal absorb, pre-mitigate, because the absorb shield scales with damage dealt.
- Reactive Toxin: Cast on player, drops Froth puddle. Run it to the edge to leave the puddle. Two players will get this on heroic, run out together and drop them next to each other.
- Reactive Froth: Puddles left behind by Toxin. These need to be broken during Nova to get the raid safely across the Nova ring. On heroic, the puddles behave as meteors, so the raid must split between them. In addition, breaking the puddle leaves a debuff, so different people must activate it each time.
- Venom Nova: Creates an expanding death ring. Stand near a Froth and break it to push raiders over the ring. Do Not Blink.
- Silken Tomb: Roots players, causes splash damage. Lightly spread out then break them out. Leaves a slow and DoT when broken.
Intermission: Boss gains a shield for intermission.
- Wrest: Pulls players towards boss, spread out as you run away.
- Paralyze: Waves and venom splashes, stacking damage and slows.
Phase 2
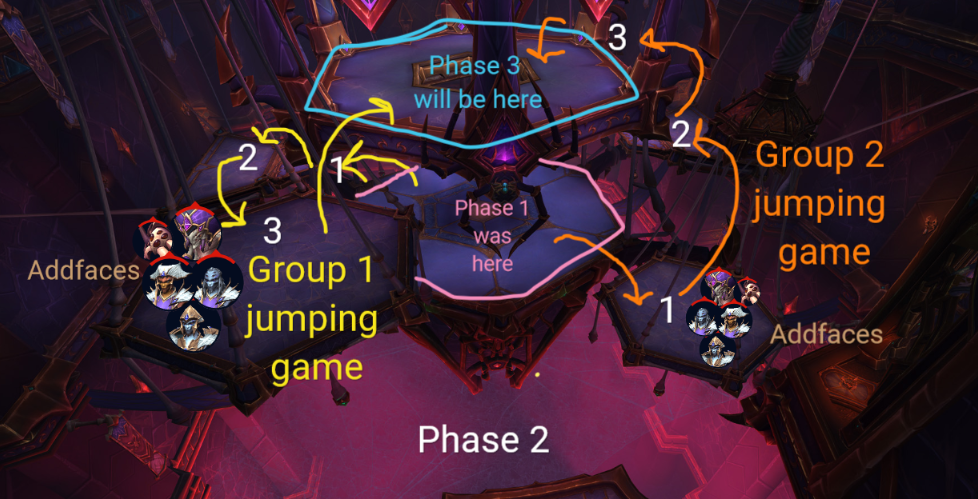
Phase 2: Split raid, and get to the top. Adds shield each other if the same ones are nearby, some share health. Boss still tries to yank.
- Worshipper: Priority target, kill before Apocalypse finishes casting and dispel Gloom Touch which will naturally explode when you dispel it, so dispel gradually.
- Guardian: Tank add, has a knockback and shares health with its twin
- Expeller: Laser beam with knockback, shares health with its twin.
- Skitterer: Small adds, cleave them. These do more damage to their target over time
- Voidspeaker: interrupt Shadowblast. Add causes a knockback on death which is used to change platforms. Shares health with its twin, so time the deaths carefully!
Phase 3
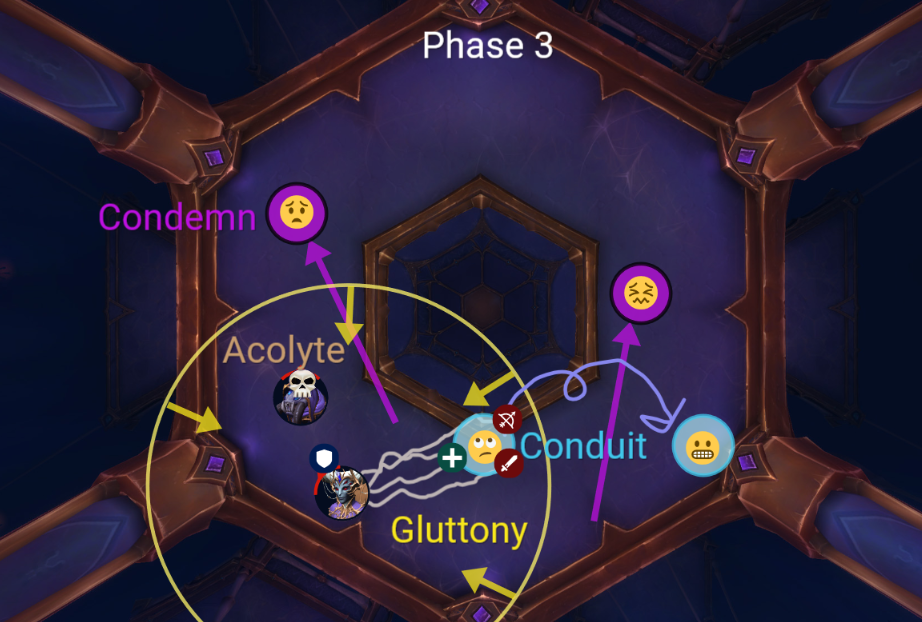
Phase 3: Top platform. Hero when we get here.
- Infest: Tank will spawn spiders that fixate on boss, run away so they can be killed, burn them down.
- Gorge: Increases physical damage taken, the debuff is increased by the amount of damage the ability dealt, so pre-mitigate. It also leaves puddles, so the boss will again need to be rotated around the room, complicating portal positioning.
- Acolytes: Priority kill. Interrupt Null Detonation. On death, drops an Essence which must be removed from the encounter by using a portal, but will also destroy that portal. Essence runner must go last! A new player must handle this each time.
- Abyssal Conduit: Marks two players who will then create portals, just like Xy’mox.
- Frothing Gluttony: Raidwide yank with a collapsing ring mechanic, both are fatal. Use the portals to evade, as we did on Xy’mox, entering the close portal to teleport to the far one, bypassing the ring. Ensure acolytes are dead and their Essences removedbefore this happens, or the boss will get a serious buff.
- Royal Condemnation: Spikes on player, run out to drip these away from the raid. This leaves shackles that slow, trap, and deal DoTs
The Silken Court
The Silken Court

Phase 1: One tank on each boss, Magic Resist tank on Taki. Shared health pool, so keep Anub near Taki for cleaves when it’s safe to do so. Hero on pull.
- Piercing Strike: High damage on Anub’s tank, stacks.
- Poison Bolt: DoT on Taki’s tank
- Web Bombs: Step inside in pairs to get Bindings (2 pairs of Buddies)
- Reckless Charge: Trip Anub’s charge with Bindings to create vulnerable window, or die.
- Call of the Swarm: 3 scarabs, cause stacking DoT, fixate. Grip and burn the Adds.
- Impaling Eruption: Anub’s frontal cone aimed at player, creates spikes, stuns anyone hit. Burn the Spike.
- Burrowed Eruption: Raidwide damage/DoT
- Venomous Rain: healer CDs, pulsing damage
Intermission: Break shield, dodge the pizza.
- Shatter: Taki teleports and creates explosive pizza, sidestep these in order.
Phase 2: Some phase 1 abilities, plus new tricks
- Stinging Swarm: insect debuff, jumps to a new target on dispel. Pin them on Taka to create vulnerable. Needs dispel rotation, and the last dispel must interrupt her Entropy cast.
- Cataclysmic Entropy: Channeled spell, wipes raid unless broken with Swarms.
- Web Vortex: Raidwide yank, run away from your partner to break webs.
- Strands of Reality: Taki’s frontal cone, damage and knockback.
- Entropic Desolation: Raidwide burst damage and DoT, run away.
Intermission: Break shield, dodge rings.
- Spike Storm: Anub teleports, spawning shockwave rings. Destroy spikes and don’t get hit.
Phase 3:
All abilities are active except for the Web Bombs, so 2 pairs of Buddies need to keep some web bindings from the Vortex to prevent Anub’s Charge.
Nexus-Princess Ky’veza
Nexus-Princess Ky’veza
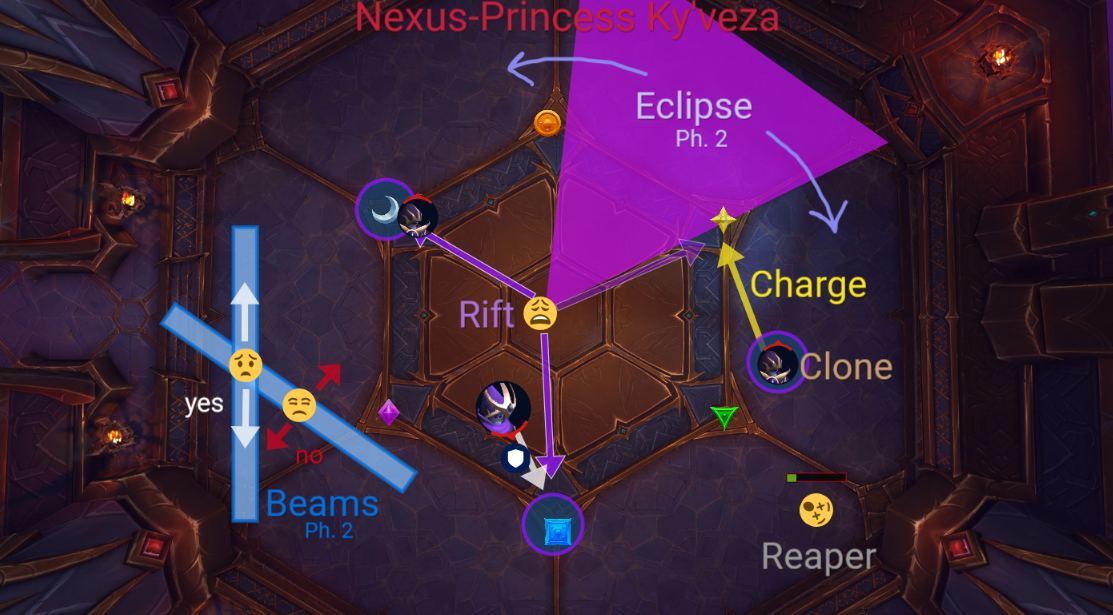
Phase 1: Single target boss phase, Hero on pull.
- Void Shredder: tank swap, deals increasing amounts of damage, swap when it starts to get painful
- Assassin: Targeted players will spawn clones, run to balanced flare locations.
- Clones: Cause AoE pulse damage, throw out directional daggers, spawn rifts, and charge players.
- Massacre: Clones will charge their target. Position so that the Clone’s new location remains balanced.
- Nether Rift: Appears at Clone’s current location, will exert gravitational force to pull players towards it. Position between rifts to cancel out opposing forces, or die.
- Queensbane: Targets will deal burst damage within 2 yards and create orbs that travel outwards. Run away from the raid to drop this.
- Reaper: If you fall below 10% health, you die.
- Stalking Shadows: Heavy AoE pulse damage caused by Clones
Phase 2: At 100 energy, becomes a movement phase while boss is immune. Boss Enrages the third time this happens.
- Regicide:Trackline beams, just like Fyrakk. Move within your own lines to ensure you are only hit by your own Beam. Avoid unnecessary motion so others don’t get caught, especially sideways motion.
- Starless Night: Continual heavy raidwide damage.
- Eclipse: Heroic Only. Floor pizza comes out on opposite sides of the room and will rotate in either direction. Position near a boundary to dodge.
Broodtwister Ovi’nax
Broodtwister Ovi’nax
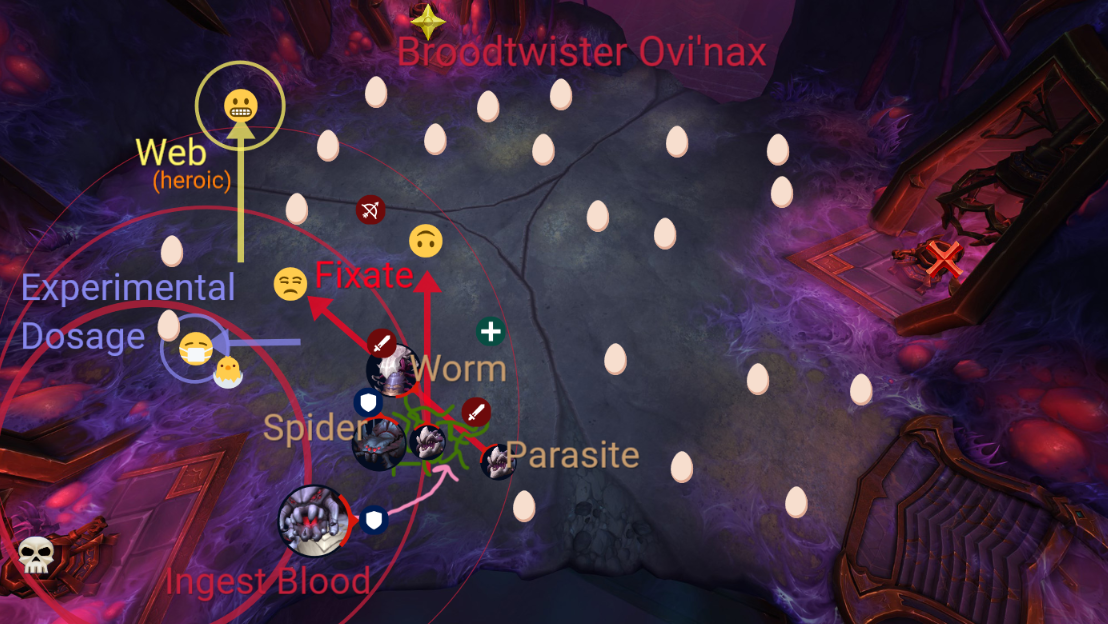
Single Phase: Reposition boss to account for adds, blood, and egg patterns and maximize cleave opportunities. Hero on first Egg hatching.
- Volatile Concoction: Tank swap. 8 second debuff, deals raid damage on expiration based on target’s missing health.
- Experimental Dosage: Targets two players on normal, and four on heroic, giving them a circle that will force eggs to break. Target eggs in order to prevent Blood from reaching them.
- Vile Discharge: Black swirlies to dodge.
- Poison Burst: Cast by Worms, causes heavy raid damage unless interrupted.
- Ingest Blood: At 100 energy, boss will kick the closest container, causing blood to spill into the room along with raidwide damage and heal absorb. If Blood touches any unbroken eggs, they break and empower.
- Sticky Web: Heroic only? Targets players with a slowing effect. Run out of raid to get dispelled, or it will spread.
- Adds: Kill priority = Parasite > Worm > Spider
-
- Parasite: Hatches from Small Eggs. Fixates on a player, infecting them if they reach the target, causing two more parasites to spawn. Kite them through the kill zone, slow, stun, and root. Emergency Murder. When empowered, gains a speed boost.
- Worm: Hatches from Medium Eggs. Cannot be repositioned. Interrupt every cast of Poison Burst. When Empowered, cast speed increases.
- Spider: Hatches from Big Eggs, needs to be tanked. Does more damage the longer it is alive. When Empowered, applies healing debuff to tank.
- Egg Order
We’ll be moving clockwise, starting from the top section, which is yellow in this map.
1. Yellow Tridrant* (extra Spiders)
2. Pink Tridrant (extra Worms)
3. Blue Tridrant (extra Parasites)
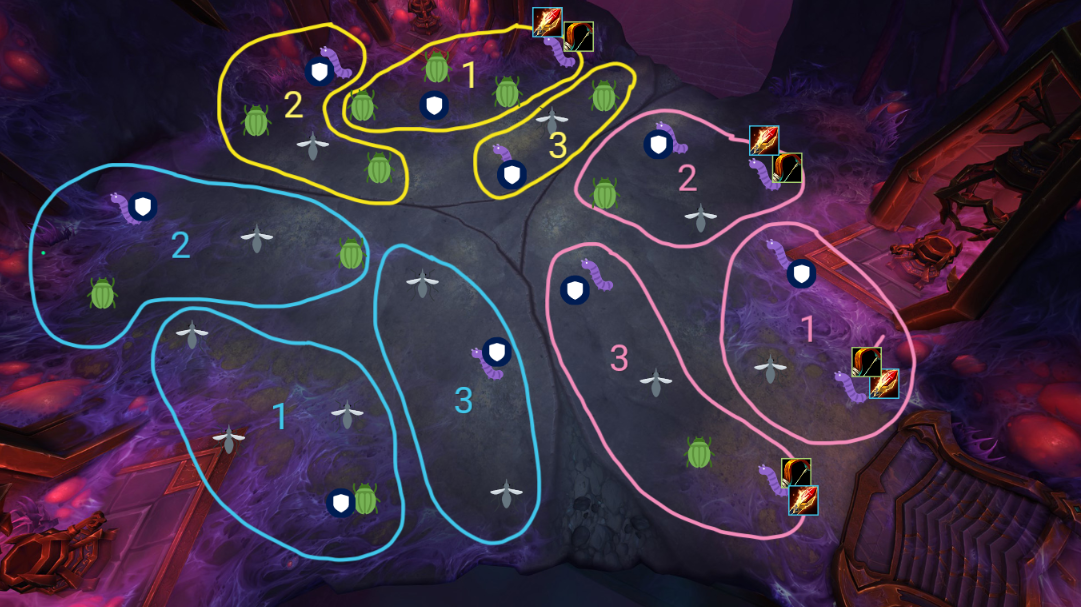
*Note, this is not a real word. Except that I made it up. So now it is.
Rasha’nan
Rasha’nan
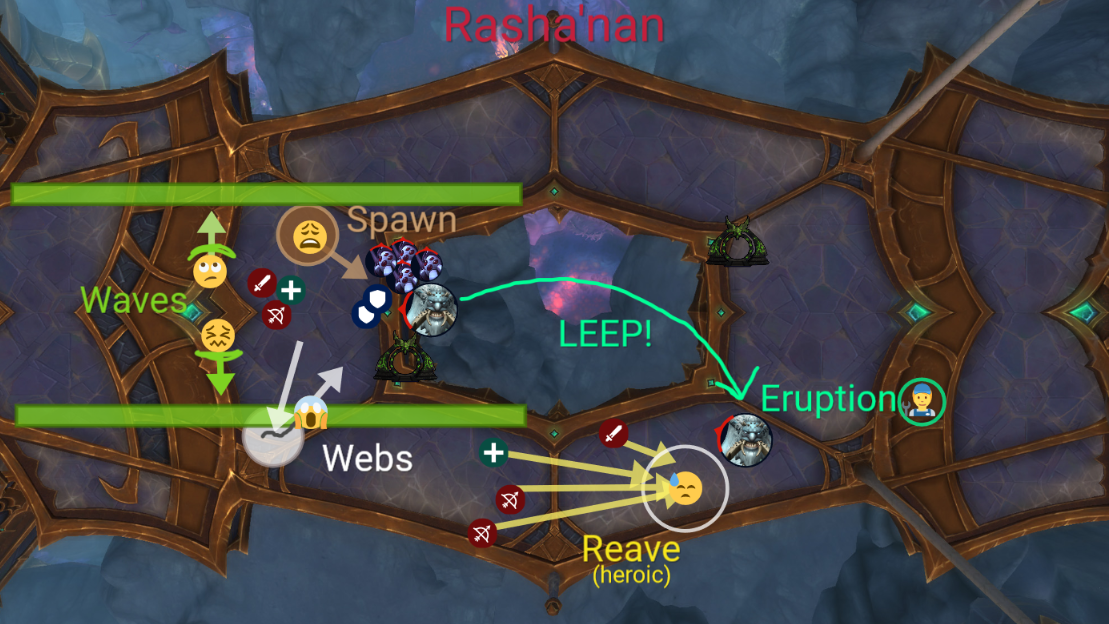
Single Phase: Stay grouped, stepping out of raid to handle mechanics, and chase boss after each jump. Hero on pull.
- Savage Assault: Tank swap. Pre-mitigate and swap after each cast.
- Rolling Acid: Two players become Right or Left Wave points. Flank the raid to spawn the waves correctly.
- Spinneret’s Strands: Targets will spawn webs, run out and drop these to avoid splash damage. Run back in to break the tether, each break will deal raidwide damage.
- Infested Spawn: Targetted players will spawn adds, group up and kill them in meleebut don’t overlap to avoid splash damage on spawn. Adds bite their target, this stacks.
- Acidic Eruption: Boss leaps away, chase her and interrupt stacking damage as soon as enough people are there . Use speed boost to get there in time for soaking the Reave that will immediately follow.
- Erosive Spray: raidwide damage, stay grouped.
- Web Reave: Heroic only Meteor, pulls raid in, everyone soak.
Sik’ran
Sikran, Captain of the Sureki
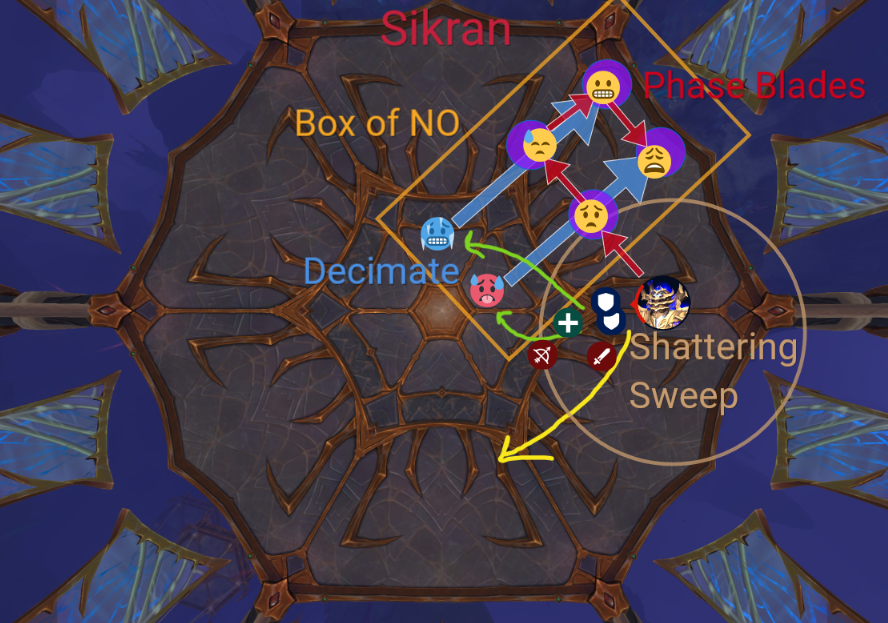
Single Phase: Positioning and awareness fight with heavy ramping damage. Hero on pull
- Captain’s Flourish: First tank takes both casts of Expose, second tank taunts right before Lunge.
- Phase Blades: Charges at 4 targets, leaving copies behind. Run out and make rectangle. Anyone hit by the charge leaves an extra Simulacrum!
- Decimate: Beams cast on players, happens after Blades. Try to position your beam to take out the Simulacra, not each other. Deals Raid damage.
- Rain of Arrows: Swirlies to dodge, may complicate Decimate positioning.
- Shattering Sweep: Giant cleave, run out and reposition raid clockwise. Destroys Simulacra, dealing extra damage.
- Cosmic Residue: Puddles left behind from Simulacra, AoE and DoT damage from each puddle. These are permanent.
Bloodbound Horror
The Bloodbound Horror
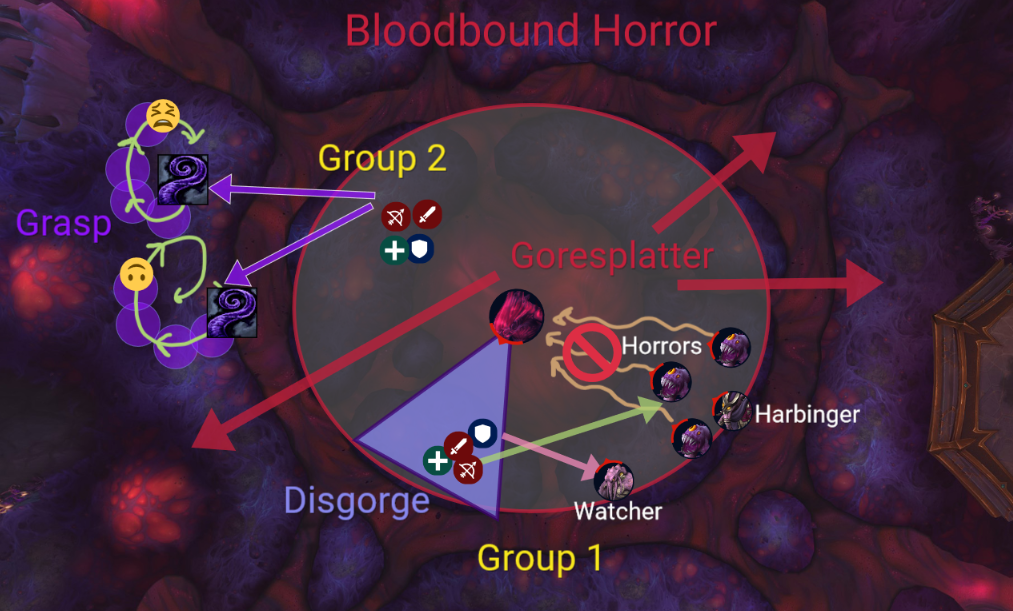
Real World: Split raid into two even groups, Hero on pull.
- Gruesome Disgorge: Frontal cone, targets/follows tank. Aim at add portals, stack inside to switch realms.
- Grasp from Beyond: Tentacles target random players for 12 seconds. Run out, make Leisa Circles.
- Goresplatter: Cast at 100 energy, deals fatal damage to center platform. Get to edges.
- Crimson Rain: Raidwide heal absorb.
- Spewing Hemorrhage: Heroic only. Counter clockwise laser cutter beam. Chase it, don’t let it chase you.
The Upside-Down: Alternate groups each time due to debuff.
- Blood Horror: kill before they get to boss or they explode, first kill target.
- Forgotten Harbinger: summons Horrors, kill second.
- Lost Watcher: Casts Bulwark on boss, tank and interrupt, kill last.
- Spectral Slam: Watcher hits tank very hard.
Ulgrax the Devourer
Ulgrax the Devourer
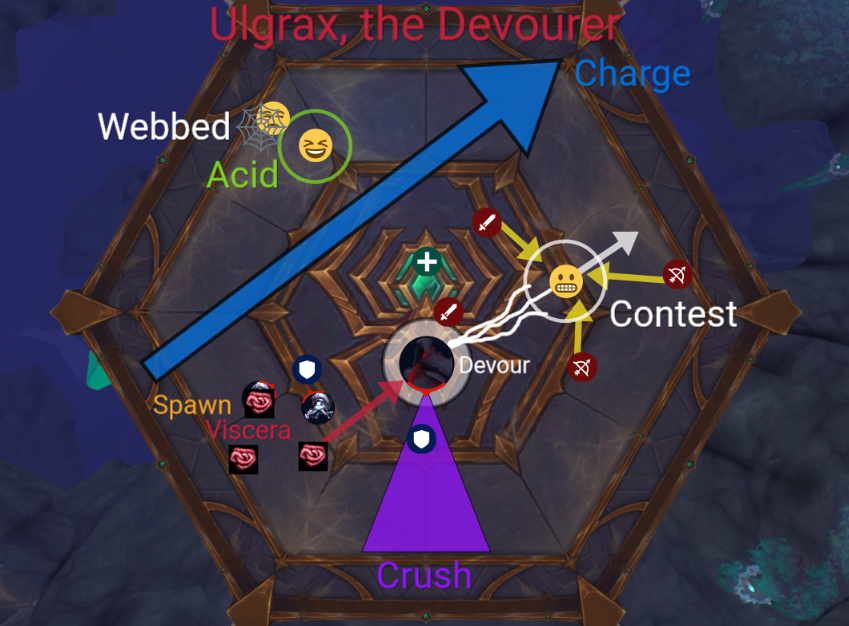
Phase 1 (100 – 0 energy)
Tank boss facing away from raid. Hero at the top.
- Brutal Crush: Frontal cone cast on current tank, reduces healing, Swap every cast, pre-mitigate.
- Carnivorous Contest: White circle centered on raider. Everyone stack, don’t get pulled to boss.
- Digestive Acid: Green circles on raiders, use to remove webbing from floors and raiders.
- Venomous Lash: Knockback and raidwide damage.
Phase 2 (0 – 100 energy)
Boss is immune and untankable. Gather and tank adds, burn them down.
- Ravenous Spawn: Adds, must be tanked and killed to feed boss.
- Juggernaut Charge: Charges across room, dodge this.
- Swallowing Darkness: Giant circle centered on raider, run out.
- Chunky Viscera: Dropped from adds, gather and bring to boss using extra action button.
- Hungering Bellows: Ramping AoE damage through phase.
Gnarlroot
Gnarlroot

Quick Strat:
- Tank Swap: Dreadfire Barrage, (Shadow Spines)
- Healers: Raid damage on Lasher spawn
- Dodge: Shadowflame Cleave, Flaming Pestilence, Toxic Loam,
- Run: Controlled Burn, Ember Charred, Splintering Charcoal
- Hero: End of an Intermission
Expanded Strat:
In general, Gnarlroot is about managing adds and running fire over things. So, basically, burning trees. (What a delightful way to start off when meeting our new home. A tree. To replace the one th.. yeah.) Keep boss central, spawn bad stuff in the compass directions and use Hero at the end of an intermission.
Phase 1:
Tanks will be positioning the boss to control the spawn locations of Tainted Lashers, these always appear in a cross-formation based on boss facing. Every time the Lashers spawn, there’s a pulse of raid damage with a DoT healers should be ready for called Tortured Scream. Gather them up, crowd control and AoE stun these guys, because they do a stacking debuff when they hit you and we don’t want tanks getting too many of these. Lashers also buff each other within 15 yards, eventually becoming immune to CC.
Controlled Burn is going to be similar to the puddles we had in Kazzara, on Normal you just need to run it away from the group to drop the Scorched Earth. In Heroic you’ll need to drop it in specific places to activate and kill the Lashers, which will be dormant when they spawn until they get hit by the fire. Ideally you will place the four puddles in the cross locations so that the next adds will spawn directly in the fire.
Shadowflame Cleave is a cone that targets any random player, watch for the purple cone and run out of it. Dreadfire Barrage is a two second channeled cast that targets tanks and increases their damage taken from Shadowflame. Wait for the barrage to finish, and then taunt off each other.
Intermission:
At some point, Gnarlroot runs to the middle and begins Doom Cultivation, making him functionally immune. He gets a Toxic Loam field at his feet, so avoid the boss during intermission! If you missed any inactive adds, they will becaime active automatically now, and should be killed quickly. To get him to phase, we need to burn all the Doom Roots around room by using the Ember Charred stacking damage debuff that you get from soaking a Splintering Charcoal puddle. This can be a bit healing intense! When the Roots are gone, Gnarlroot enters Uprooted Agony, a 20 second channel that makes him vulnerable, so save all burst cooldowns for this! After the channel finishes, he returns to phase 1, having empowered himself with a Rising Mania stack to increase his damage.
Fight repeats until death, Hero will be on whichever Agony is most advantageous, probably the last one we anticipate having, or the one our cooldowns line up best with.
Igira
Igira the Cruel
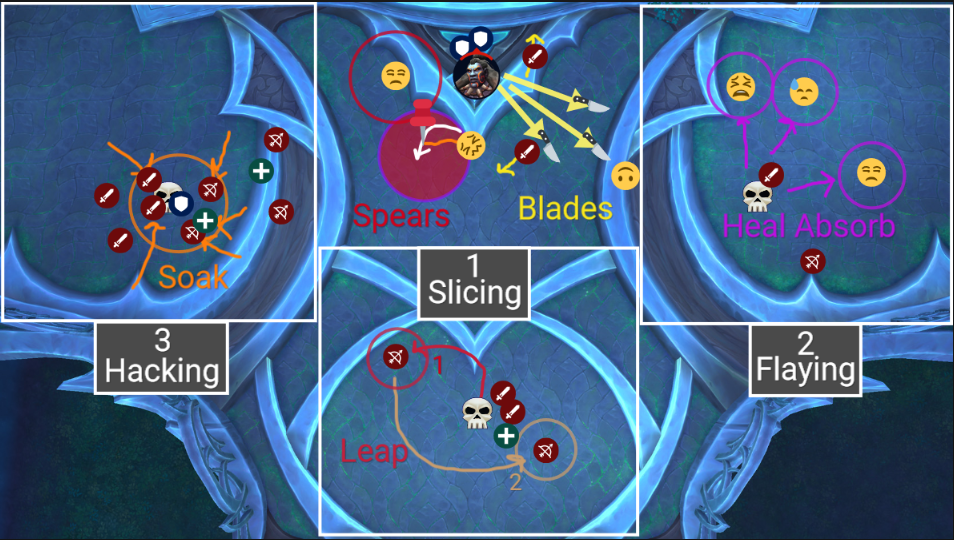
Quick Strat:
- Tank Swap: Drenched Blades (6?)
- Healers: Cooldowns on Heal Absorb phase
- Dodge: Twisting Blades, Searing Sparks, Leaps, Devastation, Vital Rupture
- Weapons: Spear = Tether, Slice = Leaps, Flay = Heal absorb, Hack = Soak
- Hero: On pull
Expanded Strat:
Igira is theoretically a one phase encounter with an intermission, but following each intermission she gains new abilities. Sounds like four sub-phases to me. Regardless, Tanks should stick right on her together to avoid murdering the melee, Ranged should always position near the next weapon to be targeted with the melee standing opposite. Burn Spears on sight, dodge everything else. Hero is on the pull.
Phase 1:
Tanks need to stay together for this one, as she will be hitting a secondary target with Vicious Swing and we don’t want that person to be Armas. This will leave a Drenched Blades debuff on the active tank, and should be swapped off about every 6 stacks, or when the previous debuff is gone.
Twisting Blades will target Melee and fly straight out, try to avoid standing right in front of a healer. Blistering Spear, meanwhile, will be targeting the Ranged, and after the cast those players will be rooted and cause a ten yard splash puddle. Trying to leave the fire will cause you to be yanked back in and stunned, so all players must destroy the pinning spears quickly to free the targets. Stacking spears is an option, but a dangerous one, let’s hold off for now. After two sets of Spears, Igira will reach 100 energy and go into her Intermission.
Intermission:
Intermission starts with a knockback, and then three weapons will appear in set locations across the room. Ranged players will already have positioned beside the weapon we’re going after. The order we’ll try for is Slicing, Flaying, Hacking. The weapons each have a Gathering Torment puddle around them, and soaking that puddle activates that weapon for the next phase, replacing the Spears mechanic. Meanwhile we have Searing Sparks going off just to give the healers something extra to do. These claim to be unavoidable, and yet ask that you avoid them. My guess is it has raid damage followed by puddles, and the puddles can be avoided (hah, but see below) and the raid damage cannot.
Our job here is to dodge the fire puddles while standing in an ever-shrinking circle around the weapon of choice. The area around that weapon is going to be covered in spark puddles making standing impossible the smaller it gets. We may need to Turtle this? Dart in and out as necessary, because if we soak NO weapons, it’s a wipe. Once we soak a circle, she’ll give herself a Harvest of Screams buff and go back to the first phase, only this time with her new weapon. It indicates that she will use each new weapon twice, and then return to throwing Spears, so we’ll need to see if that means four rounds between each intermission.
Weapon Properties:
- Slicing: Slicing is Alienny Leeps. The boss will target the furthest player with a ground circle, and then LEEP to that location. Don’t still be there when she lands. She then picks another furthest player, does the same thing, and then heads back to her tanks. Every time she Leaps, she causes Devastation, shooting fire puddles across the room that need to be dodged. It is helpful to bait her with ranged to control the jumps.
- Flaying: Flaying is Heal Absorb. Half of us will be marked with circles, these players need to spread out and cannot stack for heals. Healers have 15 seconds to get the shields off of everyone before they start exploding. Successfully healing the shield will also cause them to explode! Vital Rupture will cause orbs to spawn at the victim’s location, so no hugs please. This ability ignores tanks by preference, but can target them if not enough players are alive, be warned.
- Hacking: Hacking is Meteors. Raid needs to split evenly in two and alternate soaking the Umbral Destruction with the tanks. Each time you soak, you gain Brutalized, which prevents you from soaking again until it wears off.
Council of Dreams
Council of Dreams
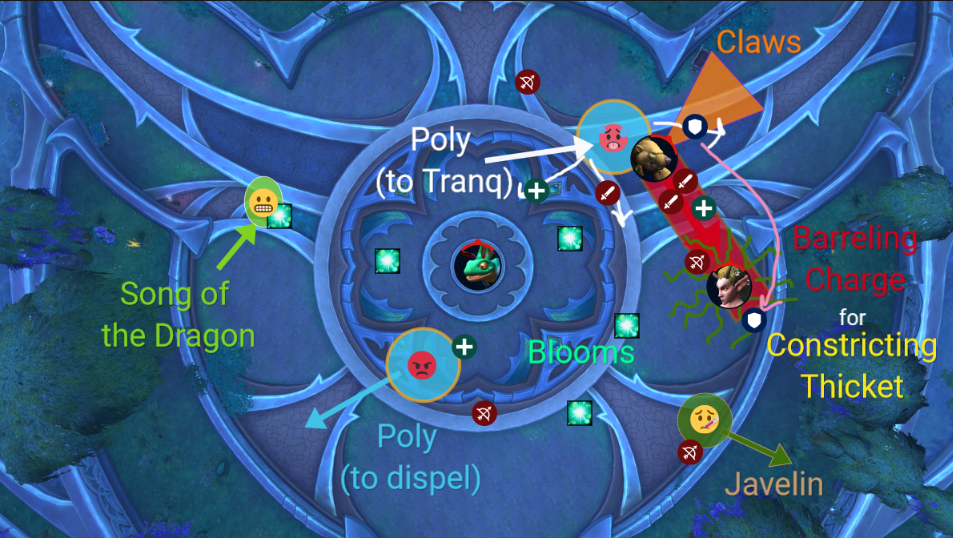
Quick Strat:
- Tank Swap: Agonizing Claws
- Healers: Top people off before Song
- Avoid: Flowers, Cleave, alternate Charges, other Raiders
- Dispel: Javelins (once clear), Polymorph (self-only)
- Hero: On pull, target = Pip
Expanded Strat:
A council fight, as one would expect, all three bosses must die together. Most insulting fight ever. May just skip this one. Tank wherever you can get cleaves in, but never point the bear towards the raid. Hero right away and attack the faerie dragon with prejudice.
Phase 1:
Three bosses, must die together within 15 seconds or they will rez each other back up to 50%. They do not share health, so we’ll need to watch and make sure they are going down evenly. Tanks will be dragging Urctos around the room to try to keep him stacked with Aerwynn for cleaves as she leaps around. Tank positioning is critical at the charge/Vines combo, so make sure you watch for that! The third boss, Pip, doesn’t care and just hangs out near the middle. Each boss has a special ability when their energy bar fills, and each of these has a specific counter.
- Urctos: Blind Rage deals raidwide tantrum damage for 20 seconds, increasing over the duration. Can be removed with… Preen. I don’t want to talk about it. If you don’t do it, we all die, though.
- Aerwynn: Constricting Thicket causes an 18-20 second raidwide DoT with a stacking slow effect. Interrupt the cast by running a bear over her face with Barreling Charge. If you do not run a bear over her face, we all die.
- Pip: Song of the Dragon is a raidwide absorb shield which apparently makes you just randomly dance while being on fire. Remove this by standing in a Noxious Blossom. You don’t get to die if you fail this. You have to stand there, stunned for 15 seconds, and feel deep shame.
Other abilities of note include the tank swap, Agonizing Claws, which is cast on Urctos’ tank, swap every cast. It’s a really heavy hit, so use your active mitigation for this one if you can. Neither melee nor the second tank should be in front because this is a frontal cone and hits anyone in the way. He also casts Barreling Charge, which has his fixate and then charge straight at his tank, stampling anyone in his path. This is a good thing, because at the end of the charge, we take raid damage from Thundering Impact, and the amount is reduced by the number of people he ran over. Raid will split in half and soak in turns, as we did with Dausegne owing to the fact that, once again, in Heroic you cannot soak two in a row.
Aerwynn will mostly just throw sticks at people, if you are hit with a Poisonous Javelin, immediately start running out of the group so that the resulting Unstable Venom doesn’t splash. Javelin can be dispelled, but again, make sure the person is out of the raid at least 10 yards before you clear it. Unlike with many fights, self dispels are encouraged once you are clear of the group. She creates Noxious Blossoms, we desperately need these to remove horrific effects, but don’t set up a summer home on them.
Pip, for his part, is literally the worst. He just sits there in the center being a nastyhat. He has a medium annoying Emerald Winds knockback but the real problem is that he will turn multiple players into hideous beasts with Polymorph Bomb for 12 seconds, removing all player abilities and replacing them with shame and indignity. Being serious for a moment: one of the two abilities you have will be to remove the polymorph effect. DO NOT PRESS THE BUTTON. It doesn’t just remove your poly, it poly’s everyone around you instead. There are exactly two ways you are allowed to use this button. One of them is to counter the bear boss tantrum. The other is if you are more than 7 yards from anyone else. I would be saying exactly the same thing if this turned you into corgis or unicorns or teethybats. Do not poly the raid for “fun”. Wiping all night because one guy wanted to get a good chuckle at the expense of 20 other peoples’ time and hard work is not actually funny. Except to that one guy. Who will have fun time looking for a new guild.
Now, if it were scorpids, though….
Anyway. The same 7 yard raid-wrecker will happen if the debuff expires naturally or if you remove it with Preen, so please, for the love of Elune and the Baby Naaru, watch your positioning. If you absolutely must troll your raid leader, use the other button to do it, don’t cost us a kill just to fry my fur. As a note, Preen is not immediately available, so if you are prepping it for a boss interrupt, you’ll need to have run over three flowers first to get the energy. Make sure someone who is Poly’d volunteers to save this ability to counter each upcoming Rage! And don’t poly the tank.
Nymue
Nymue, Weaver of the Cycle
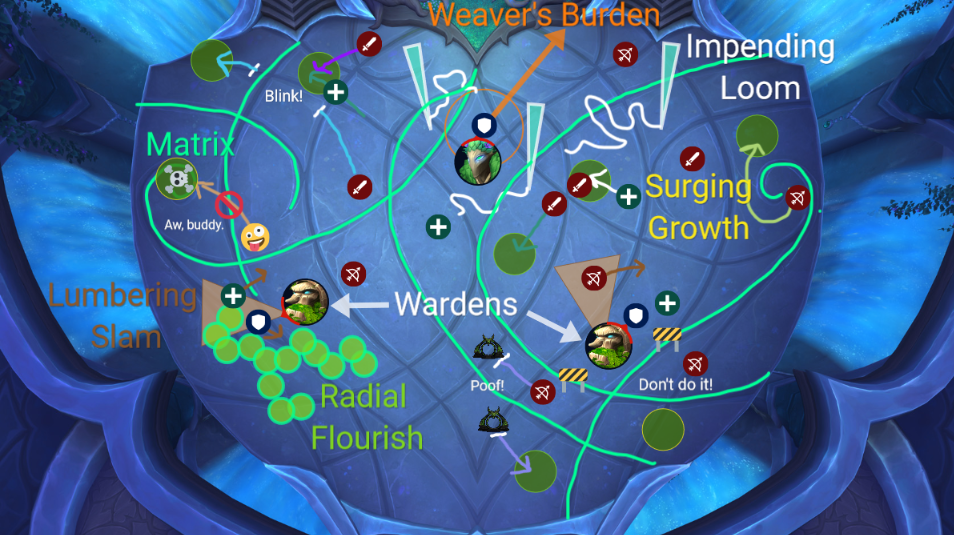
Quick Strat:
- Tank Swap: Weaver’s Burden
- Healers: Continuum needs group heals
- Dodge: Verdant Matrix, Impending Loom, Radial Flourish, Lumbering Slam, Barrier Blossom
- Soak: Surging Growth
- Hero: On the pull
Expanded Strat:
Nymue is another one phase fight with an intermission and a split raid, and their gimmick is the floor pattern which we try to cross as little as possible. Tanks will keep the boss and their respective Tree adds out of the way as we dodge and soak the things, and Hero is at the start.
Phase 1:
Tanks will be watching for the cast of Weaver’s Burden, swap when it is cast and you have 12 seconds to run away from the group towards the edge and explode. After the explosion, you do get a very short buff called Inflorescence which allows you to safely cross the lines… Nymue’s lines. Not the raid leader’s. You still may not cross those. On heroic, this will leave a Nature vulnerability for 30 seconds, and it will also target a couple non-tank innocent raiders. In addition, when the effect expires, the explosion will leave behind a cute little Barrier Blossom, that basically acts like the Shattrath bubble. It is fun to bounce off Shattrath. It is not fun to have our soak puddles trapped behind a barrier so that we can’t get rid of them, so make sure that you have run to the edges of the room if you get Burdened. It is also possible to use the Barrier to counter certain Matrix mechanics, we’ll explore this when we get there.
Puddles of Surging Growth will appear, these pulse nature damage for a full minute unless they are soaked, so naturally, we will want to do that. These are an “everybody in the pool” soak, not a “solo soak” type ability, so while people should spread out and get as many of them gone as possible, don’t hesitate to share them. They are NOT worth crossing lines for, so soak in your area but don’t go crazy. Lazy green laser lines will meander around the room; these are Impending Loom and just need to be avoided or you get a stun. Thanks for those, Juranzick.
Verdant Matrix is the floor line pattern the fight centers around, touching or crossing these lines will leave a stacking DoT. Consider blinks, teleports, and immunities if you need to suddenly dash across the Weave to soak something. But Alien shouldn’t try under any circumstances. Verdant Matrix is filigree.
Intermission:
At 100% energy, two Cycle Wardens spawn, granting Nymue a near-invulnerablity shield, Life Ward. Here, the raid will split, one group focusing on each angry tree. Wardens need to be tanked, but if they are allowed to trip on the floor lines, they do fatal raidwide damage from Verdant Rend. There is another swirly floor pattern called Radial Flourish, we want to carefully dodge that. Wardens also have a front cone, Lumbering Slam, which targets a random player and should also be avoided. More Surging Growths will spawn in Heroic, and need to be handled the same way. Be sure that you watch the floor and stay on the section you are assigned to so that we avoid unnecessary damage from the Matrix, until both Wardens are defeated and Nymue starts to channel their Continuum ability. Group up for heals during this cast as they change the floor lines and add new ones, this is a raidwide pulse damage lasting ten seconds, after which the fight repeats, only faster!
Volcoross
Volcoross
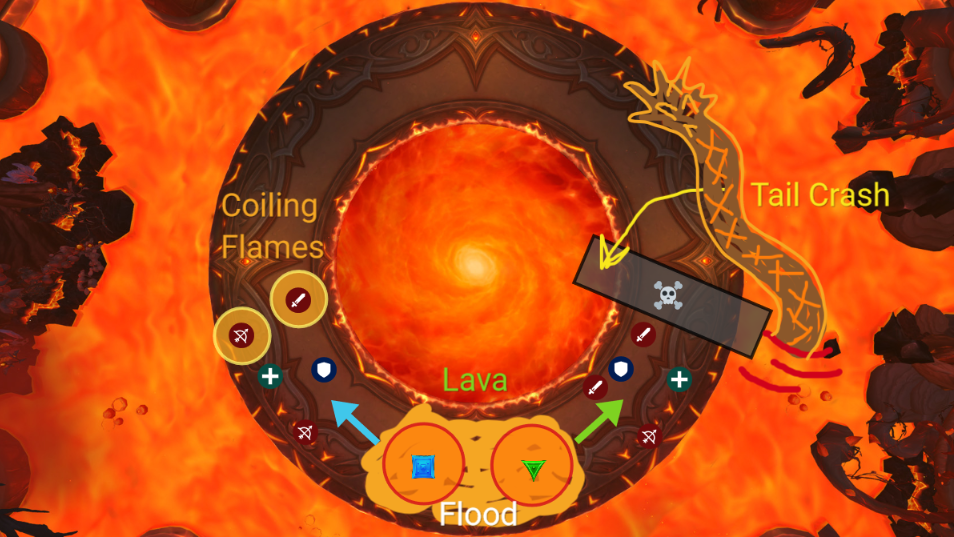
Quick Strat:
- Tank Swap: Cataclysm Jaws*, Molten Venom (2)
- Healers: Cooldowns on Serpent’s Fury, watch for Coiling Flames
- Avoid: Tail crash, Lava, Coiling Flames Tidal Blaze
- Soak: Flood of the Firelands
- Hero: On pull
Expanded Strat:
Volcoross is a single target, single phase encounter where we fight a big lava snek. His hitbox is really big, so no one needs to hug the edges. Raid is split in equal halves to soak, and we fight the forward facing head while dodging the backwards tail. Hero is on the pull.
Phase 1:
As we fight the boss, his energy bar will steadily increase, and at 100, he will throw two big puddles called Flood of the Firelands. Each half of the raid will be assigned a side, and will gather in these puddles to soak them. At least 4 people must be present, but we’re gonna go as a group. Afterwards, the puddle will simply become lava and knock people out of the circle sideways towards the direction your group will be soaking. Be careful you aren’t near an edge before the knockback!
Somehow, lava fills up the floor, and the next time we need to soak the Firelands puddles at 100 energy, we’ll be directly across the arena from each other. The guides really aren’t clear on how this happens, but it may be an ability called Hellboil which is also not explained other than the fact that it’s lava and meant to happen if the Flood is not soaked, and may be linked to the Serpent’s Wrath enrage that takes place once the room is entirely covered.
What we do know is that there will be a mechanic called Scorchtail Crash, where the snek raises his tail over a part of the floor, casting a large shadow. In a moment, he will smash his tail down on that location and kill anyone who hasn’t moved away. We’ve seen this before, watch for it and then move aside. It is best if you don’t stand too close to where the shadow comes down even once you’ve stepped aside, as on Heroic there will be Tidal Blaze waves that come out from either side and deal heavy damage if they clip you.
In addition, he will periodically cast Serpent’s Fury, which deals raidwide damage and gives four players the Coiling Flames debuff. Coiled people should step away, as anyone who stands near them will take splash damage, ramping over the ten second duration. Afterwards, the flames choose another target and begin the cycle again until the next soak.
Molten Venom and Cataclysm Jaws are the tank mechanics. Cataclysm Jaws is a channeled cast that hits whoever is tanking when the cast completes, not when it begins. This is important because Molten Venom will be stacking on the active tank, increasing damage taken from Jaws. Tanks should ensure they take as little extra damage as possible from the combination, either by taunting at 2 stacks of Venom, or by attempting to time the taunt such that the debuff lands on the new tank instead if the Venom tank. Tanks must always be in range of the boss, or he will kill us all with Combusting Rage.
Larodar
Larodar, Keeper of the Flame
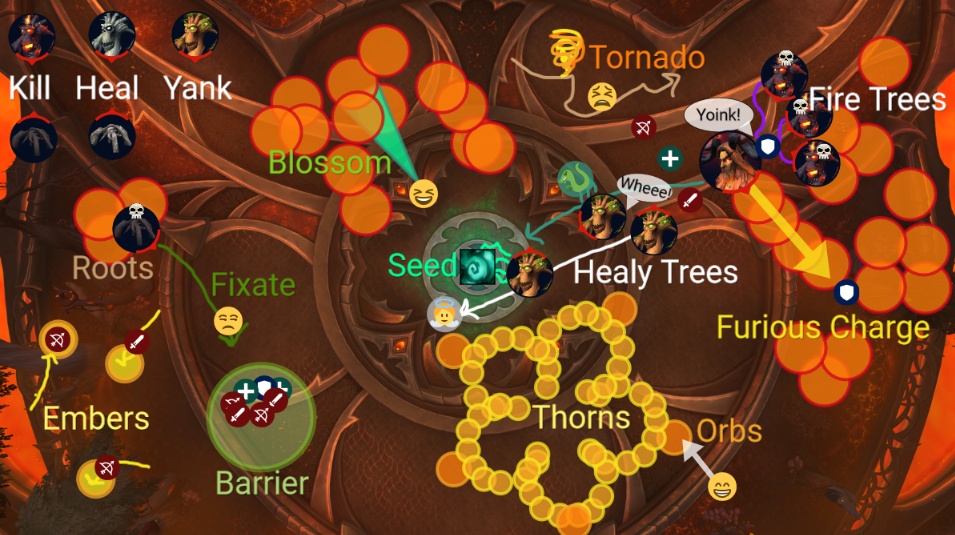
Quick Strat:
- Tank Swap: Furious Charge
- Healers: Heal Charred Treants, Charred Bramble (may need a cooldown), Intermission.
- Dodge: Blazing Thorns, Furious Charge, Raging Inferno
- Murder: Fiery Treants, Scorching Roots
- Interact: Blazing Coalescence, Seed of Life
- Hero: Top of Phase 2
Expanded Strat:
Larodar is a movement heavy fight with demanding heal checks, utility and add management often take priority. Tank the boss in the best possible bad spot, stay on top of cooldowns, especially in the intermission, and be ready to throw everything you’ve got at him when we Hero at the start of phase 2.
Phase 1:
The tank swap here is based around the Furious Charge mechanic, which targets the active tank with a four second channel, after which the boss will gallop at full speed towards the poor tank, crashing with a massive debuff, and a knockback, as well as direct damage which can be reduced by how far he runs. The new tank should taunt immediately after the Charge cast is begun so that the previous tank has time to run for the hills, especially important in Heroic where there is a Furious Outburst triggered upon contact, dealing raidwide damage which is again decreased by distance. The Charge tank should be as far from the raid as possible when hit. It also sounds like the boss is continually setting the floor on fire, and where possible try to stack the Burning Ground to make it easier to move and easier to clear.
Fiery Treants spawn, these need to be gathered on the boss for cleaves, interrupted, and killed so they can’t cast Fiery Flourish, a 12 yard damage burst.They do leave DoTs on anything they hit, and when theywalk around or die, they leave puddles. Once we kill them they turn into poor helpless Doolans, and need to be healed up so they turn from Charred Treants into Renewed Treants. Once Renewed, they will help us by meandering over and channeling into the Seed, so keep them active, and keep in mind these are Classic WoW Trees. So, if you wanna speed things up.. LifeGrip them to the Seed. Yes, for real. Have you ever played Resto in Vanilla? If you know, you know.
Seed of Life is a mechanic that allows us to put out fires, and we’ll need this ability so we don’t run out of floor, but in Heroic, there will be a debuff to stop the same person from using it every time, so we’ll need a rotation…three people may be enough?. If you have ever cleared Boss Moss, this is a job for you! Click the Seed as soon as the first Scorching Roots spawn, and hit them in the face with it. Then use the Seed to put out as much fire as you can without breaking your tether. The next raider should do the same as soon as it’s available. There will also be Blazing Thorns where the boss draws a pretty flower spiral on the ground, make sure to dodge this. When Thorns turn into Blazing Coalescence orbs, you need to stop dodging and get these, because every Orb that gets back to him increases his fire damage. Also soaking them gives you a crit buff, so yes, fight over them.
Scorching Roots will try to fixate you, run away from it while other people burn… Maybe not the best choice of words. Burst. While other people burst them down. Emergency Murder. If they catch you, you’ll need a Dispel! On heroic, these will be immune to damage until they have been hit by a dream blossom.. Which seems to be the thing we channel from the Seed. They also leave fire behind as they walk. When these die, they also turn into Charred Bramble and need healer love because at 100 energy, Larodar will cast Raging Inferno, and if we haven’t healed the Brambles, then we will have no Bramble Barrier to stand in, and you can imagine how that will go. Run to the Barrier to reduce the Inferno damage by 90%. Or die. You might die anyway; this is not an immunity, merely a mitigation. After three Infernos, Larodar will begin the intermission.
Intermission:
After the third cast of Raging Inferno (or when the boss reaches 40% health, whichever comes first), we hit the intermission. (If you wanna try to Denathrius it, you can delay the 40% until after the third Inferno is cast to get free health percent down, but really, are we gonna be that precise?) Larodar starts to pull everyone towards his position with Consuming Flame, and we naturally do not want to cooperate, so run away. Protip: when any boss says come closer and burn, you do not want to listen to him. Be spread out at least 3 yards for this, and prepare for fast, heavy damage. Dodge everything and use cooldowns to stay alive.
Phase 2:
This is the start of our soft enrage, therefore it is also where we’ll use Hero. Any fire on the ground is there for good, the Seed is inactive now, and we will be taking stacks of Searing Ash to ramp up damage the longer the phase lasts. Falling Embers will begin to rain down, make sure that we soak these because unsoaked Embers will do raidwide damage. Dodge the Fire Whirl tornadoes, Reylana, and healers should watch for the Flash Fire debuff that gives players a heal absorb followed by an 8 yard splash damage. If the absorb doesn’t get removed, the player will get stunned by Encased in Ash and require a Dispel. Tanks will meanwhile be managing the Smoldering Backdraft, which is a frontal cone so positioning here will matter. After the hit, trade off and go stand with the melee to siphon the power of Alien, because healers will not be able to outpace Smoldering Suffocation on their own. Everyone should keep an eye out for Ashen Treants, CC and kill them around the edges of the room or any time you can lock them in a fire. These do explode on death, and the floor is already covered, so ranged should swap to these asap. Melee need to avoid the boss for this phase, as being within three yards is dangerous.
Smolderon
Smolderon
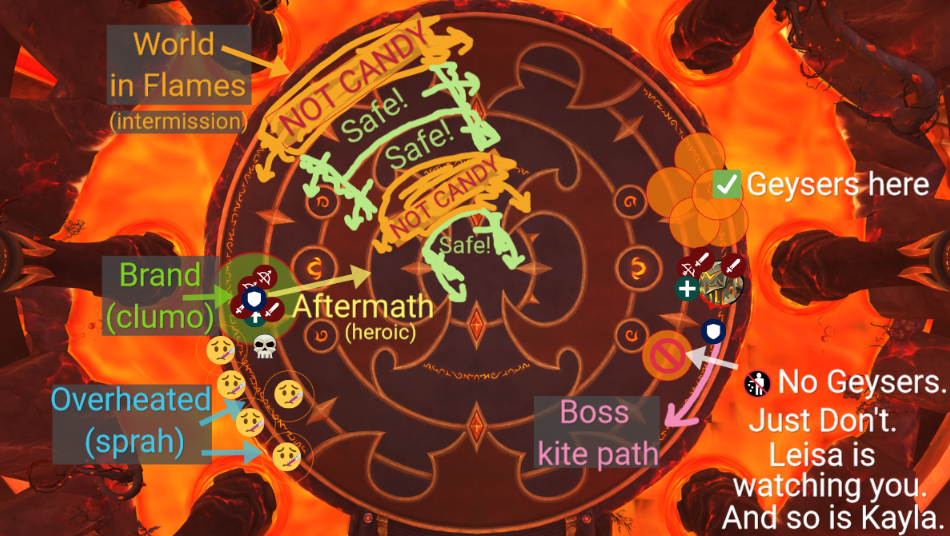
Quick Strat:
- Tank Swap: Brand of Damnation
- Healers: Cauterize (heal absorb), Heat gets worse in Intermission.
- Dodge: Lava pools, Overheated, Flames dance, Flame Wave
- Soak: Brand, Living Flames
- Run: Overheated, Aftermath
- Hero: Last Intermission, near 30%
Expanded Strat:
This is a fight where you move the raid clockwise around the room to stay out of the fire, similar to the first phase of Sarkareth, with a quick dance break in the middle. The entire raid moves around the tank mechanic, and Hero will be at the final intermission, close to his 30% health mark.
Phase 1:
There aren’t actually a lot of mechanics on this fight, but the ones he does have mean business and we have to get them right. The tank swap is actually central to the fight for everyone, as he will cast Brand of Damnation which impacts the whole raid; we all have a job to do. And no, I will not be yelling “Damnation!” for a call-out when it is cast, nice try Myrdd. So first off, he casts Overheated, which will target half the raid and everyone will have to either clumo or sprah. If we fail to soak and yet somehow manage to survive, we didn’t actually get away with anything: failing the meteor actually shortens the enrage timer. Harsh!
- If you are Overheated, spread out. You will be doing pulsing damage in a 5 yard range over ten seconds, after which you explode, dealing damage in the same area and spawning Flame Waves that deal damage and a knockback to anyone hit by them. You must not help soak with the tank.
- If you are NOT Overheated, you must stack with the tank to absorb the meteor effect of Brand of Damnation. After soaking, spread out at least 6 yards to avoid the splash damage when your Cauterizing Wound heal absorb is removed.The Brand tank will need to run farther in heroic due to Searing Aftermath, which will explode after 6 seconds.
The other mechanic (yes, there are only two) in this phase is Lava Geysers, which are simply fire pools that target player locations and clutter up our lawn with Smoldering Ground. We should all be hugging the boss immediately after dealing with the tank swap to bait these into a manageable area that we can then leave behind as we rotate the encounter just far enough clockwise so that our melee have somewhere to stand, as the fire puddles do not despawn.
Smolderon will do two rounds of Overheated/Brand before reaching 100 energy and starting the intermission, giving everyone a chance to soak that Brand exactly once. And you DO want to soak that brand, not just to save the tank, but also because… da-ta da! You get a buff! And since we know exactly who will be chosen for the second round you can even pre-position.
Intermission:
As intermission starts, there’s a knockback and anyone who was a good teammate and helped to soak now sneezes fire thanks to Emberscar’s Mark. Living Flame orbs fall out of your backpack, and if you grab them, you get a stacking damage and heal buff! If you do not grab them, Smoldy gets the buff instead. Don’t buff Smoldy.
While we’re collecting orbs though (no, you can’t steal mine, each person gets their own), we have to dodge the flame pattern on the floor, this is World in Flames, and will hit you for fire damage plus a DoT if you trip on it. It sounds like almost a Heigan dance, so watch your feet! I’m gonna need a warlock gate from the center to the edge though, because there’s no pattern to follow, it’s just blind luck and this punk may try to Dormazain us. >.< Basically though, it’s rings like Fatescribe and if the ring of the circle you’re standing in is on fire, don’t be there.
During this phase, the boss will be pulsing Blazing Soul, which is a buff to the Blistering Heat unavoidable raidwide damage that’s been going on the whole fight. After Intermission, we return to our little clockwise progress dance until we have run out of intermissions, or we kill the guy. Assuming we have failed no Brands, we have 5 Intermissions to get the job done, but only 3 in Heroic, and then time’s up. We’ll want to use Hero at whatever we think will be our final Intermission and somewhere around 30% health, but just like with Slushfish we’ll need to judge the timing based on his health and use it when we’ll get the most out of it.
Tindral Sageswift
Tindral Sageswift, Seer of the Flame
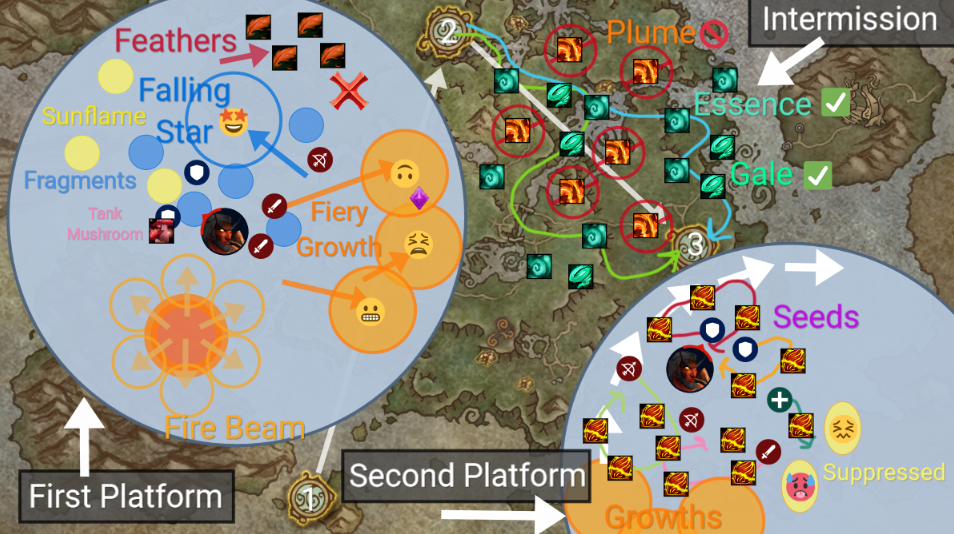
Quick Strat:
- Tank Swap: Searing Wrath (6?), Blazing Mushroom
- Healers: Dispel Growth, Suppressive Ember- absorb. Ability timers vary by phase.
- Run: Fiery Growth, Falling Star
- Murder: Roots
- Collect: Feathers, Dream Essence, Seed of Flame (DoT)
- Hero: Platform 3
Expanded Strat:
This fight takes place across three platforms which we fly between for each phase. Tanks will keep the boss central and we will move around him to cover mechanics. Hero is on the last phase, when we get to platform 3.
Phase 1:
The boss starts off on the first platform and we tank him there with the raid loosely gathered on one side of him. Tanks will be alternating two mechanics: the mushroom soak and the actual tank swap. Searing Wrath is your standard tanky DoT, aim to take 5-6 stacks, swap, and then trade off each time your debuff is gone. Meanwhile, the boss will be creating Blazing Mushroom which you need to soak, but naturally they have a debuff, so tanks will alternate who gets which. These are big, and very mushroom looking, and have a circle around their stem on the floor, you have three seconds to get yours.
The raid will all be grouped in a little arc nearby, dodging various types of fire. Three or four will get Firey Growth, and should immediately run to the edge of the room, spread out just a bit behind the group to get their dispels. Dispelling will leave a Scorching Ground on the floor, so we need to do two things, first ensure that we are making the best use of space and placing these compactly, and second that we are within range of our dispellers who will have a set rotation to clear these quickly.
Timing does matter here because to dodge fire we need to be able to move, and the boss wants to stop that with Mass Entaglement, a root with a 3 yard splash. Everyone should pile up in a tight sprah near the melee, packed in like little tic tacs such that no two people actually inhabit the same space, but it’s pretty close. Immediately after the cast, anyone who can break their own Roots should do so, and everyone should target and destroy the remaining vines, beginning with those closest to the boss and then working your way out. Not only is this the most efficient, as it targets the largest group of players quickly, it is also a very unsubtle trick by your raid leader to get you to group up, because if you don’t, you’ll be the last to get free. Not sorry.
Some folks will get a blue Falling Star circle, this one you just need to run out of the raid in whichever direction you please, and everyone should dodge the small Star Fragments that follow.
Lastly are his two Moonkin powers, Sunflame and Fire Beam. Sunflame is just raidwide damage, but Fire Beam targets the largest pile of people and drops a big pool that then radiates outwards in smaller progressive pools. There will be three of these at once on Heroic, so dodging is a bit dodgier and requires you to dodge harder. And never stand on the VERY edge, there’s a Flame Surge that’ll hit you out there.
Intermission (Flight Phase):
At this point, he will be fed up, do a Typhoon pushback and drop Empowered Feathers all over the floor, then fly off to the next platform. We each want to grab a feather and then manually mount up on a dragonriding mount and follow him. Your priorities are:
- Get to the next platform alive
- Avoid all Scorching Plumes, they deplete your flappy power and slow you
- Snatch up any Dream Essences you can on the way, this will buff the whole raid to a maximum of 10 stacks as well as giving you flappy power and a speed boost
- Fly through Emerald Gales wherever someone ahead if you caught an orb, you too will get flappy power and a speed boost.
…and then land and begin attacking the boss again as he channels Supernova for 30 seconds. If we break his cast, we go to phase 2, if we fail.. we die. Simple!
Phase 2:
This second platform is all about soaking the wee plants. Flaming Germination will cause a bunch of small bulb-like things to appear around the room, these are Seeds of Flame and we must run over all of them within ten seconds or they turn into Flaming Trees and kill us. In heroic, when you step on a seed you get a 6 second debuff making you take more damage from stepping on another, so watch your feet! The boss will also be casting Suppressive Ember, which is a heal absorb, and needs to be healed off as soon as possible.
Of course we still have all the normal phase one abilities to worry about, so watch your roots and your dispel circles, and we’ll want to take extra care to keep our puddles away from the boss and the boss away from the puddles, otherwise mushrooms spawn inside the fire and we don’t have enough paladins for that.
Intermission:
Same dance, but with more fire and more Dreams.
Phase 3:
Now he does all the things. Phase 1 and 2 abilities are all active, so use Hero and kill his face!
Fyrakk
Fyrakk the Blazing
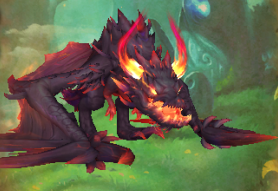
Quick Strat:
- Tank Swap: Fyr’alath’s Mark (2 stacks?), Infernal Maw
- Healers: Dispel judiciously, heal Kaldorei
- Dodge: All fire. Flame, Firestorm, Rend, Breath, Devastation, Blaze
- Handle: Orbs, Souls, Seeds
- Seeds: Carry to charge, Bloom for Roar, Don’t get hit!
- Hero: Top of Phase 3
Expanded Strat:
So the critical part here is that Fyrakk is a giant fire dragon thing, and he’s sitting on my new home. Which is made of wood. And if you wipe, it’s not “Poor brave heroes, they were mighty but now they are dead.” it’s “Amirdrassil has burned and now Fyrakk destroys the WHOLE WORLD.” So. That’s something to consider. Three phases and an intermission, Hero is at the beginning of the last phase.
Phase 1
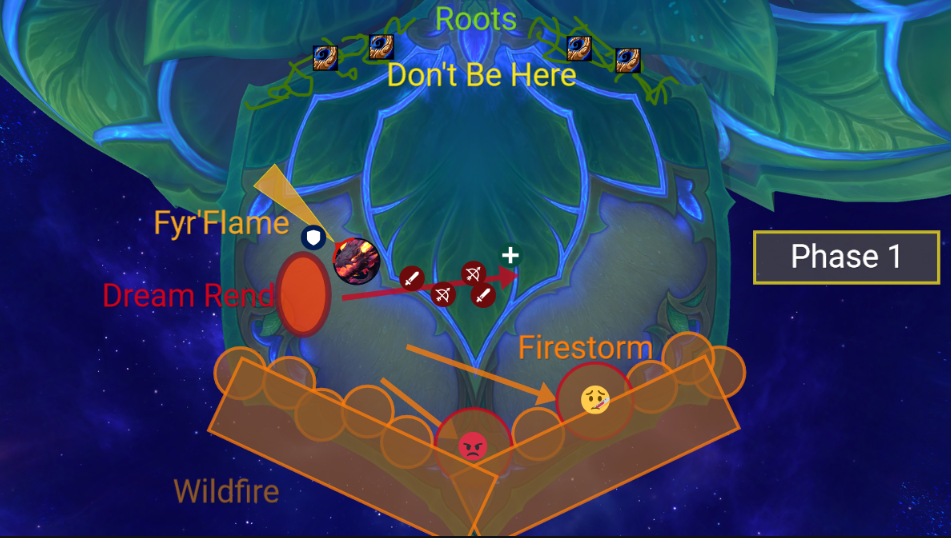
Phase 1:
Keep the Fire away from the Roots of Amirdrassil by never being anywhere near it yourself. Position on the furthest edge and move inwards only when necessary to keep the mechanics on the outside. Tanks need to face him away due to the Fyr’alath’s Flame cone, and swap at low stacks of Fyr’alath’s Mark. In heroic, during all phases you need to watch out for the Blaze debuff, which will explode after 4 seconds and fry anyone it hits. If you catch a Blaze, move out before it expires! It’s possible that Blaze can ruin our Ghostys, so watch that too.
Firestorm will drop 4-9 yard splashy fireballs on us which spread Raging Flames that try to burn the tree, never allow these to fall near the Roots of Amirdrassil. The boss tries to BITE the tree, causing Wildfire, this is raidwide damage and also leaves Raging Flames. Sometimes he claws the Dream itself, causing Dream Rend that does raidwide damage and creates a rift portal. The portal leaks fire damage, so get as far from it as you can and don;t fall in or you will be Incinerated. (And die). And meanwhile he’s busy with his Burning Presence, throwing DoTs around like we’re Onyxia, so watch out for people who have high stacks and get a dispel on them before it gets too much to handle.
Intermission
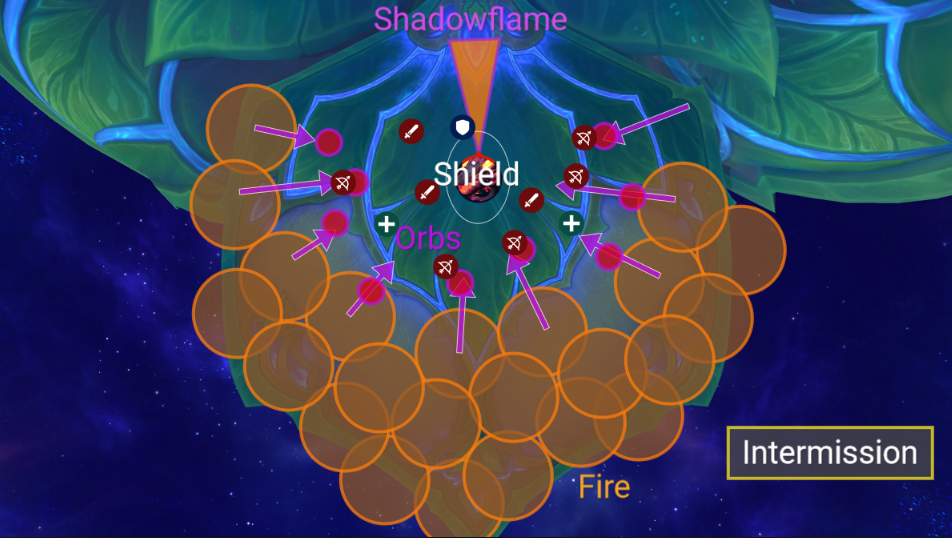
Intermission:
At 70%, we start the Intermission, where Fyrakk tries to Corrupt the Tree itself. He just stands there channeling a frontal cone of Shadowflame Breath, while hiding behind his barrier shield. We have 30 seconds to get that shield down, or he eats the tree. Of course we can’t just stand there and pew pew, we also have to worry about the Shadowflame Orbs that spawn from the fire puddles behind us. As long as we soak them all, we’re good, but if we miss any he eats em, and then we get a Shadowflame Eruption, which is another stacking DoT and heavy raid damage. If we do break the shield in time though, he stops messing around and goes into dragon form, knocking everyone back with a damage burst.
Phase 2
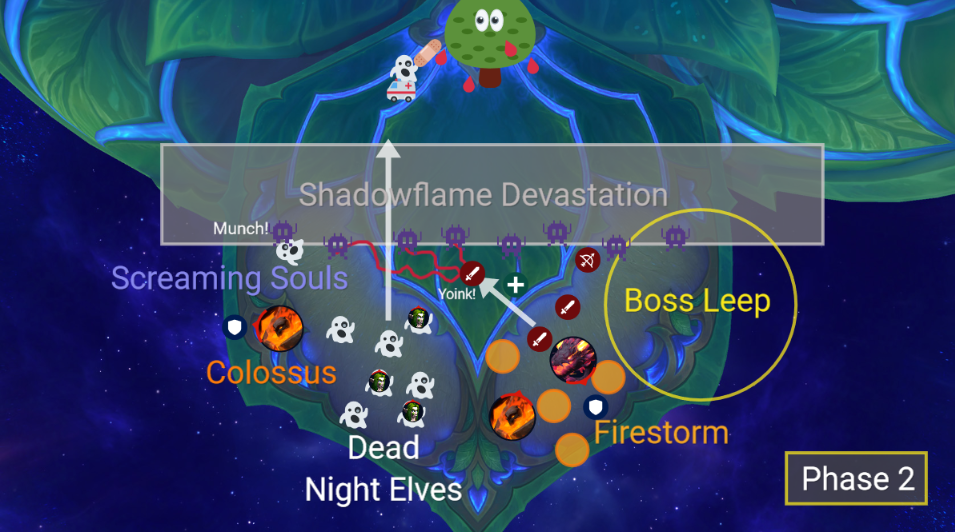
Phase 2:
Now in phase two, it’s not enough for us to just fight the boss, we also have to help ghosts alive so that THEY can die. The tree is bleeding energy; it’s not going to make it without healing, but alas! our healers are only mortal. Therefore little packs of ghostys will spawn on either side of the leaf we’re on, these are the Spirits of the Kaldorei, and they would like nothing better than to float over to the Tree and sacrifice themselves to heal it. The healthier they get, the more life they return to the tree, and if you manage to get them to full they gain a shield so the boss can’t just one-shot them on their way in.
He doesn’t want us to do this, so he throws Greater Firestorms down on us, this time with Burning Colossus adds in them. I think he pinched these from Melchezzar. These needs to be tanked, they pulse area damage, and they also need to die before their energy bars get to 100 or they Explode for heavy raid damage and a DoT. Fyrakk himself will also be playing Alien Leaping Games, and will occasionally zoom down from the sky and kill anyone he lands on, so move faster than he does. Damage taken is decreased by distance. And lastly, he’ll Deep Breath Moar, using his Shadowflame Devastation to sweep the platform and fry anyone in the way. This causes Screaming Souls, which have a two second cast called Searing Screams. This will damage all players, ramp up with each cast, and convert any nearby Kaldorei INTO Screamers, beginning the process all over, so kill them fast and keep them off our ghostys. I assume they can be interrupted, so please do.
Phase 3
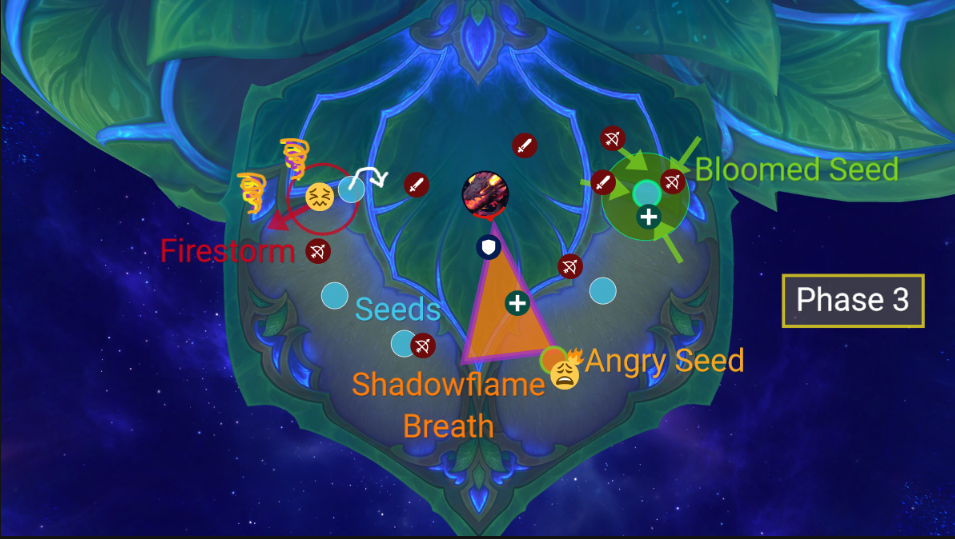
Phase 3:
Something causes us to move to the final phase, (probably Healing the Tree?) and here the Tree fights back. Use Hero here at the top while we still can. Amirdrassil will drop 6 Seeds that we can use as shields to prevent insta-kill abilities. The seed must be picked up by player and eventually it will Surge, allowing for a Bloom. Bloom is a shield that protects people in 9 yards by absorbing the fatal damage that would otherwise have gone to your face. But there’s a catch. If you are carrying a Seed waiting for it to Bloom, and you trip on any Shadowflame damage… you just broke the seed. Grats, hero, now it’s a Blazing Seed and instead of protecting us, it starts pulsing fire damage all by itself. Note that you can put DOWN your seed if mechanics are gonna get you in trouble, so keep that in mind.
As before, fire will fall on our heads, dealing splash damage and leaving behind a Swirling Firestorm (yes, it’s a tornado) to dodge; it’s best to drop these at the outer edge away from everything so Seedfolk don’t trip. Fyrakk will do an Apocalypse Roar, this is massive damage and a knockback and needs to be mitigated with a Seed Bloom. Right before the cast, if you use the Seed you can give us some nice lawn to stack in. He will still use Shadowflame Breath, a lethal frontal cone, so make sure you watch out for his face. And lastly Infernal Maw, this one is for the tanks. Swap at low stacks because it’s really high damage! Since we only have 6 seeds to save us from the Roar, we have to burn him down before we run out of Seeds.
Kazzara
Kazzara, the Hellforged
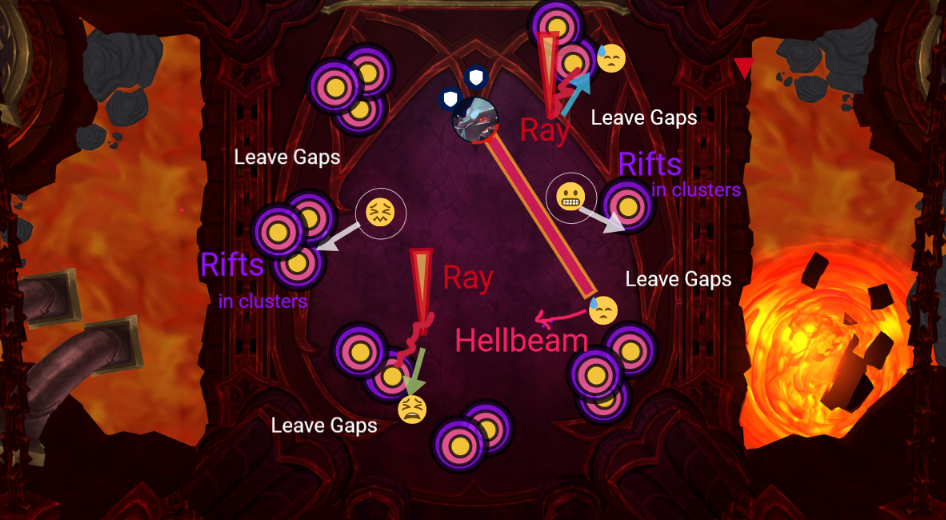
Quick Strat:
- Tank Swap: Terror Claws
- Healers: Wings, Claws, Fragments
- Dodge: Hellbeam, Fragments, Blood
- Kite: Rays into Rifts
- Hero: On the pull
Expanded Strat:
Kazzara is a single phase fight. Tank her where she starts, facing away to help dodge the Beam. She has no other frontal cleaves. Raid spread out loosely 5 yards apart behind the boss. Use heal cooldowns on Wings, and use Hero on the pull.
Phase 1:
Tank swap on every cast of Terror Claws, which is a standard heavy hit plus DoT and debuff . At 80%, 60%, and 40% she will deal heavy ticking raid damage and make Fragments to dodge. Marked players will drop Dread Rifts at their location, move slightly aside to place these and try to cluster small groups of rifts (3) into the same area to maximize space. Other players will be marked with an arrow, these need to kite their Rays of Anguish over a Rift in order to destroy it before it becomes Relentless. It is highly advised that you pre-position near a bunch of existing Rifts to facilitate this, as once the ray spawns it is too late to run; it already killed you. At 100 Energy, the boss will target a random player and shoot fire at them, this Hellbeam MUST be dodged by all players. Wings is a knockback with an initial raidwide damage burst followed by a small DoT, use healing cooldowns here and don’t get pushed into a puddle. Damage ramps up dramatically with each break point, so plan accordingly!
Amalgamation
The Amalgamation Chamber
(Molgoth)
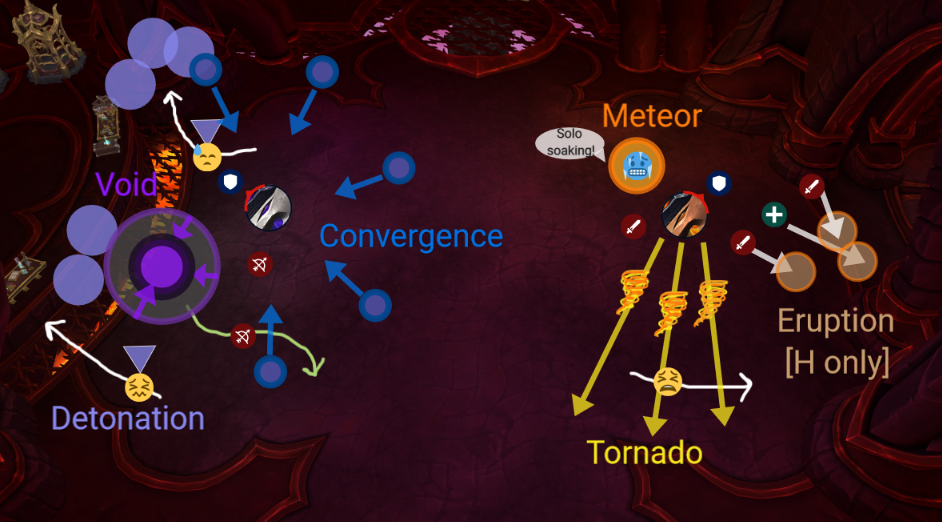
Quick Strat:
- Tank Swap: Crushing Vulnerability (p. 2)
- Healers: Gloom (40 seconds), Void, Eruption
- Soak: Meteor, Eruption
- Dodge: Fire, Shadows, Swirling Flame
- Run: Coalescing Void, Umbral puddles
- Hero: Phase 2
Expanded Strat:
This fight starts with two Eles. When either reaches 50%, they merge into the actual boss. Like Broodkeeper, we split into two even teams and avoid the other boss. Additionally, the two must be kept 25 yards away from each other or their abilities get buffed. Reduce HP evenly so both get to half at the same time. Phase one has the tanks start with one on each boss, taunting off each other periodically so that the bosses trade places in order to manage raidwide stacks. Hero is at phase two when the flames join and become Molgoth.
Phase 1:
Shadow: Stay away from Moltannia to avoid stacks of Blazing Heat. When Coalescing Void is cast on a player, run out to lessen damage. Run all Umbral puddles out to the edge to drop them, and watch behind you afterward to dodge the Convergence. Shadow spikes will hit the tank and stack, use an immunity to reset stacks when they are too high. This add is better for Ranged players.
Fire: Stay away from Krozgroth to avoid stacks of Corrupting Shadow. Stack up in the large ground swirls to soak Fiery Meteors, these can (and should) be solo soaked with an immunity when possible. Small swirls also need to be soaked or the raid suffers, this is just Kil’Jaeden all over again. Fire Tornadoes will target a “random” player, and zoom out that way, just dodge these. Flame Slash is cast on the tank and stacks, an immunity will reset this. This add is better for Melee players.
Whether or not we are swapping, it is important to watch their health and get them both to 50% at the same time!
Phase 2:
Use Hero and stack up for group heals, and keep the boss facing away from the raid to avoid being hit by the frontal cone. Shadowflame is also the name of the new DoT, and cannot be prevented, so being hit by avoidable attacks is the only way to keep these low. Gloom will replace the other meteor and needs to be soaked by everyone (or else solo soaked). It will leave a puddle when it is done that you must all immediately run out of. Umbral puddles have become Blistering Twilight, they need to be run out to the edge and will release Tornadoes when they hit. The small swirls from before still exist, and still need to be soaked, but when they impact they now proc the orbs from before, dodge these. The tanks get a new swap mechanic, Crushing Vulnerability, which will hit the tank and debuff them. Swap out whenever you are Vulnerable and ensure you are not hit by the next Shadowflame cone.
Experiments
The Forgotten Experiments
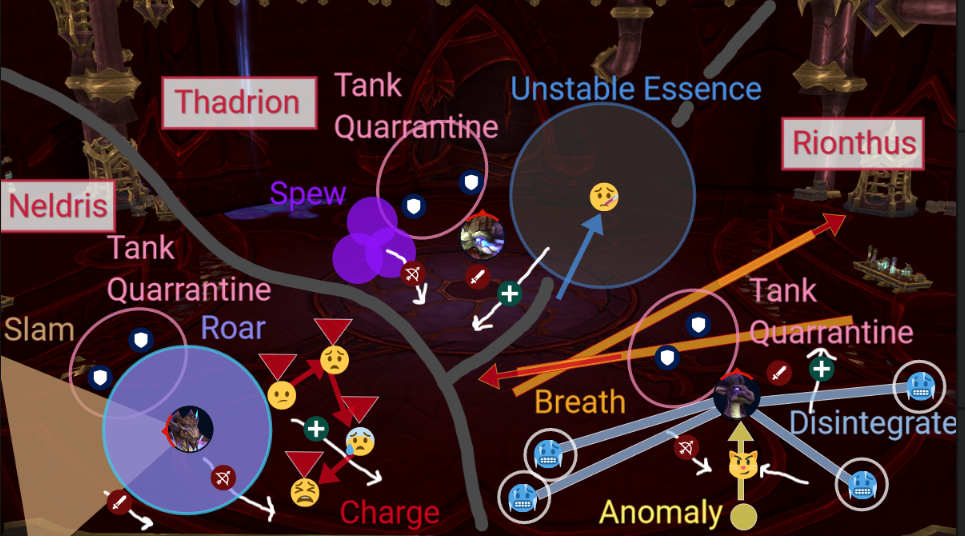
Quick Strat:
- Tank Swap: Infused Strikes (7?)
- Healers: Roar (p. 1, 30 seconds), Eruption (p.2, 45 seconds)
- Dispel: Essence at 15-20, but not during Eruption p. 3 Mass dispel, only when called.
- Burn: Remnants before Eruption
- Punt: Anomaly
- Dodge: Swirlys, Charge, Roar, Breath, Disintegrate, Breath
- Hero: Thadrion
Expanded Strat:
Like Huntsman, we fight three bosses in succession here, each new one steps in upon the death of the previous. Stay away from tanks. Tank will swap with an enthusiastic chest bump when their Infused Strikes are too high, and Heroism is used on the second boss, Thaldrion.
Phase 1: Neldris

Neldris:
Neldris will mark three players with red arrows and then Charge through them. Charge targets should head to the green flare and make a triangle, everyone else needs to clear out of there. Slam causes large cones in melee, get out of them. When she Roars, everyone should run away so they take less damage. Tanks will need to reset Infused Strikes somewhere around 7 stacks during gaps in the mechanics, as trading the debuff deals raid damage and a DoT. No one but the offtank should ever do this.
Phase 2: Thadrion
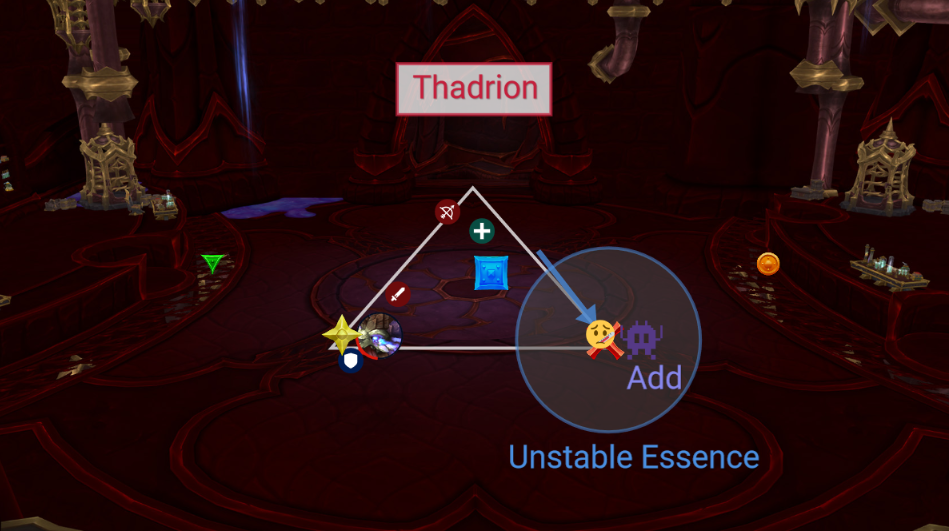
Thadrion:
Unstable Essence DoTs need to be dispelled, but not right away because it will simply jump and cause more Adds. Dispel as seldom as we can afford, maybe 15-20 stacks. Move towards the flare to get your dispel, but stay 12 yards away from the raid group and then stack boss on top of the add/s for cleaves. When Thadrion is casting Eruption, it is critical that no adds are present, or we will all take heavy raid damage. Make sure they are all down and do not dispel during Eruption. Spew just throws little swirlys around, simply dodge them. Tank swaps are handled the same way for this boss. Use hero at the start here to help manage the Essence problem and keep damage low, this is a priority burn phase.
Phase 2: Rionthus
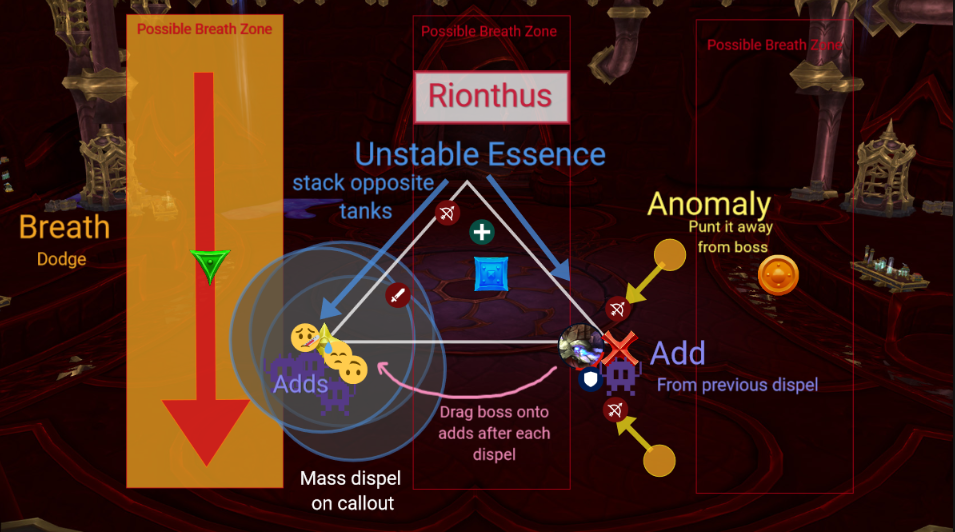
Rionthus:
Oh noes, it Deep Breaths Moar! Obviously, get out of the way. This happens twice each time it is cast, a straight line down one third of the room, and is pretty fatal. Finish any leftover adds from last phase and deal with new ones. These are not the biggest priority anymore but they do still cause raidwide damage if we don’t manage them. Unstable people should stack on the flare and get a Mass Dispel which we will call for, ensuring that Adds all spawn at the same time and in the same place. Note, the stacks will be uneven the first time, this is intentional. Move the boss on top and kill them, while the next Unstable party assembles on the flare the tanks just vacated. Tanks and Dispels alternate flares each time. Then there’s a dodgeball Anomaly to punt. It tries to get to the boss, you need to intercept it, like with Walking Hal, or he gets a big shield. Disintegrate beams target several players, causing damage, then 16 seconds of splash damage of 5 yards and a slow, avoid these guys. Tanks are still trying to time their swaps to not coincide with anything deadly.
Zaqali
Invasion of the Zaqali

Quick Strat:
- Tank Swap: Cudgel
- Healers: Barrier (p. 1, 50 seconds), Slam (p. 2, 35 seconds (25?))
- Burn: Barrier (Mystic)
- Dodge: Arbalest, Cudgel, Rubble, Leap, Spear, Roar, Volcanic Shield,
- Kill Priority: Mystic > Guard > Huntsman > Boss > Climber
- Soak: Slam
- Hero: On pull, or on Phase 2
Expanded Strat:
In this fight we need to hold the door. Waves of adds are trying to break in, and if they succeed, we lose! Raid will be split into two balanced teams, and fight on separate platforms until 25%, when we defend from the center again. Hero is either on the pull, or on the last phase when he finishes channeling.
Phase 1:
We start the fight in the center, fighting the boss until he Leaps away, at which point we split into our two platform groups. Stack up all the adds and cleave them down as soon as possible. Cudgel is cast on the current boss platform’s tank, a frontal cone that also creates a bunch of Rocks that we can use to throw at adds. Carry them towards the red flarey columns and use the extra action button to throw them off at the climbing invaders. For each rock location, one player must throw one rock, otherwise the rocks are wasted. At 100 Energy, the boss will switch sides and repeat this process. Make sure no one is in the center of the platform where he is landing, and dodge the lines created by impact.
Adds: These will aggro on the closest player until they are tanked, so healers should avoid the edges of the platform if they don’t want friends.Stun, kick, interrupt and yank these guys to help your tanks out whenever possible, because there are a lot Mystics summon a barrier that needs to be burned immediately. They also have a dispellable Magma DoT and an interruptible Lava Bolt. Huntsmen only throw spears, dodge these as well as the puddle they leave behind. Guards will Roar, causing area damage, and shoot out Shield beams towards a random player that hit anyone in the line. Wallclimbers must be intercepted and tanked, or they will run straight to the door and wipe us. Any time the door is hit, it causes a permanent stacking DoT.
Phase 2:
At 25%, the boss will jump back to the center, where he will immolate and gain pulsing raid damage while he heals himself. The Cudgel is still a cone, but now it makes fire instead of rocks, so watch out. Everyone should drag all remaining adds together and stack up so we can burn it all down. At 100 energy, he will also start trying to break the door himself with Slam, and we stop him by all (at least 8) of us standing in it, so be careful. Groups 1/3 should try to soak the first of these, 2 and 4 should get the second.This will, naturally, damage everyone standing there and give us a vulnerability to soaking a second one. We just need to finish him off before he wins.
Rashok
Rashok, the Elder
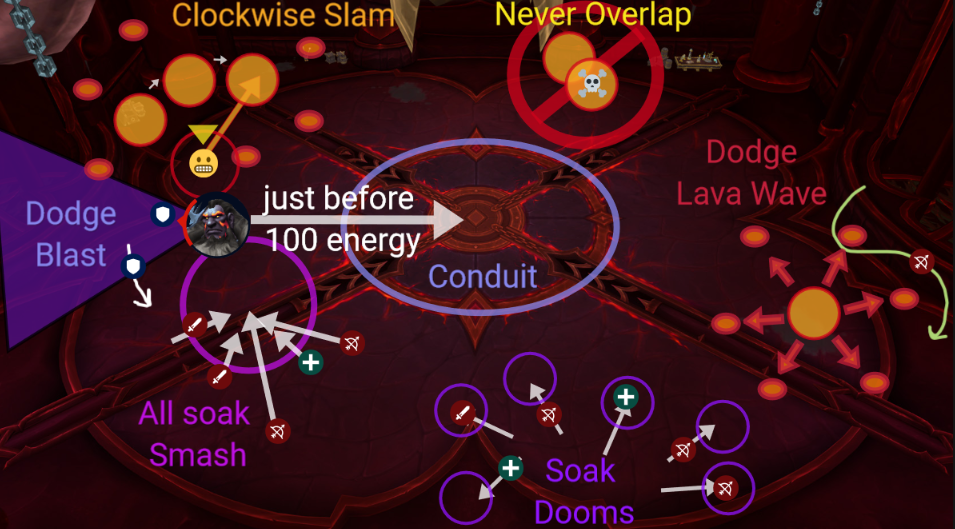
Quick Strat:
- Tank Swap: Earthen Crush/ Flaming Slash
- Healers: Heatwave (every intermission, just over 2 min), Doom Flames (2.5 minutes), Searing Slam (35 seconds)
- Dodge: Lava Blast, Waves, Shadow Lines
- Soak: Doom Flames, Charged Smash
- Enrage: 100 energy. Don’t let it happen
- Hero: On pull
Expanded Strat:
Rashok is a single phase encounter with a repeating intermission. Fight the boss at the side of the room and drag him back to the center when he gets near 100 energy for the intermission. If the boss ever reaches 100 energy, he will enrage and do raid lethal pulsing damage! Hero is on the pull.
Boss Phase:
The boss gets pulled to the edge and we reposition ourselves so that we can always see where the Lava comes from to dodge the Waves. Searing Slam will mark someone with a yellow arrow/circle, meaning the boss is about to jump on your head. This will trigger all existing pools to send out a Wave, so be ready to dodge. Place this mechanic near but NOT IN another lava puddle to maximize space without triggering an Explosion, leading them around the edge in a clockwise direction. Doom Flame throws out circles that we need to soak, these also leave a DoT, Lava Blast is a front cone, bait it or dodge it. Charged Smash is another soak, but we all need to get into this one together. The DoT from Overcharge is heroic only. Wrath of Djaruun is the tank swap, he will attack with fire and earth and you need to be sure you never take two of the same one. It is critical that we get him back to the center of the room before he reaches max energy!
Intermission:
In the middle of the room is a fancy circle, and if the boss is positioned in the center he will start Heatwave, pulsing raid damage while the circle slurps up his energy and leaving stacks of Scorch for the duration. This drain mechanic is used to prevent the Enrage, we need to stack for group heals and ride it out until he’s back down to zero energy and we can repeat the fight. After the third drain, watch out for the Shatter that will deal heavy damage to anyone within 20 yards. Dodge the Shadows that spawn around him as we wait. When he runs out of energy, he knocks us back and goes temporarily drain-immune, and we then repeat the boss phase.
Zskarn
The Vigilant Steward, Zskarn
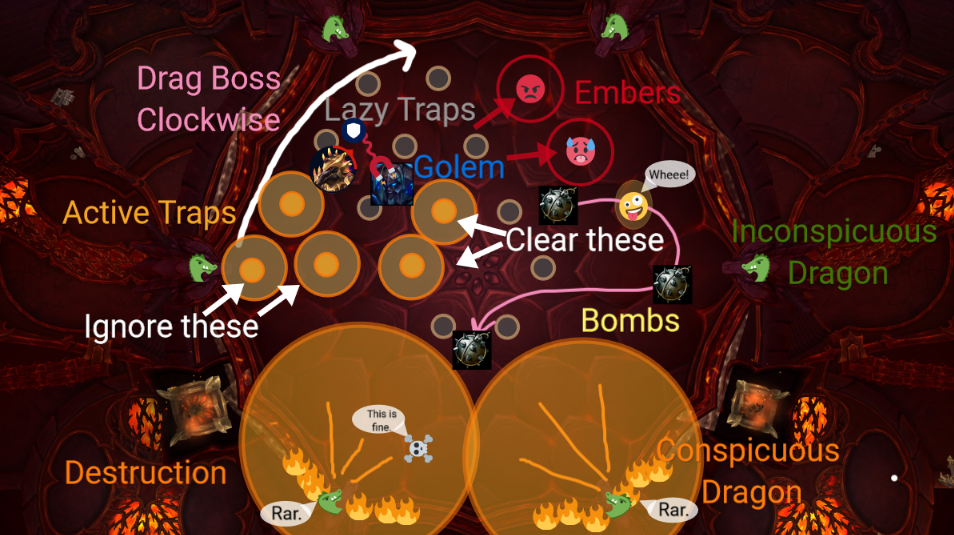
Quick Strat:
- Tank Swap: Searing Claws (~5 stacks)
- Healers: Blast Wave (35 seconds)
- Burn: Golems (interrupt Activate)
- Run: Embers, Destruction
- Interrupt: Activate
- Hero: On pull
Expanded Strat:
This is a one phase, one boss fight, full of traps and sneaky positioning tricks. Not being in the wrong place is as important as doing the right thing! A Trap Team of three will be in charge of collecting golem bits and disarming traps. Hero is on the pull.
Boss Phase:
Dragonfire traps begin in their disabled state and the boss will activate them gradually. These have a ten yard fire aura, and if you actually touch one, you get a stackable DoT. They must be disarmed by the Trap Team using the tools acquired from killing the Golems. Golems are busy trying to make new traps by casting Activate, which should be interrupted immediately, these are an Emergency Murder. At 100 energy, the boss will wake up nearby dragon statues around the room, and these will coat sections of the area in fire. This is a very wide cone, so run to get clear. Bombs will appear, these need to be soaked by the offtank or perhaps by Armas or whatever. Needs a physical immunity cooldown. Players who are targeted by Embers need to move 5 yards away from everyone else to avoid splashing them. Watch positioning before Blast Wave to make sure you don’t get knocked back into a trap or an Ember player. Tank swap whenever you don’t like how many Claws you have.
Magmorax
Magmorax
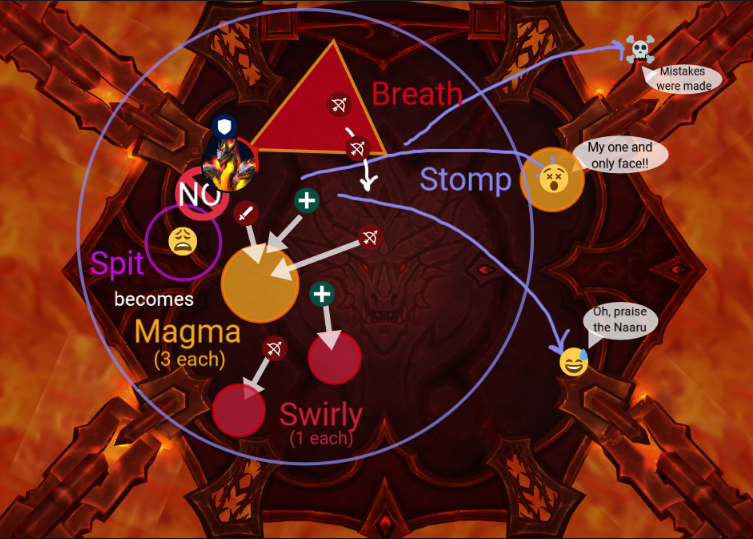
Quick Strat:
- Tank Swap: Incinerating Maws (1-2 stacks)
- Healers: Stomp (100 seconds), Roar (45 seconds)
- Dodge: Blazing Breath, Stomp?
- Run: Molten Spit
- Soak: Puddles (3 in each, never during Roar), Lava Ejection
- Never: Stack to 25 in heroic
- Hero: On the pull
Expanded Strat:
Magmorax is just the one boss and just the one phase. But he has three heads, so give him some credit for trying. Stand in fire. But tank the boss so that he is never standing in fire. Watch out for the knockback! If the boss gets to 100 stacks, he Enrages and we die.
Boss Phase:
When you are targeted with Molten Spit, step just out of the group near the boss, ten yards apart, and drop your puddle there. Placing these carefully will help us not run out of room, but keep them OUT of the middle for sure. These puddles will grow and clutter up our lives, but unlike a regular Defile, people need to soak these to shrink them, three-ish people in each one. Watch the stacks of Searing Heat you are gaining, and ensure that you never reach 25, or you will be instantly murdered. Try to get somewhere around 10-15, and make sure everyone is participating. Never soak puddles during a Roar. The tank swap here is Incinerating Maws, exactly like every other tank swap in history, and you can swap after one or two stacks.
The boss, however, must be kept out of these, or he will start having a temper fit, so make sure to move him away as often as necessary so that he gets no lava bath. In addition, standing in fire gives him energy, and if he ever gets to 100, we all die. When he Roars, everyone takes damage and gets a cute permanent DoT that will stack across the course of the encounter, so ouch. Then there will be Lava Ejections, these also need to be soaked but one person in each is sufficient… and good thing too, because soaking these leaves a vulnerability debuff. Don’t soak a second until you are clear of the first debuff.
Magmorax has a front cone breath, it targets a random player, so get out of that. He also has a Stomp knockback that will throw people a pretty fair distance, and this is a platform you can fall off of. Please don’t. This should be easily survivable with proper positioning.
At 30%, we need to focus more on boss than puddles and start soaking only if they’re getting all up in our business. I don’t know why, there’s no specific reason, Probably just the overall ramping damage, lack of anywhere to stand, and hard enrage approaching. At this point we need to stack for group heals and just throw everything we have at the boss.
Neltharion
Echo of Neltharion

Quick Strat:
- Tank Swap: Calamitous Strike, Sunder
- Healers: Fissure/ Annihilate/ Destruction (30 seconds) The whole fight.
- Run: Volcanic Heart, Fissure, Darkness, Corruption
- Burn: Voices
- Dodge: Collapse, Rocks, Fissure, Crumble
- Hero: Phase 3
Expanded Strat:
For this one we’ll be fighting the room as often as we are the boss. It’s a three phase fight and in each phase we try to keep the boss in one of the larger outer sections and then break walls and reposition as needed to counter mechanics. beware the LoS, don’t dawdle or blow each other up. Hero is in the third phase.
Phase 1
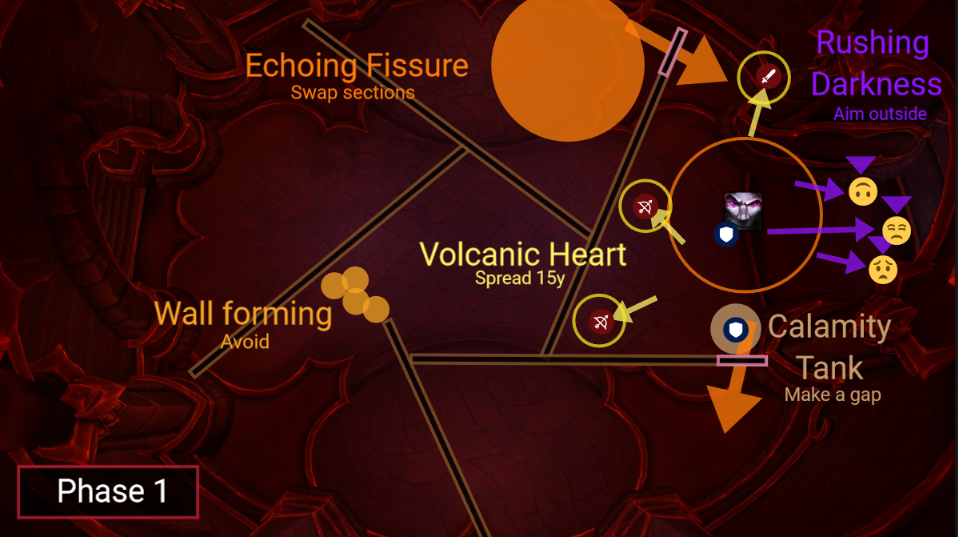
Phase 1:
Right after the pull, the boss casts Twisted Earth, blocking off various sections of the room. At this point we’re locked into one of the outside sections. Three people get Rushing Darkness, a blurple arrow on their head. A few seconds later, the boss will zap them with beams, knocking them backwards and breaking any wall they crash into. Run this instead to the perimeter so that we don’t break anything. Anyone with the Volcanic Heart debuff, a red arrow or orange circle, head towards the center of the room and spread out 15 yards to avoid splash damage. there is no need to duck through gaps: you will be out of LoS. The tank swap here is Calamitous Strike, which also punts the tank into a wall and breaks it. We’ll want to swap after each cast, and use the new gap to position the boss for his next Echo. Echoing Fissure creates a zone of death beneath the boss, and deals raid damage as well, damage that is echoed by any previous death zones that have already been created. Watch out for the swirls and the puddles, and try to phase the boss before this has a chance to happen too many times. Pre-position to flee after each Echo.
Intermission:
At 70%, all the walls all break, which hurts, and all the swirlys go everywhere, which we need to dodge or we get stunned. Get back into position as fast as possible to prepare for phase 2!
Phase 2
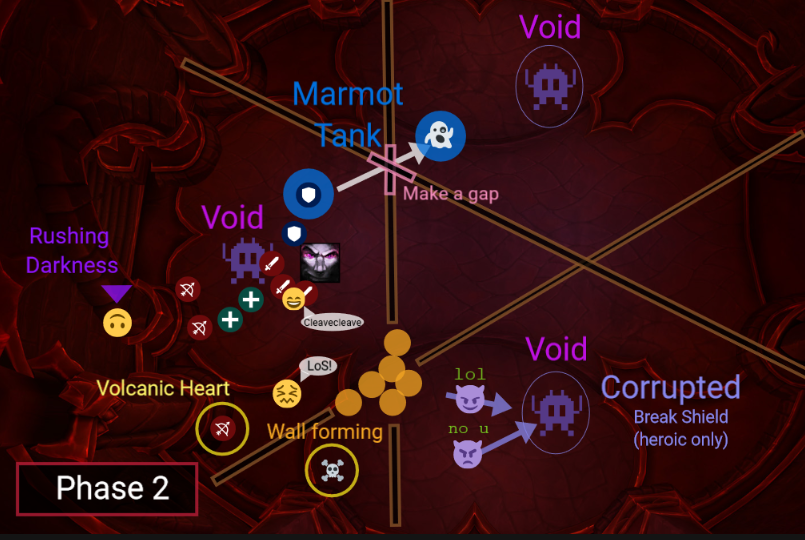
Phase 2:
At the start of phase two we’ve all just taken a big damage hit from the boss’ channeled ability, after which two of us just can’t take it anymore and become Corrupt. We always knew there was something wrong with these guys. The two Corrupted players become PvP and scary, but as a consequence they are able to see the Void add that the rest of us cannot. There are three adds sitting in corners channeling into the boss, keeping us from phasing him. If you are Corrupt, first run away from everyone (before the Corruption takes hold so that Juranzick doesn’t kill you). Find the adds and then start beating one up to break its shield. If you succeed, the corruption is removed and we can all see the add and attack it. Breaking the add’s shield, however, makes it extra spicy, and it starts pulsing damage until we kill it, so this is emergency murder time.The Heart, Rush, and Wall problems are all still occurring, of course, so we need to keep handling those as before. Meanwhile the boss is dealing ramping up damage from Umbral Annihilation, giving us plenty of motivation to get out of the phase. There are swirly Crumbles, dodge these too. The tank swap is spookier now, becoming Sunder Shadow that lets you actually phase through the wall, whereupon the boss will make a zap line connecting your shadow and your corporeal form and then punt you at yourself like a marmot. This projectile version of you will break the wall for real, allowing folks to pass through. Healers beware, the tank takes a hit when he takes that hit, based on how much health his marmot-self was missing. Tanks need to create only enough holes (two) to allow the raid to get in and attack the Void adds before our windows all close, so position carefully when you have a Wallbreaker!
Phase 3

Phase 3:
In phase three, once the Void Voice adds are down, the boss will cast Sunder Reality, making portals that spawn fixating adds. Funnel these in and cleave them down, they Mutate and get stronger the longer they’re up. The portals are dangerous, but not as dangerous as Ebon Destruction! When this is cast, everyone should go hug a portal. These will HURT, but at least you won’t get one-shot by the Destruction. The portal you stand in will be destroyed by the .. er… destruction, so we need to get the boss down as quickly as possible. If you get Rushing Darkness, make sure you don’t hit any portals! We need every one we’ve got. Same with tanks, we’re back to Calamitous Strikes again, but you don’t want to accidentally smush a portal with your calamity. Hero is in this phase, to try to keep up with the horrific damage and get him down before we run out of dangerous places to stand. The implication here is that you need to be within 5 yards of a portal, but the portals need not be discrete, you may stack multiple people in the same one. As of now, there are way more portals than we know what to do with, so feel free to spread out and thin their numbers.
Sarkareth
Scalecommander Sarkareth
Quick Strat:
- Tank Swap: Burning Claws (p. 1), Void Claws (p. 2), Void Slash (p. 3)
- Healers: Glitter Surge (p. 1), Void Bomb/Void Surge (p. 2), Eternity (p. 3)
- Interrupt: Blasting Scream
- Soak: Bombs, Black Hole
- Run: Ascension, Black hole, Eternity
- Dispel: Duress (Heroic only)
- Hero: Phase three
Expanded Strat:
Sarkareth is a three phase fight with a massive amount of mechanics. Throughout the encounter, everyone needs to know how to handle Oblivion: ten stacks send you to ghostyworld, collecting all your Fragments gets you out. Not collecting them gets you dead. For phases 1 and 2, it looks like a clockwise kite will use the room best, but in phase three it’s basically astral chaos. Use Hero in the last phase.
Phase 1
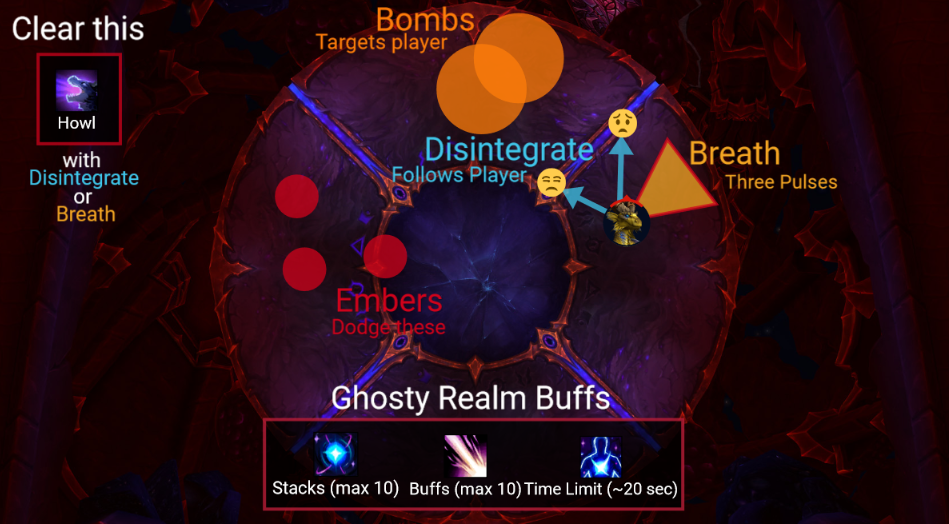
Phase 1:
The tank swap centers around Claws… this stacks and deals a burst of damage when it expires, so make sure you swap often enough that the burst won’t hit us all too hard. The boss gives us all a Howl, a knockback which causes certain mechanics to hit extra hard at times, so be aware of that as it happens. Failing a mechanic while Howled will cause raid damage, but we all need to make sure we fail exactly one before the boss casts Glitter Surge to remove our Howl debuff. Disintegrate creates a line that towards its target and anyone standing in that line will be hit. Breath is a front cone with a Dot that stacks, it pulses three times in a row. Bombs come out and create puddles, in this phase they are made of fire and we need to avoid them completely. Embers will fall and knock you back if you are hit. Glitter, of course, is just everywhere and you can’t do anything about it. Just like real Glitter.
Looking at it, it seems we should be dragging the boss clockwise after the bombs come out with everyone staying behind him to bait them out of the kite path and making sure not to crowd the melee. Make sure to angle toward the middle before Howl to avoid being punted off. Disintegrate targets should stand still and everyone else get out of their line unless clearing, so about 5 of us should try to get hit by this line each time it is cast to spread out the backlash damage. Stack up for heals during Glitter. Anyone still Howled when this cast goes off, you’re in big trouble.
Phase 2
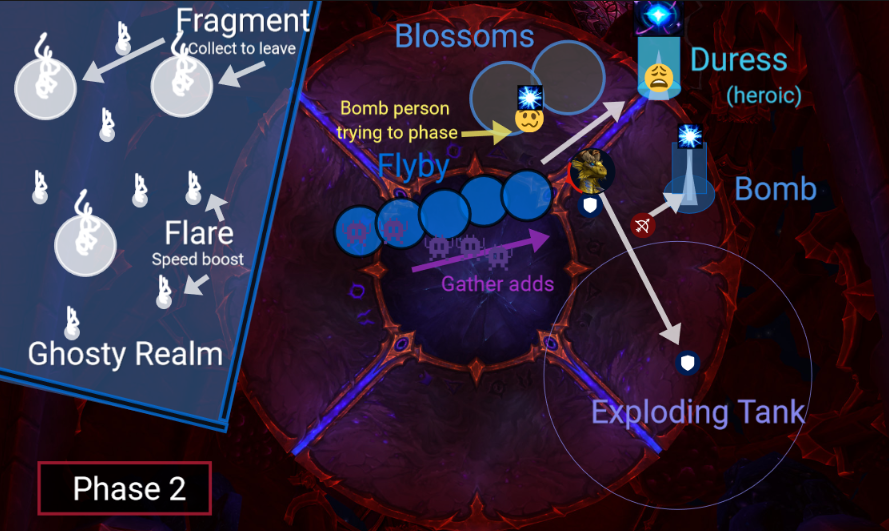
Phase 2:
Burning Claws is now Void Claws, and has a healing debuff built in. Tanks will run to Hakabalukia after the swap, as this will splash in 20 yards when it expires. He has a flyby Breath to watch out for as well, get out of the path. Little adds will spawn from this named Glimmer, and they all start trying to cast Scream, which is a spell interrupt as well as a damage ability, so it’s in our best interest to interrupt and kill these. The boss will continually buff these Glimmers with Ebon Might, and at ten stacks it will become immune to crowd control. Desolate Blossoms are little angry puddles that spawn at random player locations, they make big blue swirls where they are going to appear. It will be good practice to try to gather adds in or near these as we kill them, because in heroic, they have a Rescind effect that will keep healing them which is only countered when they enter a Blossom. (You can dps through it, but it’s harder. Also, they need not remain inside, simply touching the effect will do… but we’re trying to burn them down, not microadjust their positioning). Bombs now look like a darkish blue column of light with a cute little star floating in it. If these expire they will cause a Surge, which we avoid by having a Bomb Team stand in the column, at which point the cute star will attach to their head. The person takes their new star hat into the Ghosty realm by standing in a puddle, and waits there until it expires, collecting their haste buffs to pass the time. There is an additional DoT called Duress that will be on some players and needs to be dispelled, although doing so causes a knockback damage burst, so position and time the dispels carefully.
Most of the above effects cause stacks of Oblivion; some are avoidable and some just part of the encounter. Once you have gained ten stacks of Oblivion, you end up in the Ghosty realm, where you have some number of seconds, possibly 20-255, to find and collect all the Fragments of yourself before you simply perish. Flares floating around in this space will give you haste and a speed boost. To facilitate this, it seems people with high stacks may want to stand in stuff deliberately to push them into the Ghosty Realm. Bombs are your ticket in.
Phase 3
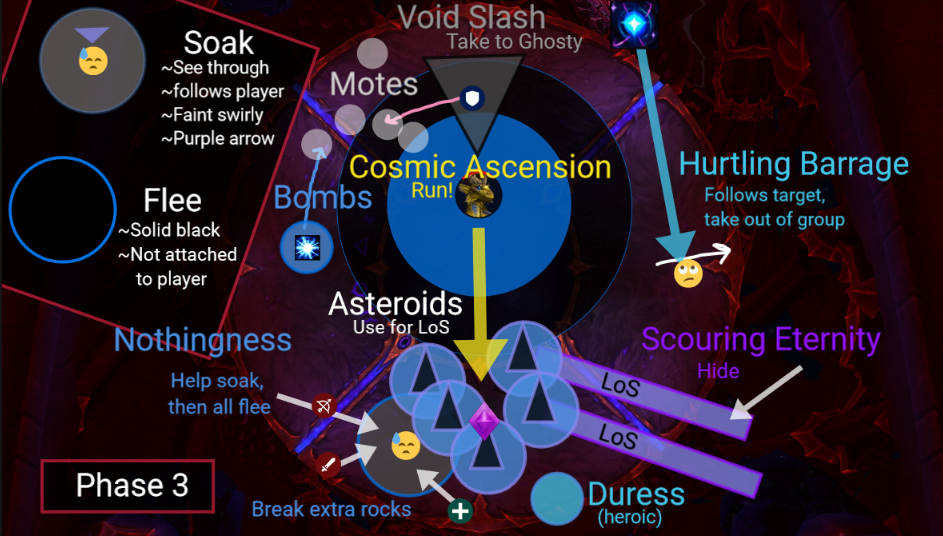
Phase 3:
In phase three, tanks are still trying to manage Void Slash, so healing them won’t be any easier, but it’s also a cone now, so yay. In addition, we can’t actually let it expire or we all take raid damage, so the debuffed tank needs to go run into two Motes to phase and let the debuff fall off inside the Ghosty realm. Infinite Duress is still a thing, watch those dispels. The timing of dispel needs to work around the other mechnaics and the first two may line up with the huge death circle and the small black hole, both of which are not things we want to introduce a knockback to! Sarkareth occasionally pulls an Alien, gives himself a buff, and LEEPS high into the air to crash down on our heads, this is Cosmic Ascension. Don’t get hit by that, obviously. He also throws some Asteroids around that target player locations, we need to stack to bait these to the right location so that we can manage them properly. Once I find the right location, we’ll use a flare there. New this phase is Embrace of Nothingness, where a player is gradually turned into a black hole. As many of us as possible need to stack and soak this with the poor victim, or it’s just too much damage. 8 seconds later, the actual black hole appears, everyone needs to get 12 yards away from that location before the final explosion, which would be fatal. This will also destroy any Asteroid Pillars nearby when it explodes, we use this to keep the numbers down as much as possible while still leaving at least one or two up to LoS behind. Glimmers will drop by, and behave the same way they did last phase including the Rescind so watch for that. Bombs are still doing their thing, only now we need to get hit by Motes to phase them out to safety. Motes are the small grey swirlys and they each give 5 stacks, so two is enough to phase you.
Watch for Scouring Eternity, this is a giant supernova that we need to LoS with those Asteroids from a minute ago. Barrage makes Zoomy Sarkareths blast across the arena like angry kittens, make sure you dodge them. They will have a player targeted and the line will follow that player just like Disintegrate did, they should run it way from the group so that no one else is hit. Heroism will be in this phase.
Eranog
Eranog
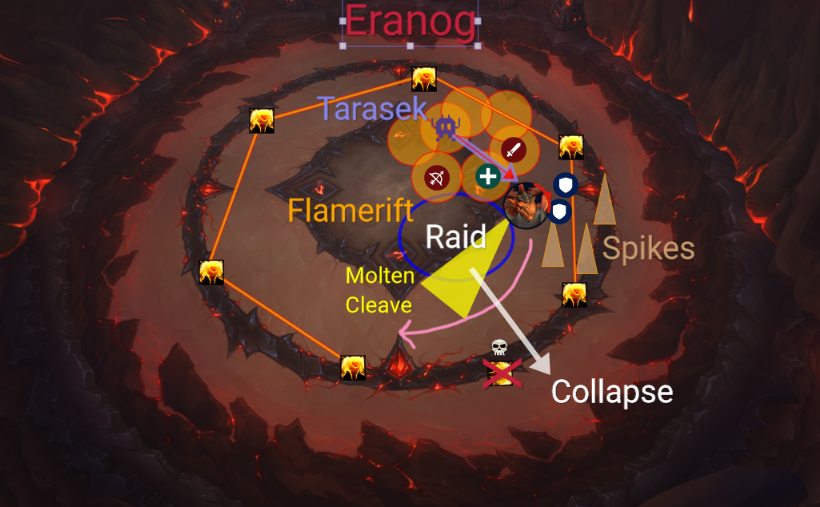
Quick Strat:
- Tank Swap: Burning Wound (~5)
- Burn: Tarasek adds, Marked Army of Flame add
- Dodge: Fire, Spikes, Cleave
- Run: Flamerift
- Hero: On the pull
Expanded Strat:
Eranog has two phases: one where we fight the boss and his adds, and then a short little break-out ring where we focus down one Flame to create a gap to run through. There are indeed no changes for Heroic. Hero is on the pull.
Phase 1:
Drag Boss off to the side and the raid will gather between the boss and the center of the room, in mid-melee range. When marked with Flamerift circles, run them behind the boss (counterclockwise) and wait for them to fall off, dropping a fire puddle and spawning an Add. Adds fixate on a player, so run them all towards the melee so we can cleave them all together. Tanks will move the boss clockwise whenever necessary as the Flamerift pools encroach upon our lawns. Molten Cleave will target a random player and fire off a cone, dodge that. Incinerating Roar deals raid damage plus a DoT, dodge Spikes and Swirls. Hero is at the top.
Phase 2:
At 100 energy, fire ele adds appear in a ring, holding hands. Tanks will call out and mark a Army of Flame add just clockwise of where we are fighting and then we burn him down to escape the circle.
Council
The Primalist Council
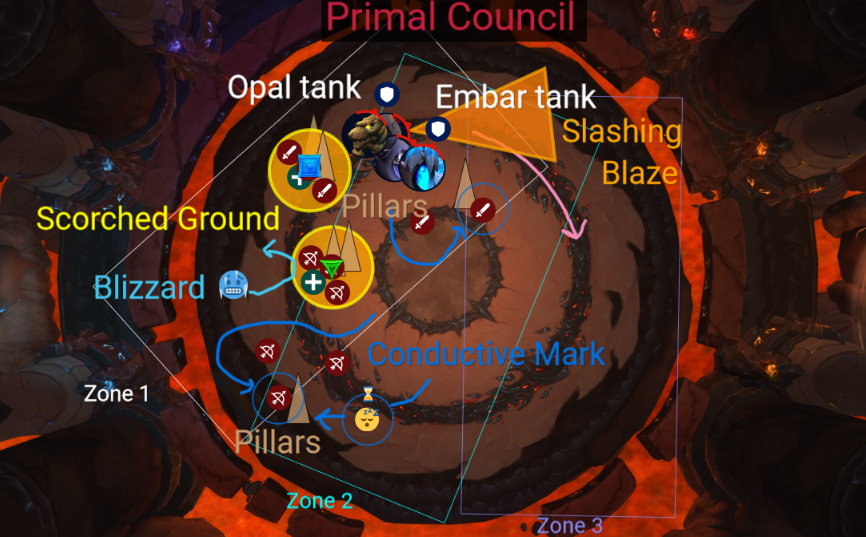
Quick Strat:
- Tank Swap: Crush
- Stack: Meteor Axes near Pillars
- Run: Conductive Mark
- Clear: Mark with Pillar, Blizzard with Scorch
- Interupt: Frost Spike, Lightning Bolt
- Hero: On the pull
Expanded Strat:
Unlike most councils, these four bosses do not share health. We do still want to kill them together though, as they each throw a temper tantrum when they die, so keep them stacked whenever possible. Clear mechanics with other mechanics and if you’re going to accidentally kill anything first, don’t let it be Opal. Try to keep the raid contained within each zone as much as possible until it is full so that there will always be somewhere to go next. Hero is on the pull.
Embar:
At 100 energy, Embar casts a Slashing Blaze cone at her tank and should always be pointed away from the raid. Her two Meteor Axes target players leaving a nasty debuff so that you cannot stack both. One player should run to the Ranged stack point and the other to Melee, positioned so as to break the most pillars and leave fire in the least awkward spot. All of Ranged and Melee should stack in their respective circles to soak the meteor. These leave behind Scorched Earth pools which persist for 2 min. If Embar dies first, she casts Burning Convocation, fire damage that ramps up until all others are dead.
Opalfang:
Opalfang has the tank swap, Crush, that debuffs the current target and stacks. Swap after each cast. She also creates pesky Pillars that we want to try to destroy with the Molten Axes because on Heroic they pulse raid damage. Try to bait the pillars out towards the back and the side to maximize our available space and group them up. Opal casts Quaking Convocation upon death, this does Nature damage and is the worst of the four.
Kadros:
Kadros casts interruptible Frost Spikes. At 100 energy, he casts a Primal Blizzard. Make sure to clear your stacks by stepping into fire at about the 5 stack mark. If they reach 10, you will freeze, and need to be broken out. He casts Glacial Convocation when dead.
Dathea:
Dathea casts Lightning. You can interrupt the single target ones but not the Chain Lightning. She also casts Conductive Mark, we should pre-position so that we are already spread out before this happens. It lasts longer on Heroic, so clearing it is a higher priority.You can remove it by running to a Pillar, but touching another Marked player will refresh the stack, and touching an unMarked player will spread the mark, so it is important that unMarked people stay away from the pillars and avoid moving around so that Marked people can get in and out quickly and safely, one at a time. It is better to take an extra tick of Mark damage than to run into another player and spread it. When she dies, she casts Storming Convocation.
Dathea
Dathea, Ascended
Quick Strat:
- Tank Swap: Zephyr Slam (2)
- Burn: Thunder Caller, Volatile Infuser
- Interrupt: Diverted Essence
- Dodge: Tornado, Knockback, Cyclone
- Spread: Conductive Mark (5y)
- Hero: On the pull
Expanded Strat:
Dathea got mad when we beat her a minute ago, and now she’s evolved. This is a repeating two phase fight on a central platform and one of several satellite platforms, and she spends the whole time trying to make you fall off. Hero is on the pull.
Phase 1: Boss
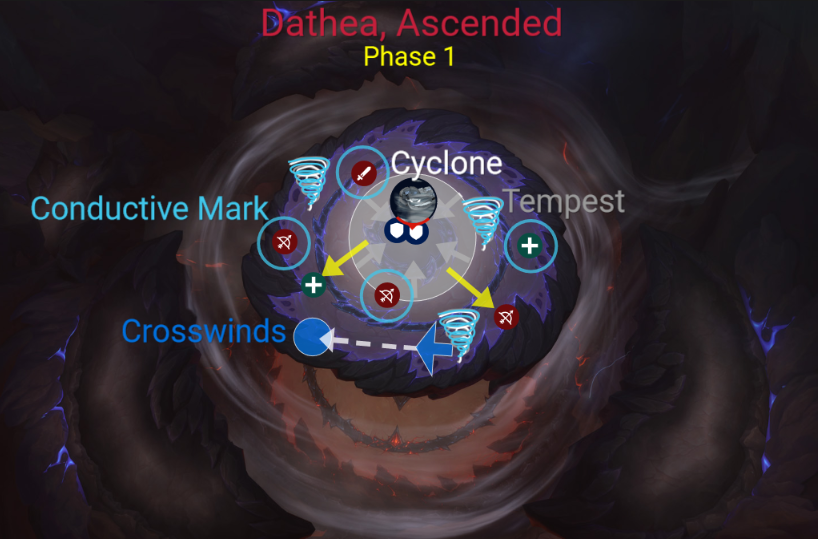
Phase 1:
There will be Tornados that spawn at player locations, so brace yourself. She creates them all through the fight and they don’t go away. Occasionally they all swap places and if you’re in their path, doom. This will be hard to see.
Tanks will swap on low stacks of Zephyr, a knockback that gets stronger with the number of stacks and will punt you off the platform if you wait too long. She still has Conductive Mark, but there are no pillars to clear it this time, so just spread 5y before each cast. If you get the Mark, stand still and wait 10 seconds, 15 on heroic, for it to fall off. UnMarked people should scoot over to give the Marked ones room to dodge tornadoes if necessary.
Cyclone is a raid yank cuisinart, try not to get dragged through a tornado as it pulls you in, and keep running out of the cyclone effect as much as you can.
Phase 2, Adds
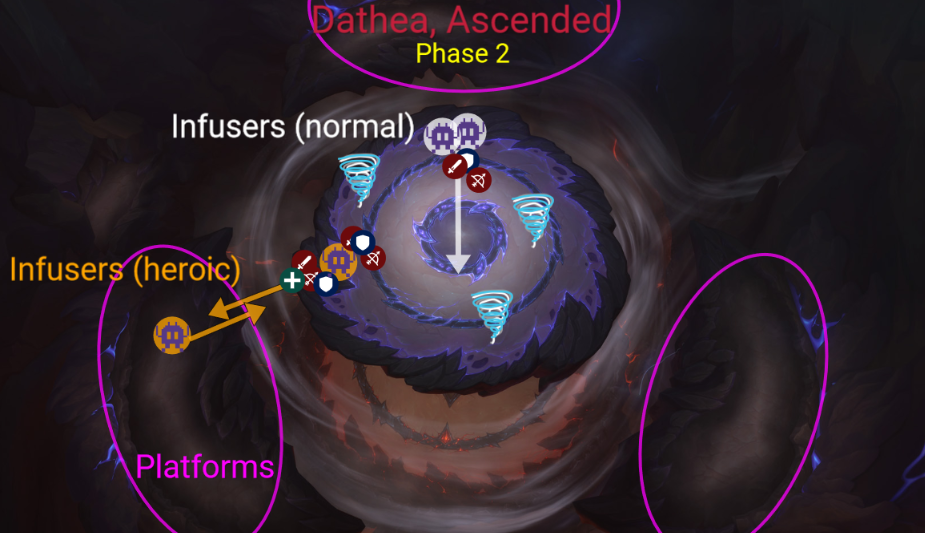
Phase 2:
Infusers will spawn and continually try to cast a Diverted Essence Buff on Dathea. We need to stop that, first by interrupting them and ultimately by killing them, which ends the phase. Tank them next to the edge, but everyone should be positioned so that when he dies, the knockback doesn’t kick them off (think Ner’zhul). Try to time the death so that knockbacks do not occur immediately before Cyclone. For heroic, we need to find the platform the add and all its buddies have spawned on, and then tank and kill the first add on that side. The Flight Crew should stand closer to the edge so that the knockback blows them across the gap to kill the second add. The Home Team needs to be closer to the center so that they fly across the main platform without falling off, then loosely gather up between the two other flares (so they can still receive healing without spreading Marks). These teams swap every time to keep Thunder stacks from becoming fatal. Kill all the little Tempest Callers, and then the second Infuser. Obviously, we then need to use the second add’s death to get back. A new Flight Crew should be used each time. When positioning for the knockback, first be sure you haven’t moved into the launch zone until the Infuser is actually dead. Use the four second window to gather up without risk of dropping Gust swirlies there. Remember to factor in the width of the cone and any hazards you will pass at your current trajectory, as well as any Marks that have gone out. Marks typically do not spawn on satellite platforms, but will do so if there are not enough targets available on the center arena.
Terros
Terros
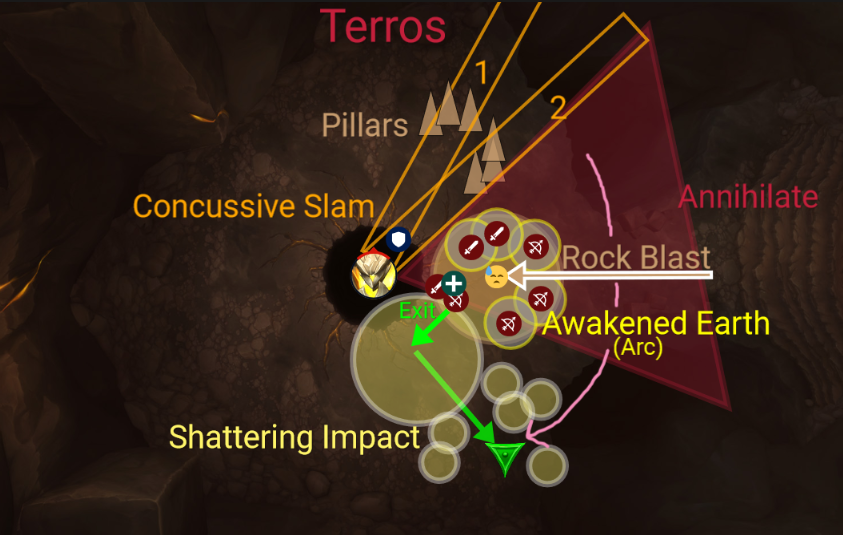
Quick Strat:
- Tank Swap: Concussive Slam (2 stacks? Every?)
- Soak: Rock Blast
- Run: Aftershock, Awakened, Annihilate, Aftermath, R.. you know what. Everything. Dodge everything.
- Hero: On pull
Expanded Strat:
This is a single phase fight with a soft enrage when the floor gets full. The fight is rather like Skolex in its rhythm, certain mechanics happen in a predictable pattern and must be managed by careful positioning. Hero on the pull and try finish him off before the fourth Annihilate is cast.
Phase 1:
Everyone should stay stacked on the marked player, in melee, for Rock Blast. The Rock Blast target should NOT move, remaining at the stack point so their circle doesn’t change. If you are targeted with Awakened Earth, move behind the stack point and form an arc along the back and counterclockwise boundary of the circle, leaving a gap at the front clockwise corner for people to exit. People who are not targeted with either effect should move to that front corner so they can exit the Aftershock as soon as they have soaked the meteor. Awakened people spawn Pillars at their location, these apply a DoT. Regardless of which mechanic you get, be prepared to move out of the Aftershocks immediately, and ranged will reposition behind the new melee gather point to avoid and bait the floor pools caused by Shattering Impact. Tanks will need to aim the Concussive Slam so that it destroys half the pillars, and the next Slam should take out the other. This deals raidwide damage based on how many pillars were hit by a Slam. At 100 energy, the boss will cast a giant Annihilation cone, this needs to be positioned carefully like with Denathrius to maximize the amount of room we have left, and then the entire raid moves clockwise to reposition. Beginning after the first Annihilation, once both sets of pillars are clear the raid should reset positioning to ensure that all new Annihilates are next to each other and the room doesn’t get blocked off.
Sennarth
Sennarth, the Cold Breath
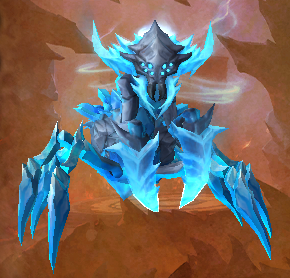
Quick Strat:
- Tank Swap: Web Blast (<5 stacks)
- Position: All Bursts, Chill and Webs p.2
- Burn: Arachnids, tragically Webbed people
- Dodge: Ice Puddles, Plumes
- Run: Chilling Blast, Enveloping Webs
- Hero: On the pull
Expanded Strat:
Sennarth has two phases, but it will feel like more than that since she changes location so often. On each platform, position arachnids facing away and make sure you won’t get yanked off the platform by Burst. At the top, stack near the boss when knockbacks are coming. Hero will be at the start of the fight unless we have trouble with the last phase.
Phase 1: Platforms
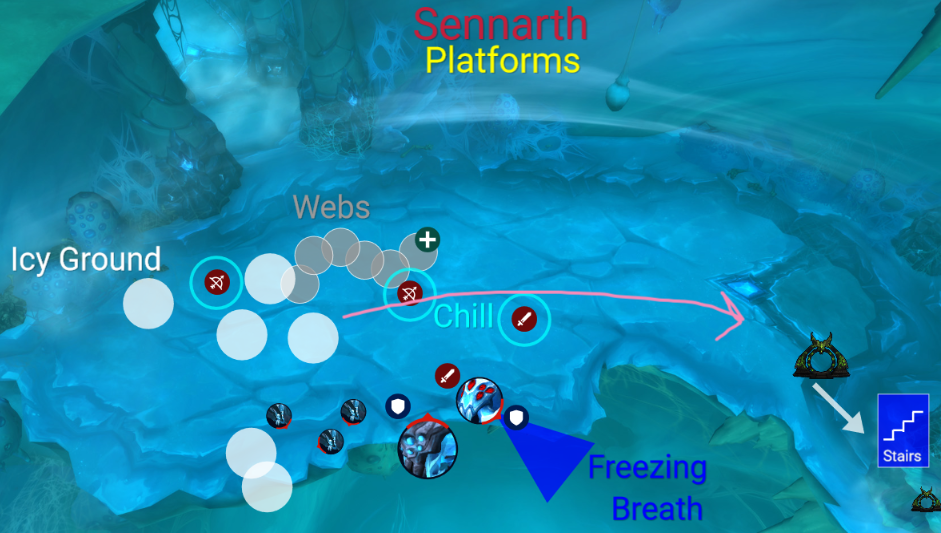
Phase 1: Platforms
While fighting on a platform, the first priority is to kill the Arachnid. Tank it facing away from the raid to minimize the Breath puddles, which will cause slippy patches. Sennarth also Breaths. If you get Enveloping Webs, you will drop webby puddles beneath you as you run, lead these out of the raid group. Standing in webs debuffs you and if you get 10 stacks you will become dramatically slowed, and on Heroic, entirely Cocooned. The only way to break the cocoon is to Grip and kill a Spiderling on your location. Killing Spiderlings deals 5y splash damage, but that splash removes these debuffs. Gossamer Burst yanks all players inward, but can be mitigated with the sticky webs. Spread out 4y for Chilling Blast, it explodes.
Phase 1: Stairs
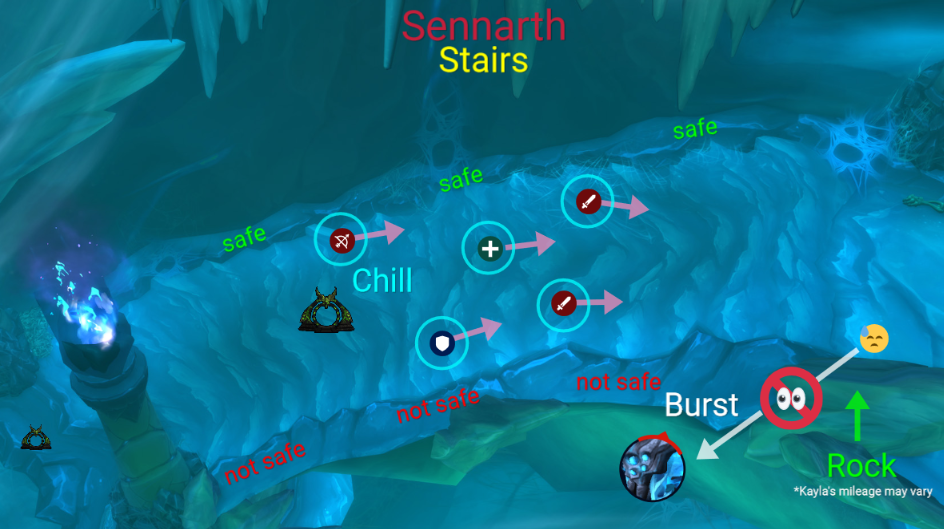
Phase 1: Stairs
Periodically, she gets bored and goes upstairs and we have to follow her. Use Warlock portals to skip as much of the ice and stairs as you can! There will still be Blasts and Bursts during the climb, so spread out for the Blast as we run, and then either stack behind the rock, use the Webs, or stay to the farthest edge from the center to avoid being yanked off into space! When we get to the next platform, the phase repeats as before.
Phase 2: Top Platform

Phase 2: Top Platform
Now that Sennarth is at the top of her webs, her abilities are empowered, the stairs behind us are death, and the whole floor is slippy. Interrupt her Apex cast as soon as we all get upstairs. Chilling Blast will leave traps on the floor, but quick and precise potion is impossible here with the ice so pre-positioning on the edges is critical. Webs will now cause a knockback and auto-wrap you after the 6 seconds, so move and stack towards the boss before you expire so that we can reach you. A tank will free you all with a baby spider. Her Burst becomes a knockback instead of a yank, handle that like Denathrius. But hey, at least she stops Blasting the tanks! In Heroic it becomes considerably more important to stack near a Cocooned person, especially a tank, and kill the Spiderlings there to free them.
Grimtotem
Kurog Grimtotem
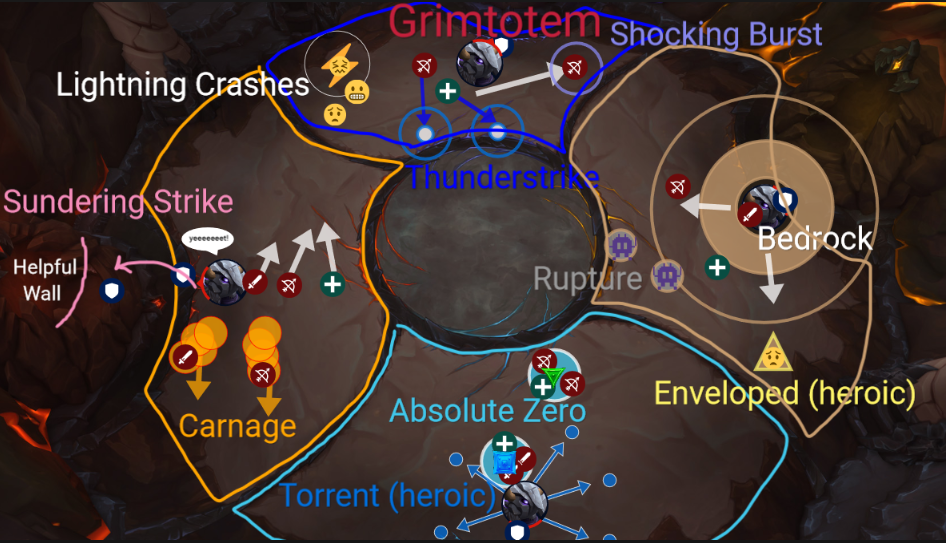
Quick Strat:
- Tank Swap: Sundering Strike, Breaking Gavel
- Soak: Absolute Zero, Thunder Strike, Freezing Tempest, Lightning Crash
- Run: Searing Carnage, Shocking Burst, Lethal Current, Shatter, Lightning Crash
- Dodge: Magma Burst, Bedrock, Seismic Rupture, Molten Rupture, Torrent
- Hero: Second intermission, until we out-dps it.
Expanded Strat:
Three phase fight where Grimtotem uses the altars to empower himself and summon Eles. If he’s not near any altar, he gets ALL of them, so avoid that. We’ll start with Frost-> Fire in the first phase one, and then do Storm -> Earth in the second, swapping altars near the 15 stack mark. Hero is in the second intermission, until we end up strong enough that we can kill the boss before he phases the second time if used on the pull.
Phase 1:
For this phase you will want to bring him sequentially to two of the Altars to ensure he doesn’t stack any one element too high, as each altar lets him pulse raid damage and it stacks. In heroic, simply approaching an altar gives you a burst of raid damage and the whole raid will get a 20 second vulnerability debuff, so it’s important not to switch altars too fast or accidentally!
Tanks, beware: Sundering Strike is your coney, DoTty, debuffy tank swap, but it also includes a knockback. If you don’t taunt fast enough, the boss will run off to the wrong altar after the tank he just yote. Move him from Frost to Fire immediately after Absolute Zero has been resolved.
- Frost Altar: Biting Chill is a pulsing raid damage, may need cooldowns. Absolute Zero is two frost meteors, separate targets and stack with each (cannot be soaked together or you Freeze). Three waves of Torrent orbs need to be dodged or they stun you.
- Fire altar: Avoid fire on the floor, run towards Frost if you get Searing Carnage and towards Lightning if you do not. The swirls from this can be stacked very close together to minimize floor fire, as the projectile is quite slow to land. Dodge the Molten Rupture patterns.
- Storm altar: Thunder Strike zones need to be soaked by one person each or they do raid damage. Shocking Burst causes players to explode, get out of the raid before that happens. Heroic’s little gem is the Lightning Crash which makes a player zap the closest person to them, causing a debuff which can stack if you are closest to more than one! Get away from each other, and then trade off who stands closest to the target so no one dies. Managing your stacks is really important! Anyone actively soaking a Strike has the right of way, followed by the Zap person, healers, then everyone else.
- Earth altar: Erupting Bedrock spreads out from the boss in rings, make sure you aren’t in one. Avoid Seismic Rupture swirls, and burn down the adds they create. The swirls are only dangerous when erupting, and do not deal damage when inert, so don’t be afraid to stand on an existing one to layer them, just don’t have two players with active Ruptures stacking on each other. On heroic, Enveloping Earth will create a heal absorb on players that needs to be killed with kindness.
Phase 2:
When Kurog finishes playing with the two altars we’ve chosen, he goes functionally immune and summons Elementals with the power we got him. Killing both breaks his shield and ends the phase. We want to ensure that we do not create Frost and Storm in the same phase 2!
- Frost: Interrupt Frost Binds, it’s a stacking DoT. Be INSIDE the Frost ring when he casts Freezing Tempest! Kill him first first.
- Fire: Drops Fire Puddles everywhere, avoid them. The pools spawn Fire Eles that need to be interrupted.
- Storm: Run out of the group if you have Lethal Current, make sure the target has assigned heals and no one stands on them, despite the boss teleporting there
- Earth: Tank swap for Breaking Gavel as necessary. Run away with Shatter, and avoid those broken zones when he casts Violent Upheaval. Kill him first second.
Phase 3:
This is basically an empowered phase 1. Hero and take him out before we get overwhelmed!
Broodkeeper
Broodkeeper Diurna
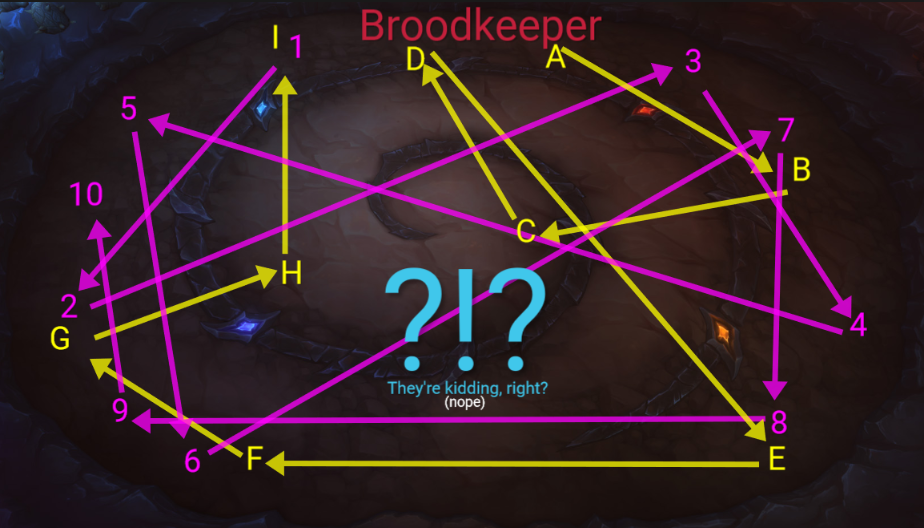
Quick Strat:
- Tank Swap: Stoneclaws (Phase 2 only)Rending Bite (Add Tank)[/heroic Interrupt: Ice barrage, Static Jolt
- Dodge: Wildfire, Sentry, Tremors, Boss
- Adds: Juveniles > Flamebenders > Stormbringers > Earthreavers > Mages > Legionnaires
- Hero: Phase 2
Expanded Strat:
Ok, this one is different. We split up into two teams, one to start breaking eggs, the other to deal with the adds. These groups have set places to be at any given moment, which is why the spaghetti god has graced us with his noodly presence in the diagram. Each team should stay on their respective lawns, 50 yards away from the other to prevent being targeted with the wrong set of mechanics. After 5 minutes, or when we break the final egg, the second phase starts and we move to standard positioning, boss in the middle raid spread around her to stay clear of fire. Use Hero here to keep ahead of her ramping damage.
Phase 1:
Phase 1: Boss Team
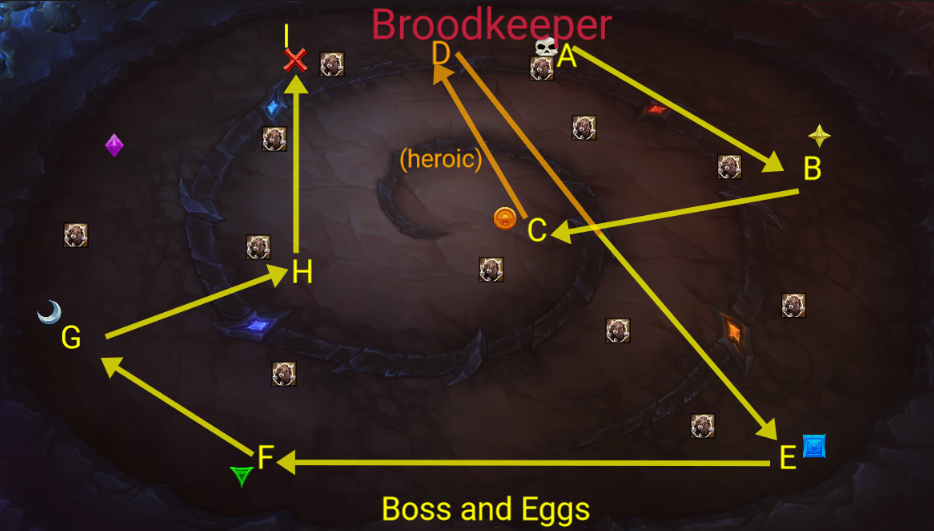
Boss Team: Tank, 2-3 healers, most of the DPS (single target and high mobility preferred). The first tank is focused on the boss and does not get to swap for the tank debuff, so mitigate Mortal Stoneclaw and be prepared for the extra damage! Keep the boss 50y away from the add waves that spawn, but close to any eggs that she is Incubating. DPS, watch for the Greatstaff, and use the extra action button to pick up a beam, then run it through any eggs that are about to hatch. You need to break at least 2 eggs, sometimes 3 in heroic, with each Staff, so be ready! Dodge Wildfire, which splashes in heroic so you need to stay spread out. Heal or dispel the Icy Shouds.
Phase 1: Away Team
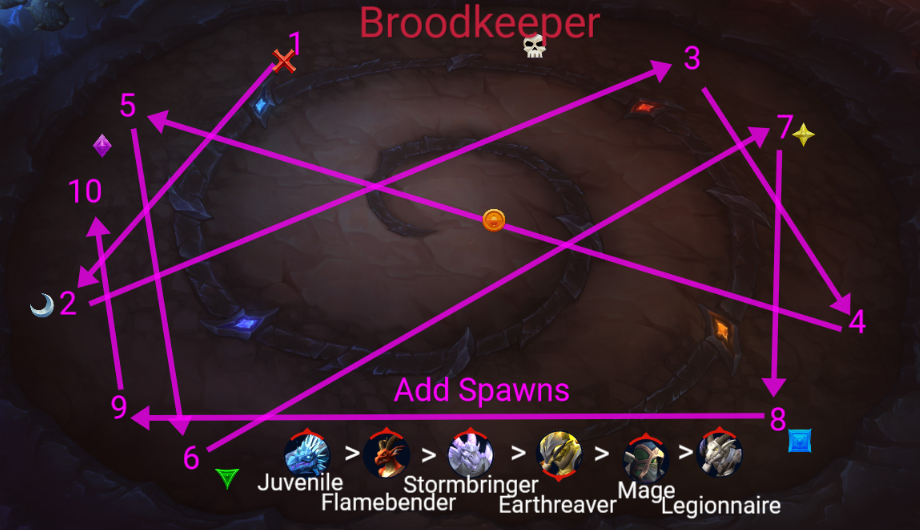
Away Team: The other tank, 1-2 healers, and a third of the dps (AoE preferred). These scoop up and burn down adds, which have static spawn points as indicated on the tangled ball of yarn in the image above so you can already be in position waiting for them. Add tank should keep the Earthreavers pointed away from the raid, they have a cone, dodge the fire Sentry, and spread out if Ionized. Interrupt the casters, and adds should be killed in the following priority order: Juveniles > Flamebenders > Stormbringers > Earthreavers > Mages > Legionnaires.
Phase 2: 5 min, or all eggs broken
The goal is to get all 24, 28 in heroic, of the eggs broken before phase two starts, and we have 5 minutes to do that, otherwise she keeps making adds in the new phase. We can now Tank swap for Mortal Stoneclaws, which is cast more often and lasts longer in phase 2. Break any Frozen players out of their Shroud, and don’t run over each other with beams as you try to kill the remaining eggs. Hero is in phase 2, and any adds left standing can be brought to the boss for cleaves once the eggs are dead.
Razageth
Razageth the Storm-Eater
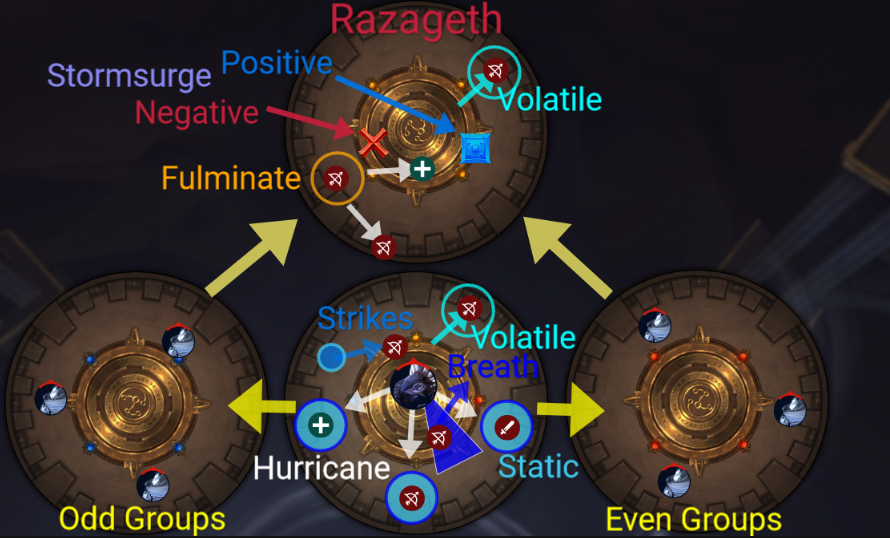
Quick Strat:
- Tank Swap: Electrified Jaws
- Burn: Stormlings
- Dodge: Lightning Strike, Lightning Breath, Ball Lightning
- Interrupt: Burst, Acolytes
- Run: Static Charge, Tempest Wing
- Hero: Final Platform
Expanded Strat:
This fight spans four platforms, three phases, two intermissions, and a partridge in a pear tree. We start on teh central lower platform, then split the raid in two and send each to one of the two side platforms for the first intermission adds. Phase two is on the upper platform, as is the second intermission with its own adds, and the final phase is back where we started in the center. Hero will be on the final platform where we have to kill her off before we run out of room due to the encroaching storm.
Phase 1:
For phase 1 we need to get her to 70% before we run out of room. Stay spread out 8y for Volatile Current, and find and interrupt the Spark if you create one to prevent them from piling up. Interrupting Burst or dispelling Volatile will cause it to despawn, but on heroic it has two charges, so takes more effort to get rid of. If you get Static Charge, back up and drop your puddles outside of the group, but in places where we can use them to negate Hurricanes at 100 energy. This may not work on heroic. Unsurprisingly, she Deep Breaths, so run out of that area.
Intermission: 70% – (all adds die or Vault reaches 50%)
At 70%, she’ll shield and we need to split up to deal with adds, half the raid going to each side platform. Odd groups got right, obviously. Dodge the lightning Devastation. Surging adds have a shield, use a shieldbreaker ability to remove this.On heroic, players with Surging Blast need to get away from the rest before they explode. Interrupt Acolytes, although this gets much harder when they enrage at 30%. Leap to the last platform once all your adds are dead, or before your 100 seconds are up.
Phase 2: (All adds die, or Vault reaches 50%) – Vault Intergrity 0
During phase two, we still have all the lightning abilities from before, with a smaller pushback called Tempest. We also get two new ones, Fulminating Charge, were you need to run away so it doesn’t spread, and Stormsurge, a shield we need to break within 25 seconds or suffer. To do this, we stack up with our respective Charges: everyone will either be a Lightning or a Tornado. You want to be with your own group and you get a buff, but being with the wrong group hurts you and everyone around you instead. Where’s my Thaddius Macro? ShieldBreaker effects are recommended.
Intermission: Vault integrity 0
More adds appear. Kill the Stormlings every time the Stormfiend teleports,make sure they don’t reach him. CC is not particularly effective, focus on killing instead. Try to kill the Stormfiends at about the same rate, because on Heroic the rest enrage when one dies. End the phase positioned towards the initial platform so that you can get knocked back onto it.
Phase 3: Adds die – Boss dies
This platform gets smaller the longer the fight goes on, so use Hero here and try to burn her down before we have nowhere to go. Tanks, will have to contend with Thunderous Blast in this phase, which deals raid damage the harder you get hit. Raza channels a beam at you, and however much damage you actually take from it is how much WE all get slapped with a few seconds later. Use cooldowns to reduce this as far as possible, and never take two in a row because of its debuff. Be wary of the Raider Yank mechanic on Heroic, Magnetic Charge, where she marks a person and then yanks everyone over to their location,messing up everything. The player should get as far away from everyone as possible without walking into the Storm, to reduce the rad damage taken by the blast.